Are you sixth sensical? Can you read tea leaves? If it’s one out of two, that will do.
We’re starting down the road to a new …
Clairvoyance Game
… today, that on today’s first draft, as a design for two players …
starts you playing yourself, or a nearby other player willing to share windows on your one common web browser incarnation …
kind of ludicrous on this day one but the building blocks are there, they being …
HTML and Javascript parent … talking to …
PHP interlocutor
… which we’re going to extend, on day two, simulating what a window.open and window.opener (just on client) can do, just with a few more calls, and sleeping
Two players take it in turns …
selecting a Zener Card the other player is asked to guess
other player trying to guess that Zener Card selected
We spend a lot of the working time with this blog in a “what we’d describe as” a …
Javascript mindset
… which “we’d describe as” …
This optimistic, and can be chaotic for choice, “anything’s possible”, but is “syntactically logical”, mindset, where Javascript is this “sponge of the Internet” not missing out on anything?! Sound familiar?! Huh?!
With yesterday’s WordPress Same Action Item Tutorial though, we got a bit of a lesson bringing that “Javascript mindset” into an issue where “MySql SQL” was the duck doing all the paddling coming up with a solution to that “Same Cut to the Chase Action Item” dropdown idea.
We found out, probably four hours later …
Regarding MySql SQL work (which we debug and “live in” the greatincrediblestupendousphpMyAdmin environment wooooorrrrlllllldddd regarding) just because an SQL statement looks “syntactically logical” does not always guarantee success.
Take a look at …
What did not work
Error Message
SELECT wps_posts.post_title, wps_posts.guid, wps_posts.post_content, LOCATE('/PHP/animegif/tutorial_to_animated_gif.php',wps_posts.post_content) as tfind, LOCATE('/PHP/animegif/tutorial_to_animated_gif.php',wps_posts.post_title) as tother, wps_posts.post_date as post_date FROM wps_posts

WHERE wps_posts.post_status = 'publish'

AND (1 = 11 OR LOWER(wps_posts.post_title) = LOWER('/PHP/animegif/tutorial_to_animated_gif.php'))

AND (wps_posts.post_content like CONCAT(CONCAT('%?p=',wps_posts.guid), '%')

OR SUBSTRING(wps_posts.post_content,1,240) like '%/PHP/animegif/tutorial_to_animated_gif.php"%')  UNION SELECT 'Code Download Table' as post_title, wps_posts.post_content as guid, '' as post_content, 1 as tfind, 0 as tother, CURTIME() as post_date FROM wps_posts

WHERE wps_posts.post_status = 'publish'

AND LOWER(wps_posts.post_title) = LOWER('/PHP/animegif/tutorial_to_animated_gif.php')

AND wps_posts.post_content like '%GETME%' ORDER BY post_date
MySQL returned an empty result set (ie. zero rows). (Query took 5.8648 seconds).
Versus what did work
SELECT wps_posts.post_title, wps_posts.guid, wps_posts.post_content, LOCATE('/PHP/animegif/tutorial_to_animated_gif.php',wps_posts.post_content) as tfind, LOCATE('/PHP/animegif/tutorial_to_animated_gif.php',wps_posts.post_title) as tother, wps_posts.post_date as post_date FROM wps_posts

WHERE wps_posts.post_status = 'publish'

AND SUBSTRING(wps_posts.post_content,1,240) like '%/PHP/animegif/tutorial_to_animated_gif.php"%'  UNION SELECT 'Code Download Table' as post_title, wps_posts.post_content as guid, '' as post_content, 1 as tfind, 0 as tother, CURTIME() as post_date FROM wps_posts

WHERE wps_posts.post_status = 'publish'

AND LOWER(wps_posts.post_title) = LOWER('/PHP/animegif/tutorial_to_animated_gif.php')

AND wps_posts.post_content like '%GETME%' ORDER BY post_date
Yes, a complex WHERE clause in MySQL can cause a query to return zero rows if it inadvertently filters out all data. This often happens due to logical errors, such as conflicting conditions, NULL values treated as equal to other values, or using NOT IN with subqueries that include NULL.
Interesting, huh?!
Perhaps the KISS principle should apply here, especially if you are doing MySql SQL outside the original indexing database design thoughts ( as we were needing to use here with the MySql SQL function SUBSTRING ). Also, if we’re into the “blame game” here, question whether a solution you are achieving is inefficient, and wasteful, before applying it as your final offering!
If this was interesting you may be interested in this too.
WordPress Is Mentioned By Less Recently Modified Tutorial
Supposing you came in here paying scant attention to the Blog Posting Title and its Animated GIF Tutorial picture I’d like to set you the challenge to look at the build up to organizing the use of the theme for today’s tutorial, and you try to anticipate what that may be? Up to the challenge? We hope so, because, with respect to the recent WordPress Is Mentioned By Recently Modified Tutorial‘s …
MySql SQL …
<?php
 $res = mysql_query("SELECT " . $tname . ".post_title, " . $tname . ".guid, " . $tname . ".post_content, LOCATE('" . $ourtitle . "'," . $tname . ".post_content) as tfind, LOCATE('" . $ourother . "'," . $tname . ".post_title) as tother, " . $tname . ".post_date as post_date FROM " . $tname . "

WHERE " . $tname . ".post_status = 'publish' " . "

AND (1 = 1 OR LOWER(" . $tname . ".post_title) != LOWER('" . $ourtitle . "')) " . "

AND (" . $tname . ".post_content like CONCAT(CONCAT('%?p='," . $tname . ".guid), '%') " . "

OR " . $tname . ".post_content like '%" . str_replace('youllneverfindthis','%',permalinkit($ourtitle)) . "%' " . "

OR " . $tname . ".post_content like '%" . str_replace('youllneverfindthis','%',$ourother) . "%' " . "

OR " . $tname . ".post_content like '%" . str_replace('youllneverfindthis','%',$ourtitle) . "%') " . " UNION SELECT " . $tname . ".post_title, " . $tname . ".post_content as guid, ' ' as post_content, -1 as tfind, -1 as tother, " . $tname . ".post_modified as post_date FROM " . $tname . " WHERE " . $tname . ".post_status = 'publish' AND " . $tname . ".post_modified > NOW() - INTERVAL 1 WEEK " . " UNION SELECT 'Code Download Table' as post_title, " . $tname . ".post_content as guid, '' as post_content, 1 as tfind, 0 as tother, CURTIME() as post_date FROM " . $tname . "

WHERE " . $tname . ".post_status = 'publish' " . "

AND LOWER(" . $tname . ".post_title) = LOWER('" . $ourtitle . "') " . "

AND " . $tname . ".post_content like '%GETME%' ORDER BY post_date ");
?>
… we changed it to be …
<?php
$res = mysql_query("SELECT " . $tname . ".post_title, " . $tname . ".guid, " . $tname . ".post_content, LOCATE('" . $ourtitle . "'," . $tname . ".post_content) as tfind, LOCATE('" . $ourother . "'," . $tname . ".post_title) as tother, " . $tname . ".post_date as post_date FROM " . $tname . "

WHERE " . $tname . ".post_status = 'publish' " . "

AND (1 = 1 OR LOWER(" . $tname . ".post_title) != LOWER('" . $ourtitle . "')) " . "

AND (" . $tname . ".post_content like CONCAT(CONCAT('%?p='," . $tname . ".guid), '%') " . "

OR " . $tname . ".post_content like '%" . str_replace('youllneverfindthis','%',permalinkit($ourtitle)) . "%' " . "

OR " . $tname . ".post_content like '%" . str_replace('youllneverfindthis','%',$ourother) . "%' " . "

OR " . $tname . ".post_content like '%" . str_replace('youllneverfindthis','%',$ourtitle) . "%') " . " UNION SELECT " . $tname . ".post_title, " . $tname . ".post_content as guid, ' ' as post_content, -1 as tfind, (-480 + TIMESTAMPDIFF(MINUTE,NOW()," . $tname . ".post_modified)) as tother, " . $tname . ".post_modified as post_date FROM " . $tname . " WHERE " . $tname . ".post_status = 'publish' AND " . $tname . ".post_modified > NOW() - INTERVAL 1 MONTH " . " UNION SELECT 'Code Download Table' as post_title, " . $tname . ".post_content as guid, '' as post_content, 1 as tfind, 0 as tother, CURTIME() as post_date FROM " . $tname . "

WHERE " . $tname . ".post_status = 'publish' " . "

AND LOWER(" . $tname . ".post_title) = LOWER('" . $ourtitle . "') " . "

AND " . $tname . ".post_content like '%GETME%' ORDER BY post_date ");
?>
… to fit in with …
we changed the modifiedis_mentioned_by.php‘s SQL result set logic “if logic framework” … from …
<?php
  while (($r_array = mysql_fetch_row($res))) {

   if ($r_array[3] == "-1" && strtolower($r_array[3]) == strtolower($r_array[4])) {

      // this is a member of the modified list (via middle UNION SELECT) of the MySQL SQL query result set

   } else if (strtolower($r_array[0]) == strtolower($ourtitle)) {

      // matches current post logic goes here

   } else {

      // does not match current post logic goes here

   }

  }
?>
… to …
<?php
  while (($r_array = mysql_fetch_row($res))) {

   if ($r_array[3] == "-1" && strpos(("" . $r_array[4]), "-") !== false) {

      // this is a member of the modified (and less recently modified) list (via middle UNION SELECT) of the MySQL SQL query result set

   } else if (strtolower($r_array[0]) == strtolower($ourtitle)) {

      // matches current post logic goes here

   } else {

      // does not match current post logic goes here

   }

  }
?>
… turning a “binary” piece of logic into a “ternary” (and above) one … as well as, for good ol’ header.php we add some global Javascript variables …
 var coption='option';

 var cdisabled='disabled';

 var chidden='hidden';

 var cblank='_blank';
Is it apparent to you now what we are using to achieve some new “Less Recently Modified Tutorial” list data onto the “Recently Modified Tutorial” list data of below? But how do we go about doing that, that has been an enthusiasm around here, of recent times? What if we could say …
we changed the modifiedis_mentioned_by.php‘s SQL result set logic “within that top if logic” … from …
<?php
    if ($secresult == "") {

      $secresult=" <span id=xdrpl><select style=\"background-color:orange;display:inline-block;width:80px;\" id=mr" . permalinkit($ourtitle) . " onchange=window.open(this.value,\"_blank\"); title=\"Modified recently (over last week)\"><option value=\"\">Modified</option></select></span> ";

    }

    $secresult=str_replace('>Modified</option>','>Modified</option><option value=https://www.rjmprogramming.com.au/ITblog/' . permalinkit($r_array[0]) . '>' . $r_array[0] . '</option>', $secresult);
We’ve also long been interested in HTML select (dropdown) element option (subelement) disabling and/or hiding (statically or dynamically (as with today’s Javascript work)), and today, for the first time for us, we put this into action
… and we’ve found a new (probably you’d say, “more apt”) use of this idea. We differentiate the …
new less potent (you could argue) “older than one week and up to one month” of modified postings list that can be made “singly selectable” by the user (but don’t start that way, because they initially have “hidden” and “disabled” option element attributes set) … and …
in order to save space and honour those platforms that really render the “hidden” option tags we add “older than one week and up to one month” blog posting titles onto the “selectable day age” ones (all causing a select (dropdown) element value property of blank (if trimmed … ie. their length matches (40 – number of days age)) so that that new Javascript onchange logic can just look for a select element value existing in an option (list) member outerHTML property in order to decide whether to remove the “disabled” and “hidden” properties initially populated into those option “older than one week and up to one month” elements
Now can we recommend turning off the “scant attention” and having a look at today’s animated GIF tutorial picture showing a bit of how this new functionality works in practice here at the WordPress TwentyTen themed blog you are reading up with the ☞ emoji button (you click) above.
For biassed moi, just another reason to keep on admiring and using the ever useful HTML select (dropdown) element in our web applications.
WordPress Is Mentioned By Recently Modified Tutorial
Administering this blog there are two major criteria that would cause a blog posting’s modified date to change, that being …
at this blog we schedule one new blog post per day … and …
as we see things, on an ad hoc basis, we’ll make changes
… but that “Recent Posts” widget you see at this blog only reflects blog post criteria 1 above. Supposing you are following a thread of blog posts or an old blog post, try out the code and see that there is something amiss. How could this possibly be so! Yes, humanity rainsreigns, and we are scouring the postings you might visit to see what you might see, as a basis for revisits to code of the past.
And pretty naturally, if we find an issue, and can do something about it, with that category 2 blog posting type above, we may change one or other or both of …
the underlying code of said category 2 blog posting … and/or, as applicable …
the blog posting content of said category 2 blog posting
… the latter of which will cause that blog posting’s modified date to change, and as of today, adding onto yesterday’s WordPress Is Mentioned By Posting Order Tutorial, your clicking of “Is Mentioned By” ☞ “emoji button” above to change the “Recent Posts” widget title to “Recent Posts”, that (select element) dropdown populated in chronological order by a week’s worth of modified date changes at this blog. Using this, you may get an update to something you cannot figure, else drop us a line.
<?php
 $res = mysql_query("SELECT " . $tname . ".post_title, " . $tname . ".guid, " . $tname . ".post_content, LOCATE('" . $ourtitle . "'," . $tname . ".post_content) as tfind, LOCATE('" . $ourother . "'," . $tname . ".post_title) as tother, " . $tname . ".post_date as post_date FROM " . $tname . "

WHERE " . $tname . ".post_status = 'publish' " . "

AND (1 = 1 OR LOWER(" . $tname . ".post_title) != LOWER('" . $ourtitle . "')) " . "

AND (" . $tname . ".post_content like CONCAT(CONCAT('%?p='," . $tname . ".guid), '%') " . "

OR " . $tname . ".post_content like '%" . str_replace('youllneverfindthis','%',permalinkit($ourtitle)) . "%' " . "

OR " . $tname . ".post_content like '%" . str_replace('youllneverfindthis','%',$ourother) . "%' " . "

OR " . $tname . ".post_content like '%" . str_replace('youllneverfindthis','%',$ourtitle) . "%') " . " UNION SELECT " . $tname . ".post_title, " . $tname . ".post_content as guid, ' ' as post_content, -1 as tfind, -1 as tother, " . $tname . ".post_modified as post_date FROM " . $tname . " WHERE " . $tname . ".post_status = 'publish' AND " . $tname . ".post_modified > NOW() - INTERVAL 1 WEEK " . " UNION SELECT 'Code Download Table' as post_title, " . $tname . ".post_content as guid, '' as post_content, 1 as tfind, 0 as tother, CURTIME() as post_date FROM " . $tname . "

WHERE " . $tname . ".post_status = 'publish' " . "

AND LOWER(" . $tname . ".post_title) = LOWER('" . $ourtitle . "') " . "

AND " . $tname . ".post_content like '%GETME%' ORDER BY post_date ");
?>
… that -1 as tfind, -1 as tother an intentional ploy to fit in with a new “if” clause in the PHP (that loops through database record reads of the MySql SQL query above) as per …
<?php
 $secresult="";

 if ($res == 0) {

  if (1 == 2) echo("<b>Error " . mysql_errno() . ": " . mysql_error() . "</b>");

 } else if (mysql_num_rows($res) == 0) {

  if (1 == 2) echo("<b>Query executed successfully</b>");

  $retval=$delim;

  $retval = str_replace(" }", " parent.document.getElementById('d" . permalinkit($ourtitle)  . "').innerHTML='<select style=background-color:yellow; id=" . permalinkit($ourtitle) . " onchange=window.open(this.value,\"_blank\"); title=\"Is mentioned by\"><option value=\"\">Sadly, this tutorial is not mentioned by any others, yet</option></select>'; }", $retval);

 } else {

  while (($r_array = mysql_fetch_row($res))) {

   if ($r_array[3] == "-1" && strtolower($r_array[3]) == strtolower($r_array[4])) {

    if ($secresult == "") {

      $secresult=" <span id=xdrpl><select style=\"background-color:orange;display:inline-block;width:80px;\" id=mr" . permalinkit($ourtitle) . " onchange=window.open(this.value,\"_blank\"); title=\"Modified recently (over last week)\"><option value=\"\">Modified</option></select></span> ";

    }

    $secresult=str_replace('>Modified</option>','>Modified</option><option value=https://www.rjmprogramming.com.au/ITblog/' . permalinkit($r_array[0]) . '>' . $r_array[0] . '</option>', $secresult);

   } else if (strtolower($r_array[0]) == strtolower($ourtitle)) {

    $isize++;

    $retval = str_replace(" }", " isize++; theseopts=theseopts.replace(' size=' + eval(-1 + isize) + ' ', ' size=' + isize + ' ').replace('>','><option value=https://www.rjmprogramming.com.au/ITblog/" . permalinkit($r_array[0]) . " selected>" . $r_array[0] . pluckfirstreal($r_array[2]) . "</option>'); }", $retval);

   } else {

    $pdate = $r_array[1];

    if ($retval == "") {

      $retval=$delim;

      $retval = str_replace(" }", " var theseoptions='<select style=background-color:yellow; id=" . permalinkit($ourtitle) . " onchange=window.open(this.value,\"_blank\"); title=\"Is mentioned by\"><option value=\"\">This tutorial is mentioned by ...</option></select>'; }", $retval);

      $retval = str_replace(" }", " var theseopts='<select si' + 'ze=0 style=width:100%;background-color:#f0f0f0; class=select_ms id=z" . permalinkit($ourtitle) . " onchange=changed(this.value,ocb); title=\"Is part of a blog posting thread ... and you can select multiple tutorials to show\"></selec' + 't>'; }", $retval);

    }

    if ($r_array[3] != "0") $retval = str_replace(" }", " theseoptions=theseoptions.replace('</select>','<option value=https://www.rjmprogramming.com.au/ITblog/" . permalinkit($r_array[0]) . ">" . $r_array[0] . "</option></select>'); }", $retval);

    if ($criteria != "") {

      if (str_replace($criteria, "", $r_array[0]) != $r_array[0] && $r_array[4] != "0") {

        $found = true;

        $isize++;

        $retval = str_replace(" }", " isize++; theseopts=theseopts.replace(' size=' + eval(-1 + isize) + ' ', ' size=' + isize + ' ').replace('>','><option value=https://www.rjmprogramming.com.au/ITblog/" . permalinkit($r_array[0]) . ">" . $r_array[0] . pluckfirstreal($r_array[2]) . "</option>'); }", $retval);

      }

    }

   }

  }

  if ($retval != "") {

    if (!$found) {

      $retval = str_replace(" }", " theseopts='';  }", $retval);

    } else {

      $retval = str_replace(" }", " theseoptions+=(' ' + theseopts);   }", $retval);

    }

    $retval = str_replace(" }", " parent.document.getElementById('d" . permalinkit($ourtitle)  . "').innerHTML=theseoptions; parent.checkclass(\"\"); }", $retval);

  }

 }

 mysql_close($link);   // close the MySql database connection

 if ($retval != "") {

    if ($secresult != "") {

      $retval=str_replace("></selec' + 't>';", "></selec' + 't>' + '" . $secresult . "'; ", $retval);

    }

    echo $retval;  // this get communicated back to TwentyTen theme's header.php changes as explained below ...

 }
?>
… teaming up with this blog’s TwentyTen theme’s (good ol’) header.php changes (to suit above) that go …
<?php
var rppspana=null;
function rpcheck() {
if (rppspana == null) {
var h3sare=document.getElementsByTagName('h3');
for (var ih3sare=0; ih3sare<h3sare.length; ih3sare++) {
if (('' + h3sare[ih3sare].innerHTML).indexOf('cent Post') != -1) { rppspana=h3sare[ih3sare]; }
}
}
if (rppspana != null && document.getElementById('xdrpl')) {
if (rppspana.innerHTML.indexOf('cent Post') != -1 && document.getElementById('xdrpl').innerHTML != '') {
var dx=document.getElementById('xdrpl').innerHTML;
document.getElementById('xdrpl').innerHTML='';
rppspana.innerHTML=rppspana.innerHTML.replace('cent Post', 'cent ' + dx + ' Post');
} else {
setTimeout(rpcheck, 4000);
}
} else if (document.getElementById('xdrpl')) {
setTimeout(rpcheck, 4000);
} else if (rppspana != null) {
setTimeout(rpcheck, 4000);
}
}
function preresize_font(aois) {
setTimeout(rpcheck, 3000);
zzzspare=aois.id.replace('t','d');
resize_font();
}
… to move this newly created “Modified” (select element) dropdown from the Blog Posting content area over to the title of the Recent Posts widget to become that “Recent Posts” dropdown populated with a week’s worth of modified date changed blog posting titles that if selected navigate the user onto that blog posting.
the order of blog postings that could end up on dropdowns as a result of this PHP code was not always chronological … and …
the … “glimpse into” wording on the dropdown options told us (the users) nothing … and …
the navigation off a user selected dropdown option was flaky and sporadic
… so let’s talk about these in more depth below …
the order of blog postings that could end up on dropdowns as a result of this PHP code was not always chronological … so … we changedis_mentioned_by.php‘s central bit of SELECT (DML) SQL as per …
<?php
 $res = mysql_query("SELECT " . $tname . ".post_title, " . $tname . ".guid, " . $tname . ".post_content, LOCATE('" . $ourtitle . "'," . $tname . ".post_content) as tfind, LOCATE('" . $ourother . "'," . $tname . ".post_title) as tother, " . $tname . ".post_date as post_date FROM " . $tname . "

WHERE " . $tname . ".post_status = 'publish' " . "

AND (1 = 1 OR LOWER(" . $tname . ".post_title) != LOWER('" . $ourtitle . "')) " . "

AND (" . $tname . ".post_content like CONCAT(CONCAT('%?p='," . $tname . ".guid), '%') " . "

OR " . $tname . ".post_content like '%" . str_replace('youllneverfindthis','%',permalinkit($ourtitle)) . "%' " . "

OR " . $tname . ".post_content like '%" . str_replace('youllneverfindthis','%',$ourother) . "%' " . "

OR " . $tname . ".post_content like '%" . str_replace('youllneverfindthis','%',$ourtitle) . "%') UNION SELECT 'Code Download Table' as post_title, " . $tname . ".post_content as guid, '' as post_content, 1 as tfind, 0 as tother, CURTIME() as post_date FROM " . $tname . "

WHERE " . $tname . ".post_status = 'publish' " . "

AND LOWER(" . $tname . ".post_title) = LOWER('" . $ourtitle . "') " . "

AND " . $tname . ".post_content like '%GETME%' ORDER BY post_date ");
?>
… noting that ORDER BY clause fields should appear in the (SELECT) column list, and we chose to put it at the end (of that list) to avoid any array indexing code changes
the … “glimpse into” wording on the dropdown options told us (the users) nothing … so … we changedis_mentioned_by.php‘s “function pluckfirstreal” as per …
<?php
 function pluckfirstreal($pcont) {

   $xpcont=$pcont;

   if (strpos($xpcont, "[/caption]</p>") !== false) {

     $xpcont=explode("[/caption]</p>", $pcont)[1];

   } else if (strpos($xpcont, "[/caption]") !== false) {

     $xpcont=explode("[/caption]", $pcont)[1];

   }

   $paras = explode("</p", str_replace("<p", "</p", $xpcont));

   if (sizeof($paras) > 2) {

     $oth = explode("<", $paras[1]);

     $retval = " ... ";

     for ($i=0; $i<sizeof($oth); $i++) {

      $huh = explode(">", $oth[$i]);

      $retval .= str_replace("'", "`", str_replace("}", " ", str_replace("{", " ", $huh[-1 + sizeof($huh)])));

     }

     return substr($retval,0,200);

   }

   return "";

 }
?>
the navigation off a user selected dropdown option was flaky and sporadic … so … in (good ol’) header.php of the WordPress Blog TwentyTen theme folder we changed …
<?php
function changed(inval,intxt) {
if (1 == 1 || navigator.userAgent.match(/Android|BlackBerry|iPhone|iPad|iPod|Opera Mini|IEMobile/i)) {
if (callwhat.length == 0) {
parentwino(inval,intxt.toLowerCase(),'');
}
}
if (callwhat.length > 1) {
if (prevxcmd != "") {
eval(prevxcmd);
} else if (prevcmd != "") {
eval(prevcmd.replace("''","'top=50,left=50,width=600,height=600'"));
}
prevxcmd="parentwino('" + inval + "','" + intxt.toLowerCase() + "','top=50,left=50,width=600,height=600')";
prevcmd="";
} else if (callwhat.length == 1) {
if (sitlist.indexOf(',') != -1) {
prevcmd="";
prevxcmd="";
var invala=sitlist.split(',');
for (var ip=0; ip<invala.length; ip++) {
if (prevxcmd != "") {
eval(prevxcmd);
} else if (prevcmd != "") {
eval(prevcmd.replace("''","'top=50,left=50,width=600,height=600'"));
}
prevxcmd="parentwino('" + invala[ip] + "','" + intxt.toLowerCase() + "','top=50,left=50,width=600,height=600')";
prevcmd="";
}
} else if (1 == 1) {
parentwino(inval,intxt.toLowerCase(),'');
} else {
if (prevcmd != "") {
eval(prevcmd);
} else if (prevxcmd != "") {
eval(prevxcmd.replace("'top=50,left=50,width=600,height=600'", "''"));
}
prevcmd="parentwino('" + inval + "','" + intxt.toLowerCase() + "','')";
prevxcmd="";
}
}
}
function antiaway() {
if (document.getElementById('hfloater') && document.getElementById('aaway')) {
document.getElementById('hfloater').innerHTML=document.getElementById('hfloater').innerHTML.replace(' ' + document.getElementById('aaway').outerHTML, '');
}
}
function parentwino(a, b, c) {
var woisp=null, eqas=null;
if (c == "") {
try {
if (woisp == null && document.getElementById('hfloater')) { // && !navigator.userAgent.match(/Android|BlackBerry|iPhone|iPad|iPod|Opera Mini|IEMobile/i)) {
document.getElementById('hfloater').innerHTML+=' <a id="aaway" target="_blank" href="' + a + '" style="display:none;">WOpen</a>';
document.getElementById('aaway').click();
setTimeout(antiaway, 4300);
} else {
woisp=window.open(a,b);
}
} catch(eqas) {
woisp=null;
}
return woisp; //window.open(a,b);
At this blog we are keen for users to learn one off ideas and on occasions linked “threaded” (or blog postings of a theme) ones.
The last WordPress Blog (TwentyTen theme) “Is Mentioned by” functionality is good for certain scenarios, but what if you arrive at a blog posting that is part of a “threaded” series of blog postings? We normally show you older ones and that’s fine. But I’m not so much talking about the avid reader here who follows it “hot off the press” but more the users finding things off search engines, coming to this blog, and the posting they get to may not be the last in the “thread”. Below the blog posting they log in at, the reader can read all the information of the past to do with the thread, but what of getting it into context, relative to the entire “thread” up to that point, or out more recently “beyond” it? Well, that is the purpose of today’s extension of functionality to the WordPress Blog “Is Mentioned by” functionality we last finished up discussing with WordPress Is Mentioned By Code Download Progress Tutorial as shown below.
Surprisingly the WordPress Blog TwentyTen theme’s header.php does not need to change to make this happen. The PHP that queries the WordPress MySql database can handle all the change today, and ended up looking like is_mentioned_by.php changing this way.
The method is to …
query the MySql database with a more complex query that results in data for …
“is mentioned by” and “is part of a blog posting thread” are represented by two separate dropdowns … and …
in order to show you the context of the current blog posting in a blog posting “thread” we have an HTML select size property set to the number of dropdown records … alas, mobile platforms do not honour the size property regarding their display of dropdowns … display and set the selected property to the current blog posting’s entry, with this entry consisting of …
a blog posting title and the first paragraph of content are put into the “is part of a blog posting thread” dropdown option text to enhance the context for the user, shown this list with the most recent posting first down in reverse chronological order to the older blog posting of the “thread” down the bottom
Below in bold is how the MySql query got more complex …
 $res = mysql_query("SELECT " . $tname . ".post_title, " . $tname . ".guid, " . $tname . ".post_content, LOCATE('" . $ourtitle . "'," . $tname . ".post_content) as tfind, LOCATE('" . $ourother . "'," . $tname . ".post_title) as tother FROM " . $tname . "

WHERE " . $tname . ".post_status = 'publish' " . "

AND (1 = 1 OR LOWER(" . $tname . ".post_title) != LOWER('" . $ourtitle . "')) " . "

AND (" . $tname . ".post_content like CONCAT(CONCAT('%?p='," . $tname . ".guid), '%') " . "

OR " . $tname . ".post_content like '%" . str_replace('youllneverfindthis','%',permalinkit($ourtitle)) . "%' " . "

OR " . $tname . ".post_content like '%" . str_replace('youllneverfindthis','%',$ourother) . "%' " . "

OR " . $tname . ".post_content like '%" . str_replace('youllneverfindthis','%',$ourtitle) . "%') UNION SELECT 'Code Download Table' as post_title, " . $tname . ".post_content as guid, '' as post_content, 1 as tfind, 0 as tother FROM " . $tname . "

WHERE " . $tname . ".post_status = 'publish' " . "

AND LOWER(" . $tname . ".post_title) = LOWER('" . $ourtitle . "') " . "

AND " . $tname . ".post_content like '%GETME%'");
where the (new) variable $ourother is set to being the first few words of the blog posting title.
In order to “pluck out” one paragraph from the content (of variable $pcont) we use …
WordPress Is Mentioned By Code Download Progress Tutorial
There are various approaches with user experience (UX) considerations regarding putting a web application user at their ease as they wait for a response. I’m talking about where the response is coming from a separate serverside script doing something that may take a while, such as querying a database for instance, and that responder will do the work back at its parent to say it has finished its job. Given all this, you may be asking “What is there left to worry about, with the user, if the responder is doing this?”. Well, there is that amount of time between …
clicking the action item of HTML at the parent … all the way through to …
the responder “child”, often serverside code (for us, PHP), finishing its work and fixing the parent webpage to indicate that it has finished its work
Now, we all hope this time period is short, and, hopefully, most of the time, it is short, and perhaps it is “overkill” to worry about doing anything here. However there are some things to consider …
if you are writing commercial software code there could well be an UX expectation that you would code for this, to keep the user informed at all times … and …
it could be the case that the database crashes at that very “clicking” moment, and though your responder may not get back to the parent with information, at least if you’ve coded for the scenario back at the client, at least the user will know something is being attempted, even if it doesn’t appear to be succeeding, which is less frustrating than getting no information at all, which could be mistaken for software code “hanging” … definitely not a great UX feel, or look
Now there are a variety of client code approaches for showing “progress”, such as …
something you just clicked, changing appearance cyclically over time
That last one appeals to us for a recent bit of functionality we added to this WordPress Blog you are reading, as well as for the fact that what we show “progress” on is difficult to numerically quantify as far as completion time is concerned, and so the first two above are not as suitable. We actually change the HTML div element font size to make an emoji “button” pressed “throb” while the user waits for the PHP and MySql query to respond back. Do you remember our thread of blog posting that used to end with WordPress Is Mentioned By Code Download CSS Tutorial? That’s the functionality we’re talking about today, as we do at WordPress 4.1.1’s WordPress Is Mentioned By Code Download Progress Tutorial.
Now reading that previous link’s content below, you may see that we have considered the scenario of the child responder not finding any mentions and responding with …
Sadly, this tutorial is not mentioned by any others, yet
… which is good, but it may either take a long time for the responder to work this out, or, as we’ve indicated above, the responder’s mechanism for finding out may fail, and we’re dealing with that, from the perspective of the user looking at the client webpage, and waiting for information after clicking that emoji link we introduced when we did that work in that tutorial.
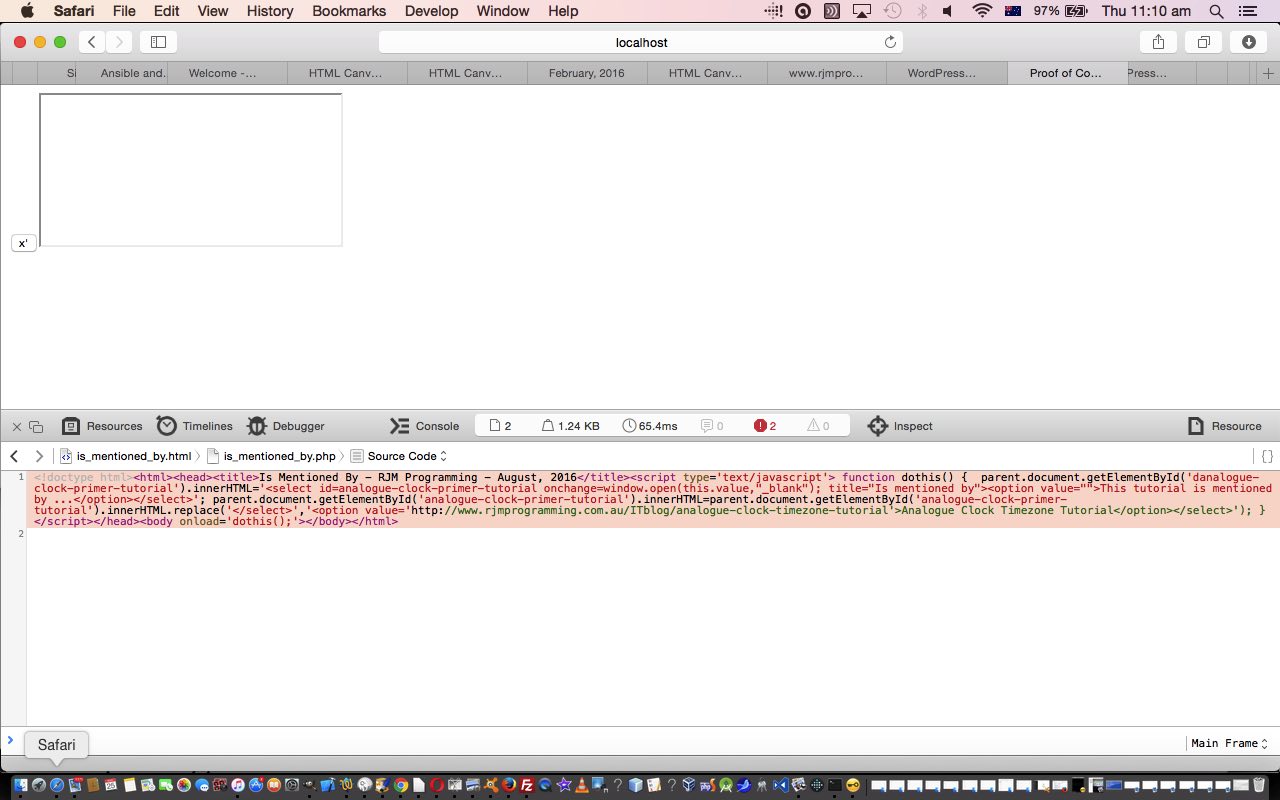
We decided to prove our method with a “proof of concept” local MAMP web server HTML and Javascript and CSS parent taking …
one blog posting bit of HTML body HTML …
the is_mentioned_by function renamed to was_is_mentioned_by and a new is_mentioned_by worked until it works, tested via the Safari web browser’s Develop menu’s Web Inspector (similar to the Firefox Firebug web inspector we tend to go on and on and on and on and on and on about at this blog)
… that took the form of this imb_poc.html … supervising the reworked PHP serverside code is_mentioned_by.php on MAMP that is, deliberately, made to …
wreck the connection to MySql … and then intervene to …
change the die message to instead sleep(18) before showing “Sadly, this tutorial is not mentioned by any others, yet” … at which time our changes should look good UX wise for the user
We must stress this about “proof of concept”. Don’t waste time on “proof of concept” with too much fine grain simulation of the original scenario, if it is not involved in what you are proving, that is different, and is what is being tested here. See how it can even be that it suits the purposes of some “proof of concept” scenarios, like today’s, that you wreck the MySql connection in a progress “proof of concept” scenario, for example?
We made these WordPress Blog changes in good ol’ TwentyTen themed header.php, as we so often do, and show changed code bold below …
<script> var ourfs=21, zzzspare='';
// ...
// lots of other Javascript code
// ...
// down to ...
function preresize_font(aois) {
zzzspare=aois.id.replace('t','d');
resize_font();
}
function resize_font() {
ourfs=eval((ourfs + 5) % 45);
if (document.getElementById(zzzspare).innerHTML.indexOf('<select ') != -1) {
ourfs=21;
} else {
setTimeout(resize_font, 500);
}
document.getElementById(zzzspare).style.fontSize='' + ourfs + 'px';
}
… where is_mentioned_by function is called by the document.body onload event, to trigger all this. You can see some of all this with today’s tutorial picture, and by trying to click some of the right pointing emoji ☞ “is mentioned by” functionality “buttons” you see next to Blog Posting Titles around you here at this WordPress TwentyTen themed blog, but here’s hoping you don’t see too many throbbing emojis … heaven forbid?!
change the PHP that creates the HTML for displaying the Code Download Table, and that is accessed by our web server at RJM Programming using the Crontab/Curl “dynamic duo” (we often look at) … that uses …
CSS Complex Selector functionality (we’ve last talked about with WordPress Blog Complex Selectors Tutorial), but via the use of jQuery methods like parent() and siblings() methods … and only being called, as for yesterday’s scenario, where …
… to make what we are doing stand out more for the user, who may “swim” in a large table devoid of any styling to focus their attention.
We’ll leave you with modified PHP, that writes out the HTML Code Download Table manipulator, you could call getmelist.php and which changed in this way to make the Code Download Table be more usercentric with its presentation of hashtagged calls linking a WordPress Blog Posting at this blog with a particular piece of software code of interest in our Code Download Table.
A blog posting being referred to … back, optionally, as a link, to …
A blog posting that mentioned that blog posting currently being viewed
… and looking at this premise, it stands to reason that as helpful as this concept looks on paper, if a regular reader expects a recent posting be referred to by others “hot off the press” they’d be expecting quite a lot, and though what they get in this scenario …
Sadly, this tutorial is not mentioned by any others, yet
… probably does a good job tweaking them to the dilemma of “hot off the press” being “too recent to be referred to” it still remains a disappointment, perhaps. So, thinking a tad laterally on this, what is going to help out here will be to particularize the scenario for what we do around here … and am sorry if this annoys, but we are showing a line of thinking here … and allow for Blog Posts that contain the word “GETME” … our favourite code download mechanism around here … to add a “Code Download Table” dropdown option, that if selected will lob the user directly onto the RJM Programming Code Download Table entry for the first “GETME” file link found in that blog posting. This additional scouring of the MySql database, that utilizes the SQL UNION operator (the “adding an extra clause or paragraph” SQL operator, we like to think of it as) with its query, will not be relevant to all unmentioned blog postings, but it will help those that talk about software coding, which is quite a few.
That functionality had us looking back at how the Code Download Table was constructed in terms of its hashtagging when we discussed PHP Blog Summary Follow Up Tutorial. In this way, we had a first try at …
… using the hashtagging for a date … as you see with these changes to is_mentioned_by.php at the left hand column of the Code Download Table … did a couple of unit tests seeing the first one work, the second one work if you take it a day back, and the third one not work at all, at which point it tweaked with us that the date in the Code Download Table is a date reflected by the software code file’s modified date, not the WordPress Blog Posting publication date, that we can derive off our amended query … so that being less friendly than we envisaged we end up …
… using the very interesting hashtagging that particularizes the filename, where the read file extension (minus all the “GETME” and “-“‘s and “_”‘s that is) is taken out of the prefix to the hashtag, and made into a suffix … like “analogue_clock.-GETMEhtml” for Analogue Clock Timezone Tutorial that is exemplified in today’s tutorial picture and as you can see the changes for at this is_mentioned_by.php link
So it panned out to make this happen the original Code Download Table code did not need any tweaking, not good ol’ WordPress TwentyTen theme header.php … just is_mentioned_by.php … but we hope you try out clicking some “White Right Pointing Index” emoji …
What gives with the &tsp=[someBigNumber]GET parameter … like is yellow highlighted in today’s tutorial picture … in the “Code Download Table” lookup URLs? This is so that we end up with different URLs each time a user accesses this functionality. This is because web browsers often try to help you out with speeding up your browsing, and use the web browser cache to “regurgitate” a previously visited URL should that have happened since the last clearing of any web browser cache, to “slap” the cache version quickly on the screen. But we don’t want any “slapping” to go on around our functionality today, and a way to force the web browser to reconsider the real lookup, and go back to the real web server again for data, is to make your URL be unique. A curiosity here you can try is to use something like a local MAMP (for Mac or EasyPHP for Windows) local web server to, for an image file called image.jpg that is put into the Apache web server’s Document Root …
see the image in your favoured web browser with the URL http://localhost:8888/image.jpg … then …
change that image somehow with an image editor … and …
refresh, or revisit the image with the URL http://localhost:8888/image.jpg … and you’ll probably see the cached web server version … unless you haven’t got web browser caching going … so amend this to …
revisit the image with the URL http://localhost:8888/image.jpg?random=7456536 … and this time we think you’ll see the amended image that happened with your image editing … and yes, you can add GET parameters to your URLs even for image URLs (often, most helpfully with image URLs, actually)
WordPress Is Mentioned By Navigation Primer Tutorial
We’ve written some new WordPress navigation logic today, for blog posting relationships between …
A blog posting being referred to … back, optionally, as a link, to …
A blog posting that mentioned that blog posting currently being viewed
… done, because we see that it is not only the “vertical” type linking of blog postings into a “thread” that helps understanding … we hope … but also to jump around among commonalities between concepts (like “horizontal” “degrees of separation”), perhaps. This functionality involves MySql database queries, and is best suited to a user clicks something (rather than pre-emptive content loading) to reach the functionality so that our database query has a post title to work with, and also so that every blog post does not overload the web server with a query ahead of time whose work may not be accessed anyway. The something that is clicked is an HTML a tag whose “look” is an Emoji.
We also wrote a proof of concept, before applying that proof of concept live. To us, a “proof of concept” is not much use if it is as involved as what it is trying to prove, and in today’s scenario we did a proof of concept for two scenarios, that being …
a blog posting that was referred to by others … and …
a blog posting that wasn’t … doh! … but if you don’t change something about the “look of things” you’ll confuse the user as to whether the web application just took notice of their click (via the onclick event) … so this is of mild importance, but we grant you that it is not as important as the first scenario’s workings
We quite often adopt a proof of concept scenario which tests the workings of a child (often in an HTML iframe element), in this case, PHP server side, piece of code, by introducing a simplified and pared down parent, in this case HTML piece of code. At the end of successful testing you are left with a good, and close to totally suitable child piece of code, to slot into the functionality of the real and live parent code.
That proof of concept was definitely a good “unit testing” thing to do, but nevertheless, don’t feel overconfident as you go live … living with other real “goings on” on the live website are things to consider, and test … it took us half an hour to iron out these types of issues.
The other good thing to have on your side is a Web Inspector like on Safari, similar to the Firefox Firebug web inspector we tend to go on and on and on and on and on and on about at this blog. We’re giving you a Safari rest on that today, and we want to show you an “early days” view …
… in the proof of concept help that the Safari Web Inspector gave us, delving in under the called (by HTML parent) PHP’s actions. This type of information makes server side programming, like you do with PHP, that much easier … much easier than ideas where you write out web server files, with information, for your own benefit, or the other one we often like, during testing, is to write information out to top.document.title or perhaps to an alert box or to use console.log (on the debugging window, down the bottom).
You’ll never guess where we made this change to our WordPress TwentyTen themed blog? Give up … yes, good ol’ header.php changed in the bold Javascript new function way below …
Team that with some new PHP source code you could call is_mentioned_by.php and you have today’s new WordPress blog TwentyTen theme “Is Mentioned By” functionality.
Today we return to the WordPress (TwentyTen themed) blog you are reading now, as with WordPress Blog Standard Makeover Tutorial, and it’s header.php (PHP writes) Javascript (inhouse) function …
function img_alt
… in good ol’ header.php file, where we check for a lot of the tweaks we apply to the default TwentyTen theme look and feel. Why? Well, we noticed, finally, a bit of a “hanging sentence” there … being charitable, that is. It’s that (ol’) …
Ending a sentence with a preposition
… proposition, again?! After “by” (now a dropdown) should be the blog posting author, and so added into function img_alt is …
<?php echo ”
  var alis = document.getElementsByTagName(\"a\");

  for (ialis=0; ialis<alis.length; ialis++) {

    if (alis[ialis].innerHTML == '') {

     if (alis[ialis].outerHTML.indexOf(' content=\"') != -1 && alis[ialis].outerHTML.indexOf(' content=\"\"') == -1) {

       alis[ialis].innerHTML=alis[ialis].outerHTML.split(' content=\"')[1].split('\"')[0];

       alis[ialis].href+=encodeURIComponent(alis[ialis].outerHTML.split(' content=\"')[1].split('\"')[0]);

       alis[ialis].style.fontSize='6px';

     }

    }

  }
Can a Schnauzer change it’s mind … in the sense that the writer is currently on all fours on the ground looking up at some food?
Well, it appears they have phases in life … so … yes.
Well, it appears we’ve grown out of The “Teenager” Phase, apparently, and are changing our tack regarding mobile smaller device WordPress blog “repositioning” tactics that the Miniiature Schnauzer “within us” must have been so into when we presented WordPress Blog Mini Makeover Tutorial.
But it’s standard practice to review ideas every now and then, and when “mini” was the go, this WordPress Blog had less traffic, but in today’s scenarios you could get, on an iPhone, for instance, circumstances where …
a WordPress Blog webpage could flash up for perhaps a second and then …
blank content could take over, for a good while … before …
repositioned webpage content could eventually show
We accept, sometimes, there will be too much traffic to service every reader, but to see a “flash of it” and “then it disappears” is, to put it bluntly, disappointing.
And so, if you have been put out that way …
we apologize …
our research has indicated it is the efforts in trying to have “repositioned webpage content” that is the biggest drag here … and so …
Standard schnauzer … still on all fours … is pulling the plug … though …
Have you ever tried to get into a bath on all fours?
… and, if so (and you claim you did?!) …
Have you ever tried to pull a plug out just with your teeth?
… and no animals were harmed in the making of this blog posting so that is today’s work, stopping that mobile iPhone sized device repositioning that involves either …
location.href=’#[someElementId]’;
window.scrollBy(deltax, deltay);
Good ol’ TwentyTen theme’s header.php, in it’s relevant bit, now shows code that goes …
function windowscrollBy(inxis, inyis) {
if (navigator.userAgent.match(/Android|BlackBerry|iPhone|iPad|iPod|Opera Mini|IEMobile/i)) {
return null;
}
return window.scrollBy(inxis, inyis)
}
Further to yesterday’s Autumn Leaves One Image Webpage Tutorial another discovery in the category of “generic issue” (and so moves up priority lists around here) was the discovery that …
the optional audio playing functionality of One Image Webpage ideas around here worked on non-mobile via HTML webpages (calling an *.mp3 iframe URL) or a *.mp3 URL as the destination href attribute of an “a” link encompassing the image img elements … but …
these same programmatical approaches do not “cut the mustard” on mobile platforms, where, to play media, the user needs to tap (with a real non-programmatical gesture) the media element
… and so we needed a “generic makeover”. Luckily we had an external Javascript called onrightclick.js called on every One Image Webpage we could call upon as a good place to affect all the behaviour of all these webpages, as per …
    function audiolook() {

     var ifsare=document.getElementsByTagName('a');

     if (eval('' + ifsare.length) > 0) {

      // alert(ifsare[eval(-1 + ifsare.length)].href);

        if (ifsare[eval(-1 + ifsare.length)].href.slice(-4) == '.mp3') {

             //document.title='' + ifsare[eval(-1 + ifsare.length)].href;

          var parisis=null, parisisx=null;

          if (window.opener) {

             parisis=window.opener;

             if (parisis.document.getElementById('xxsource')) {

                      parisisx=parisis.document.getElementById('xxsource');

             }

          }

          if (parisisx) {

             if (parisisx.src != ifsare[eval(-1 + ifsare.length)].href) {

               if (6 == 8) { parisisx.src=ifsare[eval(-1 + ifsare.length)].href; }

             }

             var ifzsare=parisis.document.getElementsByTagName('a');

             if (eval('' + ifzsare.length) > 0) {

              if (ifzsare[eval(-1 + ifzsare.length)].href.slice(-4) == '.mp3') {

                if (ifzsare[eval(-1 + ifzsare.length)].href != ifsare[eval(-1 + ifsare.length)].href) {

                  if (6 == 8) { ifzsare[eval(-1 + ifzsare.length)].href=ifsare[eval(-1 + ifsare.length)].href; }

                }

              }

             }

          } else if (document.getElementById('xxsource')) {

             if (document.getElementById('xxsource').src != ifsare[eval(-1 + ifsare.length)].href) {

               if (6 == 8) { document.getElementById('xxsource').src=ifsare[eval(-1 + ifsare.length)].href; }

             }

          } else if (!document.getElementById('xxsource')) {

             var firsta=ifsare[eval(-1 + ifsare.length)].href.split('/')[eval(-1 + ifsare[eval(-1 + ifsare.length)].href.split('/').length)].split('.')[0];

             document.body.innerHTML+='<audio id=xxaudio onclick="this.style.left=0;  this.style.opacity=0.5;  this.autoplay=true; ; if (document.getElementById(' + "'thedivlink'" + ')) { document.getElementById(' + "'thedivlink'" + ').style.marginLeft=' + "'120px'" + ';   } " controls style="opacity:1.0;z-index:8976;position:fixed;left:' + eval(-120 + eval('' + window.innerWidth)) + 'px;top:-20px;height:60px;\" loop><source id=xxsource type=audio/mp3 src="' + ifsare[eval(-1 + ifsare.length)].href.replace(firsta,'all')  + '"></source></audio>';

          }

        }

     }

    }


    setTimeout(doacheck, 100);


    if (navigator.userAgent.match(/Android|BlackBerry|iPhone|iPad|iPod|Opera Mini|IEMobile/i)) {

     setTimeout(function(){

     document.ontouchend=function(e){

       if (document.URL.replace('/wordpress','/ITblog').indexOf('/ITblog') != -1) {

        lastsp=eval(e.touches.length);

       }

       if (eval('' + e.touches.length) >l= 1) {

        if (document.URL.replace('/wordpress','/ITblog').indexOf('/ITblog') == -1) {

        onrightclickask();

        } else if (e.touches[0].target.outerHTML.split('>')[0].indexOf('<img ') == 0 && e.touches[0].target.outerHTML.split('>')[0].indexOf(' tabindex=') != -1) {

        onrightclickask(); //document.title=':' + e.touches[0].target.outerHTML.split('>')[0].substring(1);

        }

       }

     };

     }, 4000);

     setTimeout(function(){

     var ifsare=document.getElementsByTagName('a');

     if (eval('' + ifsare.length) > 0) {

      // alert(ifsare[eval(-1 + ifsare.length)].href);

        if (ifsare[eval(-1 + ifsare.length)].href.slice(-4) == '.mp3') {

             //document.title='' + ifsare[eval(-1 + ifsare.length)].href;

          var parisis=null, parisisx=null;

          if (window.opener) {

             parisis=window.opener;

             if (parisis.document.getElementById('xxsource')) {

                      parisisx=parisis.document.getElementById('xxsource');

             }

          }

          if (parisisx) {

             if (parisisx.src != ifsare[eval(-1 + ifsare.length)].href) {

               if (6 == 8) { parisisx.src=ifsare[eval(-1 + ifsare.length)].href; }

             }

             var ifzsare=parisis.document.getElementsByTagName('a');

             if (eval('' + ifzsare.length) > 0) {

              if (ifzsare[eval(-1 + ifzsare.length)].href.slice(-4) == '.mp3') {

                if (ifzsare[eval(-1 + ifzsare.length)].href != ifsare[eval(-1 + ifsare.length)].href) {

                  if (6 == 8) { ifzsare[eval(-1 + ifzsare.length)].href=ifsare[eval(-1 + ifsare.length)].href; }

                }

              }

             }

          } else if (document.getElementById('xxsource')) {

             if (document.getElementById('xxsource').src != ifsare[eval(-1 + ifsare.length)].href) {

               if (6 == 8) { document.getElementById('xxsource').src=ifsare[eval(-1 + ifsare.length)].href; }

             }

          } else if (!document.getElementById('xxsource')) {

             var firsta=ifsare[eval(-1 + ifsare.length)].href.split('/')[eval(-1 + ifsare[eval(-1 + ifsare.length)].href.split('/').length)].split('.')[0];

             document.body.innerHTML+='<audio id=xxaudio onclick="this.style.left=0; this.style.opacity=0.5; this.autoplay=true; if (document.getElementById(' + "'thedivlink'" + ')) { document.getElementById(' + "'thedivlink'" + ').style.marginLeft=' + "'120px'" + ';   } " controls style="opacity:1.0;z-index:8976;position:fixed;left:' + eval(-120 + eval('' + window.innerWidth)) + 'px;top:-20px;height:60px;" loop><source id=xxsource type=audio/mp3 src="' + ifsare[eval(-1 + ifsare.length)].href.replace(firsta,'all')  + '"></source></audio>';

             setInterval(audiolook, 10000);

          }

        }

     }

     }, 1500);

    }
… because, that is very much the go around here in the Blue Mountains in those coniferous and associated maple deciduous tree type areas. The colours are very vibrant!
What have we noticed changing? Well, the iPhone outputs IMG_[0-9]*.HEIC images these days for full sized images, rather than DSC_[0-9]*.JPEG, like the way it used to be for the same full sized images back when we last tried to create a One Image Webpage website. We decided to convert HEIC to JPEG and found both Ffmpeg or ImageMagick, on a Windows command line, could attempt it, but Ffmpeg had an issue, and so, the Windows (ImageMagick) command …
for %i in (*.HEIC) do magick "%i" "%~ni.jpg"
… ended up suiting our purposes.
And what was the transferring from iPhone to macOS MacBook Air (for this part of the work) methodology?
iPhone Camera app takes photo …
each stored in iPhone Photos app …
use iPhone Photos app Sharing link … to …
tap AirDrop option (which, in Apple woooorrrrllllddd is the best go for these “too large for Mail attachments” amounts of data) …
tap MacBook Air as the recipient (which, even out and about, and only lassooing MacBook Air to iPhone’s Hot Spot as a connection, worked (and was very fast)) … which …
copies images (as is in *.HEIC format) from iPhone to MacBook Air
… retiring the iPhone, optionally, from any further involvement creating Autumn Leaves One Image Webpage website.
If this was interesting you may be interested in this too.
If this was interesting you may be interested in this too.
… because, that is very much the go around here in the Blue Mountains in those coniferous and associated maple deciduous tree type areas. The colours are very vibrant!
What have we noticed changing? Well, the iPhone outputs IMG_[0-9]*.HEIC images these days for full sized images, rather than DSC_[0-9]*.JPEG, like the way it used to be for the same full sized images back when we last tried to create a One Image Webpage website. We decided to convert HEIC to JPEG and found both Ffmpeg or ImageMagick, on a Windows command line, could attempt it, but Ffmpeg had an issue, and so, the Windows (ImageMagick) command …
for %i in (*.HEIC) do magick "%i" "%~ni.jpg"
… ended up suiting our purposes.
And what was the transferring from iPhone to macOS MacBook Air (for this part of the work) methodology?
iPhone Camera app takes photo …
each stored in iPhone Photos app …
use iPhone Photos app Sharing link … to …
tap AirDrop option (which, in Apple woooorrrrllllddd is the best go for these “too large for Mail attachments” amounts of data) …
tap MacBook Air as the recipient (which, even out and about, and only lassooing MacBook Air to iPhone’s Hot Spot as a connection, worked (and was very fast)) … which …
copies images (as is in *.HEIC format) from iPhone to MacBook Air
… retiring the iPhone, optionally, from any further involvement creating Autumn Leaves One Image Webpage website.
If this was interesting you may be interested in this too.
… can be used to manage Windows firewall settings Microsoft Defender will be defending, especially the Windows desktop applications you allow through the firewall that would, as a default, refuse. We had this happening on our Windows laptop involving the FileZilla sftp manager of file transferring to and from a public website … the one you are reading from.
A firewall is a security device, or network security system, designed to protect a secure internal network from other networks, by the means to control the incoming and outgoing network traffic, via a rule set (in a similar way to how some email systems allow the user to write their own rules, to control the flow of emails into their email client mailboxes).
Today, with our slideshow example, we imagine, on a Windows 7 laptop, that you want to block (or ban) the network traffic from a nominated IP address (or range of IP addresses).
This kind of control can perhaps protect the computer network “behind” the firewall from some sort of scamming operation.
This would be of pretty obvious interest to system administrators and network administrators charged with protecting the integrity of their network arrangements.
The way to access the firewall functionality in Windows has been pretty fluid over the various versions of the Windows operating system, but the one we gravitate towards, as a generic piece of advice, is to …
get to a Windows Command Line prompt … and … type …
firewall.cpl
The firewall in Windows 7, at least, also appears in Control Panel as “Windows Firewall” … mainly because it would be pretty obtuse to say “Fenestra Firewall” (though it sounds like a good movie).
Sometimes the firewall duties for a Windows laptop, for instance, are taken on by the Virus Protection software you have installed, perhaps. For instance, the Norton by Symantec software called Internet Security offers up its own Windows Firewall as an option for use, that will supercede any Windows Firewall arrangements that come with an install of the Windows operating system.
So please take a look at our slideshow showing you the blocking of our mythical 48.xx.xxx.xx IP address using Windows Firewall.
If this was interesting you may be interested in this too.
If this was interesting you may be interested in this too.
The personal computer world has been fed the line for years that Apple Mac OS X (or macOS) is more secure than Microsoft Windows, but is this true? Have a read of this interesting article for more in this regard.
Whether the sentiment is true or not, must say the simple Avast Security virus protection arrangement I have for this MacBook Pro does not fill me with the anxiety the virus protection on Windows, so front and centre does. But maybe that is just delusion on my part. Anyhow, with Windows, though all this remains very front and centre stil lwith Windows 10, it is far less disorganized feeling, where years ago third party software was the only place to go. You can still …
use third party software to manage virus control (as we show with the previous Windows Virus Protection Primer Tutorial) … but Microsoft’s Microsoft Defender application will tell you so and work with that … whereas you can …
use Microsoft’s Microsoft Defender application on its own to manage virus protection
… meaning that there is a “one stop shop” for finding out about the security controls in place for a Windows 10 personal computer or laptop. Much less “wild west” feeling.
As such, today, we take a stream of consciousness tour of Microsoft Defender to show you today, screenshotted on a Windows 10 personal computer.
Hope you can see that “all in one place” can have its benefits.
Windows users will almost always have considered the issue of Virus protection. The term “Virus Protection” encompasses, for many of us, so much more these days. Terminology that springs to mind with regards to that general concept of “protecting your computer from harmful software” could be …