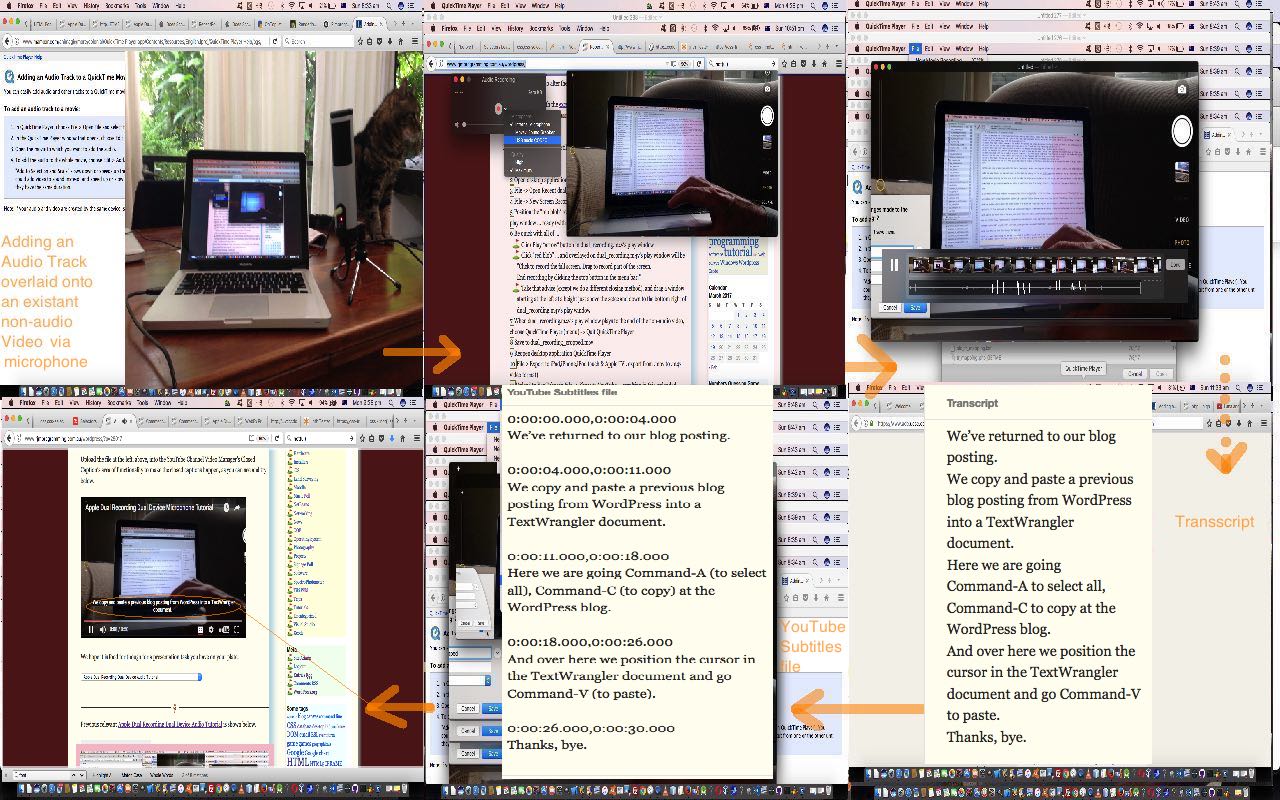
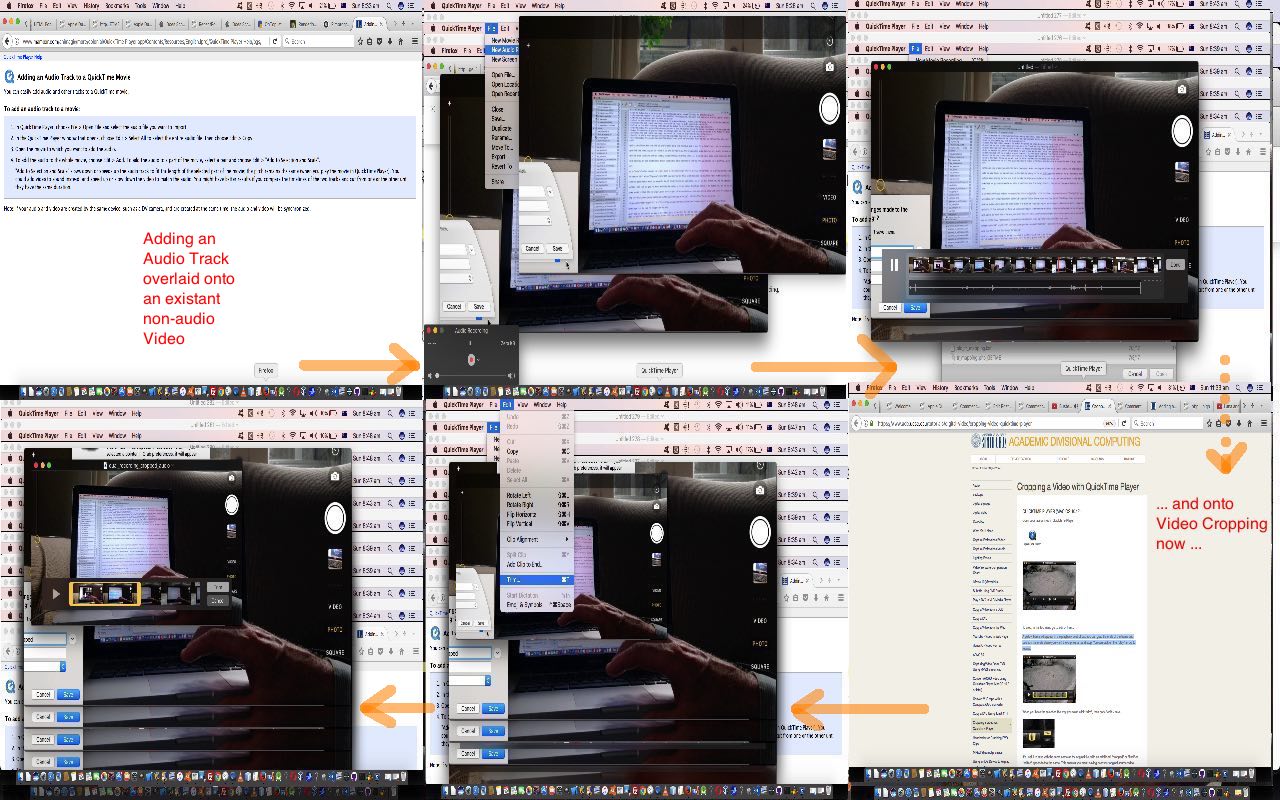
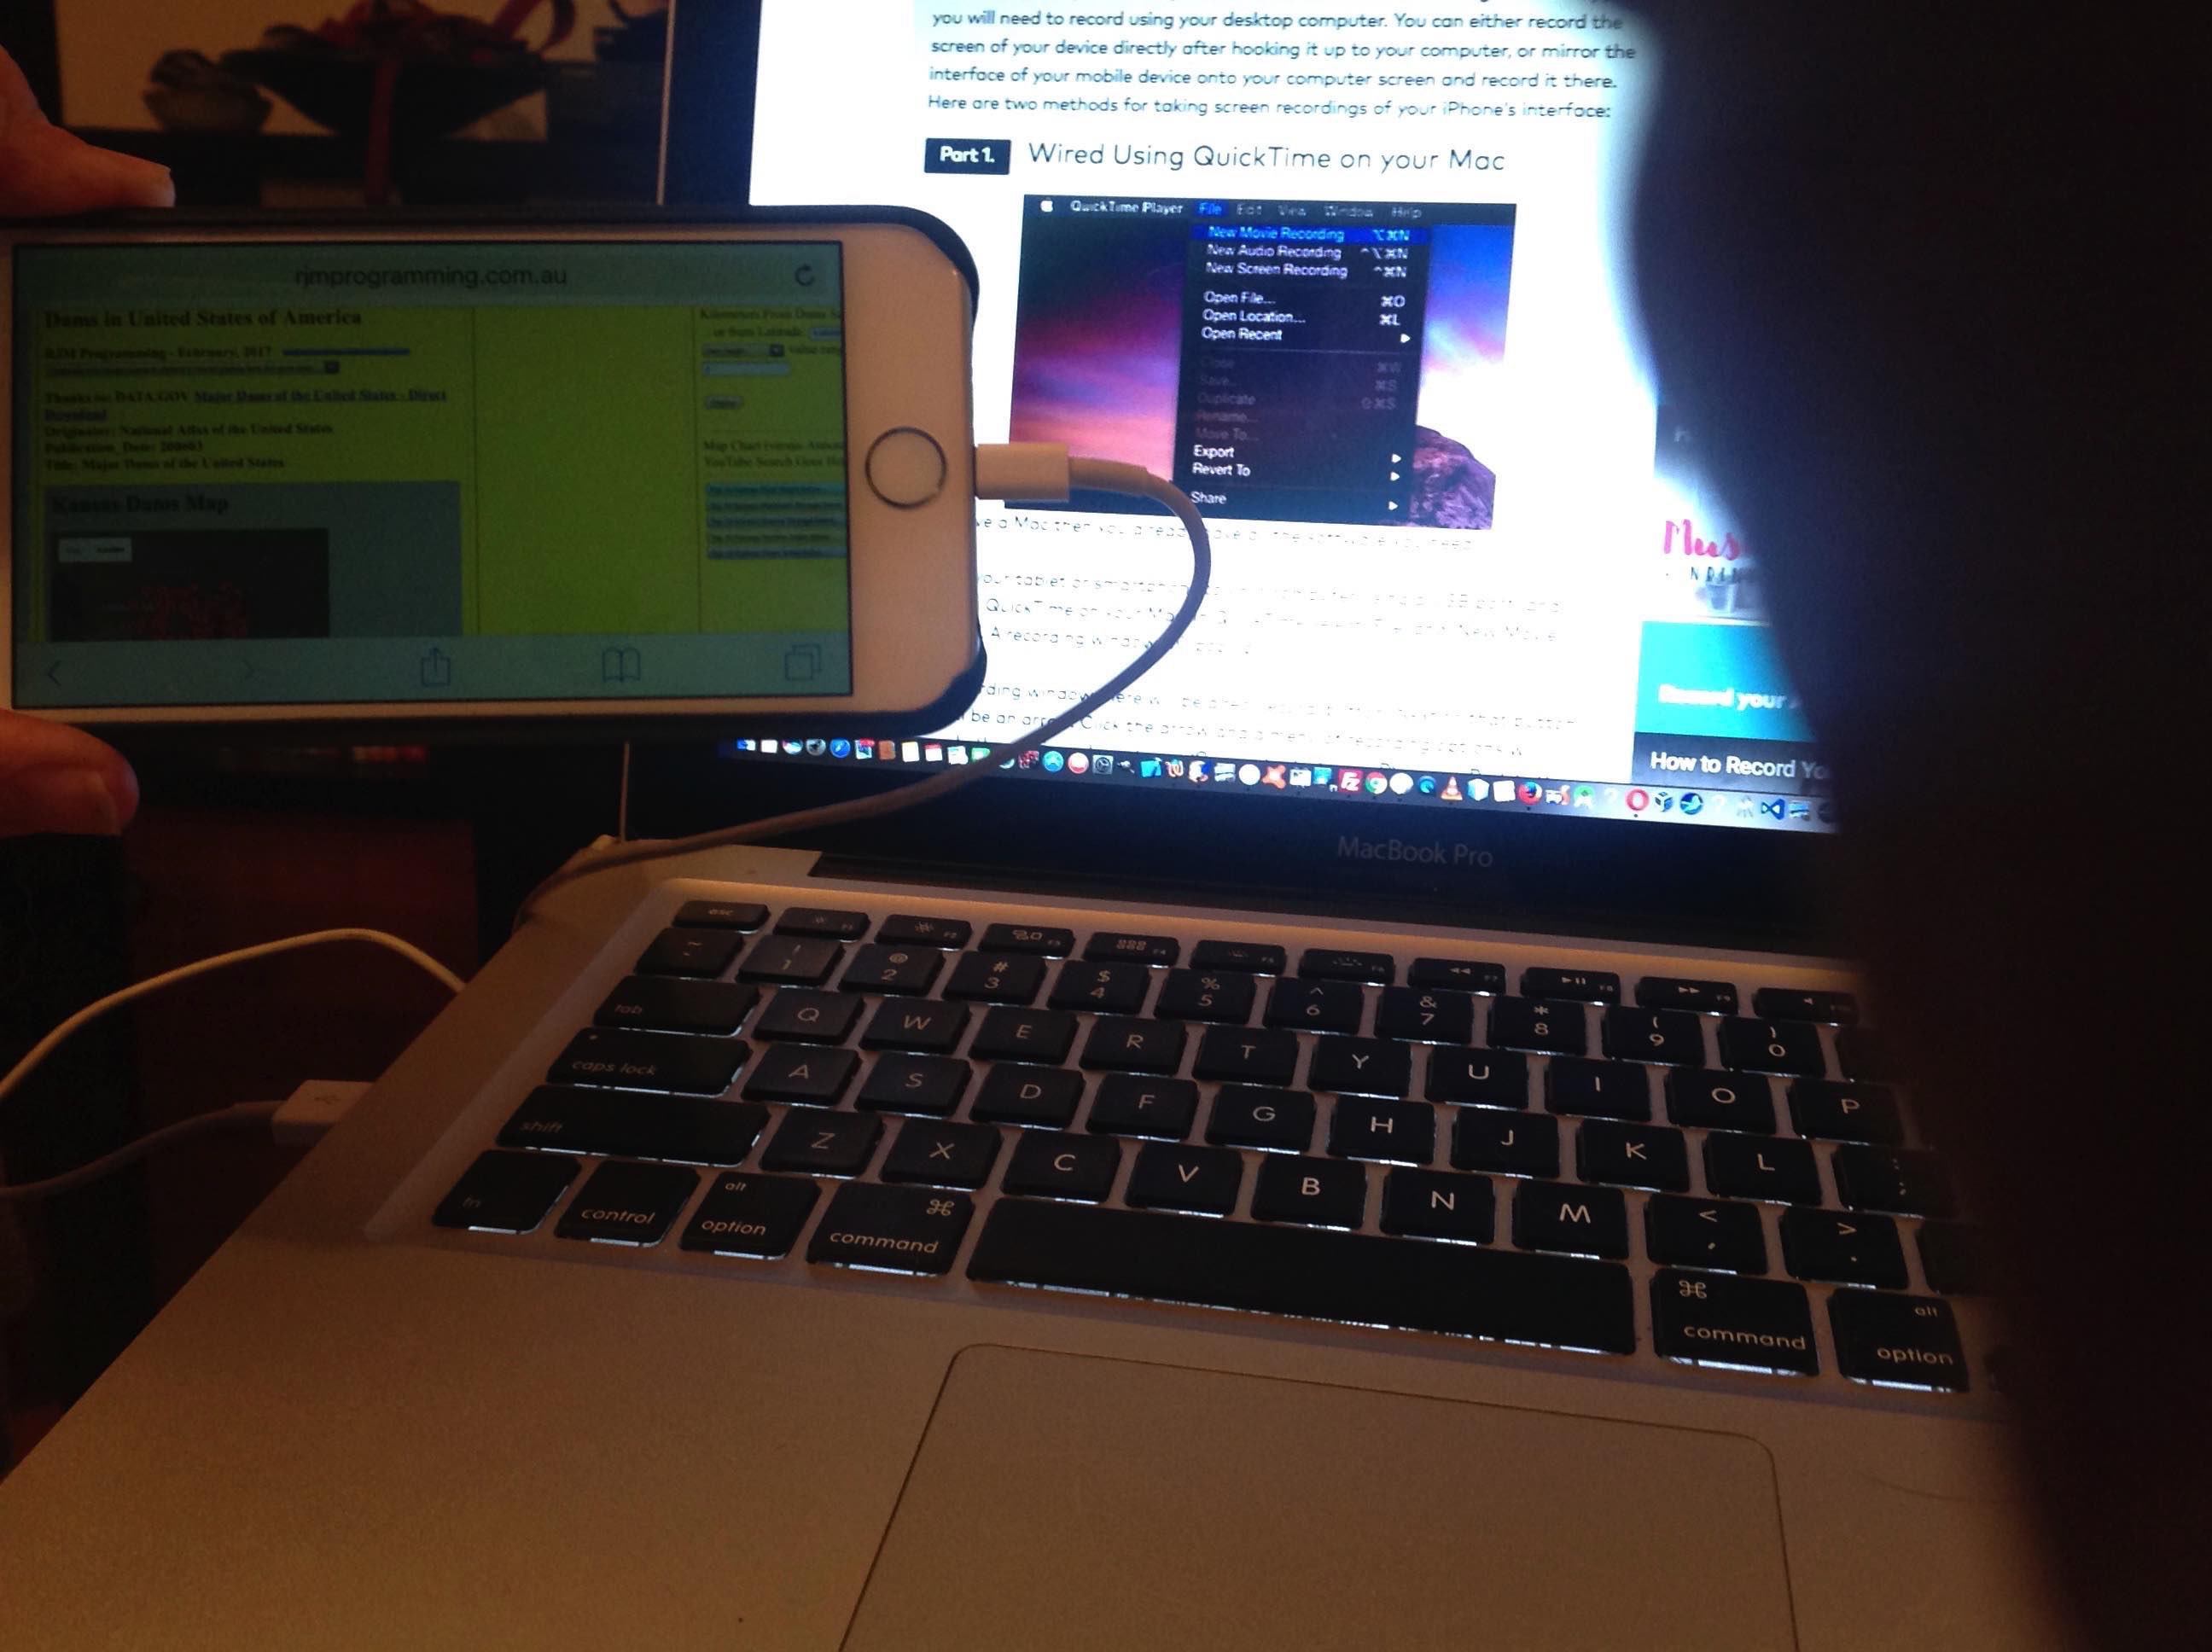
Yesterday’s audio track added to the non-audio video of an iPad recording a movie of the screen and keyboard goings-on of a MacBook Pro, that we showed with Apple Dual Recording Dual Device Audio Tutorial as shown below, panned out to be far too quiet. Today we remedy that weakness by involving a microphone with the creation of the Audio Track to the video. We’ve talked about external microphone usage before when we presented WebEx Presentation with Microphone Tutorial, and back then, that external microphone definitely was the difference between “incommunicado” and “very good communication”.
Again, the QuickTime Player can help out here both with …
- creating a new Audio Track (déjà vu (barring the red new bits) with lots of the steps at Apple Dual Recording Dual Device Audio Tutorial) …
- Get MacBook Pro
- Open desktop application QuickTime Player
- File -> Open Recent dual_recording_cropped.m4v … but don’t start playing it yet
- File -> New Audio Recording
- Position the “reb blob” audio recording window out of the way of dual_recording_cropped.m4v’s play window …
- plug in your microphone and speakers to a USB port
- make sure, in System Preferences that the Input microphone line has almost maximum volume, otherwise it won’t do much of a better job than the inbuilt microphone of the MacBook Pro
- click the dropdown (arrow) to the right of the reb blob and pick USB audio CODEC to use the plugged in microphone, and click Maximal quality
… ready (with your quick reflexes?) - Be quick with all of …
- Click Play “arrow” button in dual_recording_cropped.m4v’s play window
- Click “red blob” … and talk to (the MacBook Pro’s default audio recording functionality) synchronize your words with what is going on with the non-audio video (still playing)
- When dual_recording.m4v’s play window plays to the end of the non-audio video that is relevant to your audio track, choose QuickTime Player (menu) -> Quit QuickTime Player
- Save to dual_recording_cropped_audio.m4a … taking a note of how long (in seconds) this Audio Track is
… as well as …
- that audio being loud enough now to hear for writing a transcript, and on to writing a YouTube Subtitles file to create Closed Captions on the resultant YouTube clip …
Transcript YouTube Subtitles file We’ve returned to our blog posting.
We copy and paste a previous blog posting from WordPress into a TextWrangler document.
Here we are going Command-A to select all, Command-C to copy at the WordPress blog.
And over here we position the cursor in the TextWrangler document and go Command-V to paste.
Thanks, bye.0:00:00.000,0:00:04.000
We’ve returned to our blog posting.0:00:04.000,0:00:11.000
We copy and paste a previous blog posting from WordPress into a TextWrangler document.0:00:11.000,0:00:18.000
Here we are going Command-A (to select all), Command-C (to copy) at the WordPress blog.0:00:18.000,0:00:26.000
And over here we position the cursor in the TextWrangler document and go Command-V (to paste).0:00:26.000,0:00:30.000
Thanks, bye.
Later we upload the resultant audio/video to YouTube, that you can see below.
Upload the file at the right, above, into the YouTube Channel Video Manager’s Closed Caption’s area of functionality to make the closed captions happen, as you can see and try below.
We hope it is food for thought for a presentation task you have on your plate.
Previous relevant Apple Dual Recording Dual Device Audio Tutorial is shown below.
The non-audio video resulting out of yesterday’s Apple Dual Recording Dual Device Cropped Tutorial, as shown below, could have done with …
- an audio track
- some “video cropping” (to delete some spurious parts at the end)
… so with those aims in mind we first looked up regarding “overlaying” an audio track to an existant non-audio video, hopefully (on a MacBook Pro) with (the stupendous) QuickTime Player, and yes, that is possible, thanks (and led to that second “video cropping” aim) …
- Get MacBook Pro
- Open desktop application QuickTime Player
- File -> Open Recent dual_recording_cropped.m4v … but don’t start playing it yet
- File -> New Audio Recording
- Position the “reb blob” audio recording window out of the way of dual_recording_cropped.m4v’s play window … ready (with your quick reflexes?)
- Be quick with all of …
- Click Play “arrow” button in dual_recording_cropped.m4v’s play window
- Click “red blob” … and talk to (the MacBook Pro’s default audio recording functionality) synchronize your words with what is going on with the non-audio video (still playing)
- When dual_recording.m4v’s play window plays to the end of the non-audio video that is relevant to your audio track, choose QuickTime Player (menu) -> Quit QuickTime Player
- Save to dual_recording_cropped_audio.m4a … taking a note of how long (in seconds) this Audio Track is
- Reopen desktop application QuickTime Player
- File -> Open File… dual_recording_cropped_audio.m4a (audio file saved above)
- Click into dual_recording_cropped_audio.m4a’s window and choose Edit -> Copy
- File -> Open Recent dual_recording_cropped.m4v
- Click into dual_recording_cropped.m4v’s window and choose Edit -> Add Clip to End…
- Play (via the Play “arrow” button) to satisfy yourself of synchronization, and when happy click Trim button to add this Audio Track to the existant non-audio video
- Choose QuickTime Player (menu) -> Quit QuickTime Player
- Save to dual_recording_cropped_audio.mov
- Reopen desktop application QuickTime Player
- File > Export to iPad,iPhone,iPod touch & Apple TV.. export from .mov to .m4v video format)
- If you weren’t going on to the next session, you may, now , consider, uploading to YouTube via File -> Share to YouTube … but we continue on with “video cropping” steps below because we want to get rid of some spurious bits of video (and now audio) at the end of the presentation, so …
… which are the “an audio track” steps, which we, optionally, follow up with the “video cropping” ideas (that we returned to this link for advice from) …
- Be on, or get MacBook Pro
- As required, be in or open desktop application QuickTime Player
- File -> Open Recent dual_recording_cropped_audio.m4v … that resulted from steps above
- Edit -> Trim…
- With that “taking a note of how long (in seconds) this Audio Track is” advice of above as a guide, perhaps, remember the advice from link above …
A yellow frame will appear in the playback control bar. You can grab the ends of the frame and position the ends where you want the clip to start and stop. You can click on the “play” arrow to review.
… and, for us, we’ll be stopping it (at a timing) a bit longer than the length of that Audio Track length (in seconds)
- Click the Trim button when happy
- File > Export to iPad,iPhone,iPod touch & Apple TV.. export from .mov to .m4v video format)
- Upload to YouTube via File -> Share to YouTube … resulting in this uploaded YouTube audio/video
We hope you get some documentation and/or presentation ideas from today’s tutorial outlining the addition of an audio track to an existant non-audio video, and the “video cropping” work we did. Tomorrow we need to improve on the quality (or lack thereof) of that first draft (attempt at an) audio track, that you can also see play out … chortle, chortle … at Apple Dual Recording Dual Device Audio Tutorial.
Previous relevant Apple Dual Recording Dual Device Cropped Tutorial is shown below.
The video resulting out of yesterday’s Apple Dual Recording Dual Device Primer Tutorial, as shown below, could have done with some …
- “visual cropping” … in other words, in our non-audio video recording, “crop” what the video is showing up the top regarding Sydney’s rainy weather that day … a job at first, looking online, got us confused with …
- “video cropping” … which the excellent link points you to QuickTime Player’s Edit -> Trim… option … to alter the recording start and/or end (video) timings
… and lined us up with the excellent link that re-engaged us with a piece of functionality we’d already registered in passing, but needed somebody to push us into the “lateral thinking” required, thanks.
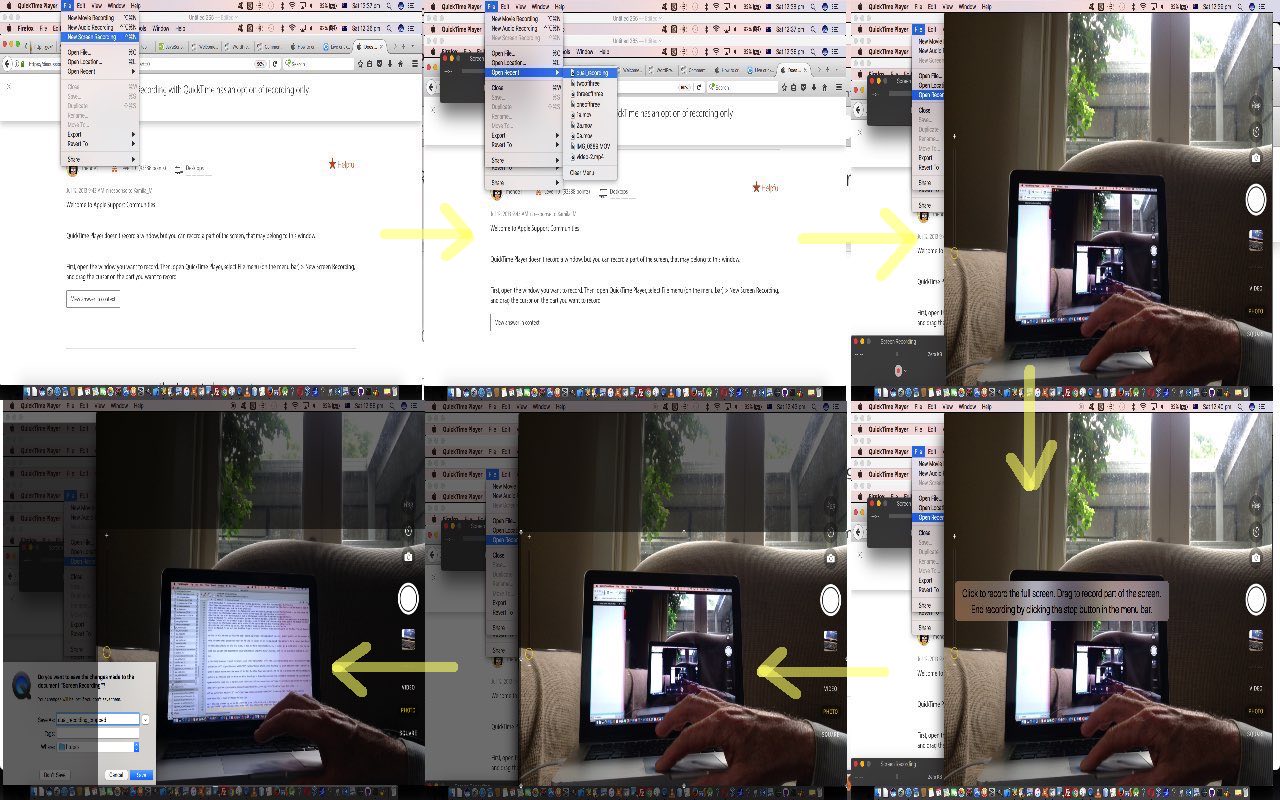
That “lateral thinking” idea still had us using QuickTime Player …
- Get MacBook Pro
- Open desktop application QuickTime Player
- File -> Open Recent dual_recording.m4v … but don’t start playing it yet
- File -> New Screen Recording
- Position the “red blob” recording window out of the way of dual_recording.m4v’s play window … ready (with your quick reflexes?)
- Be quick with all of …
- Click Play “arrow” button in dual_recording.m4v’s play window
- Click “red blob” … and overlayed on dual_recording.m4v’s play window will be
“Click to record the full screen. Drag to record part of the screen.
End recording by clicking the stop button in the menu bar.” - Take that advice (except we do a different closing method), and drag a window starting at the left at a height just above the setee and down to the bottom right of dual_recording.m4v’s play window
- When dual_recording.m4v’s play window plays to the end of the non-audio video, choose QuickTime Player (menu) -> Quit QuickTime Player
- Save to dual_recording_cropped.mov
- Reopen desktop application QuickTime Player
- File > Export to iPad,iPhone,iPod touch & Apple TV.. export from .mov to .m4v video format)
- Upload to YouTube via File -> Share to YouTube … resulting in this uploaded YouTube video
We hope you get some documentation and/or presentation ideas, cropping wise, from QuickTime Player (on Mac OS X today) in today’s tutorial, that you can also see at Apple Dual Recording Dual Device Cropped Tutorial.
Stop Press
A sneak peek for tomorrow shows us adding a (yet to be improved, first draft) audio track, and “video cropping” that audio/video presentation result to weed out the spurious parts of the video (and, as far as timing goes (and is guided by that first try at the audio track) agrees with the audio) at its end …
Previous relevant Apple Dual Recording Dual Device Primer Tutorial is shown below.
Recently, with YouTube iPhone Screen Recording via QuickTime Player Primer Tutorial as shown below, we discovered the incredibly useful inter-device Movie Recording “red blob” dropdown functionality of the QuickTime Player desktop application, that we use on a MacBook Pro using Mac OS X. That last time we used this functionality we were using it with an iPhone connected to the MacBook Pro via one of those very useful Apple white leads that are also used when recharging the iPhone. All that aspect to today’s idea of usage is the same, except that this time we are connecting to an Apple iPad tablet instead.
This time around, (dual) recording a procedure on the MacBook Pro that needs more than Screen Capture, but rather real life Movie Recording to get the gist, we are using …
- Get MacBook Pro
- Open desktop application QuickTime Player
- Get iPad
- Open the Camera app
- Connect the iPad to the MacBook Pro using an Apple white lead
- The desktop application iTunes may open on the MacBook Pro and you can Cancel any Sync or Download ideas presented, as you see fit
- On the MacBook Pro in the QuickTime Player desktop application, choose File -> New Movie Recording
- Pulldown the dropdown to the right of the “red blob” recording button, and select that iPad (which is called “Robert’s iPad) for either/both of Camera and Audio selections (and today we select “Robert’s iPad” just for Camera)
- At the iPad Camera app, pick the Video option
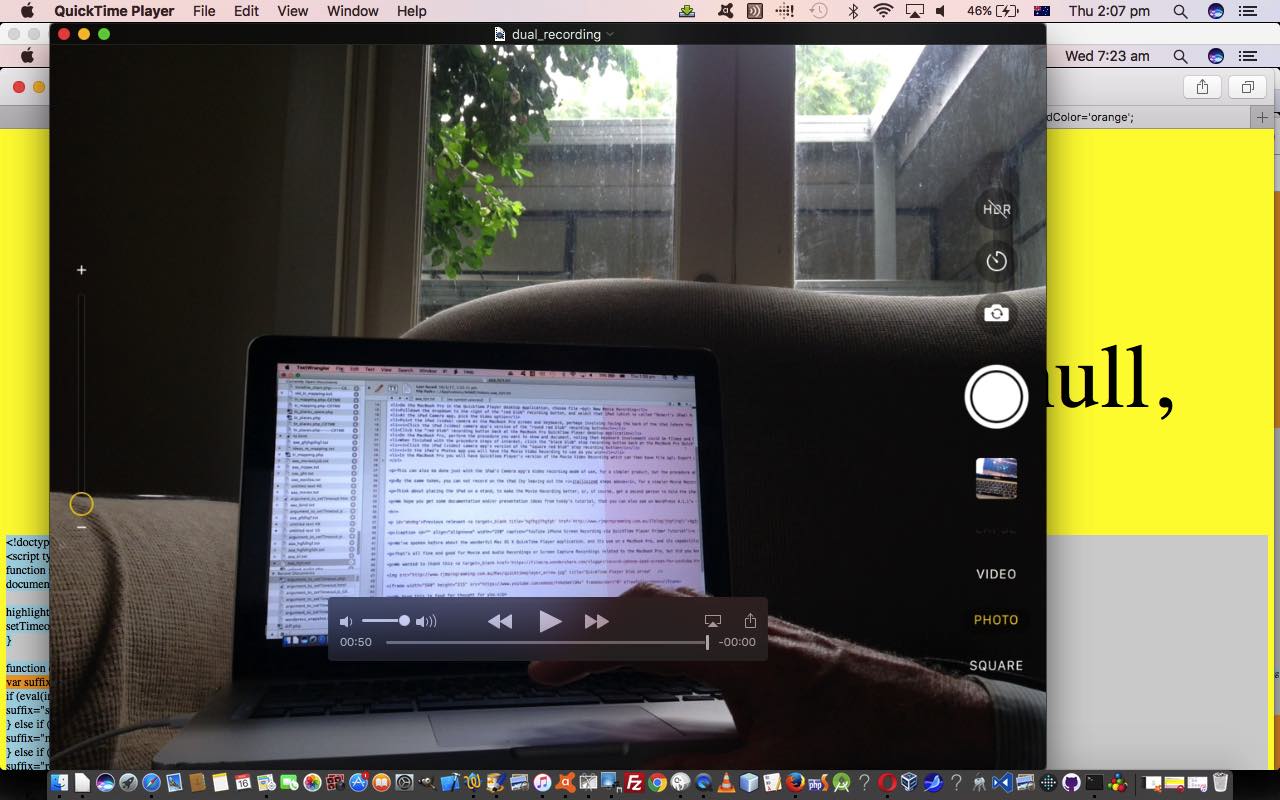
- Point the iPad (video) camera at the MacBook Pro screen and keyboard, perhaps involving facing the back of the iPad (where the camera is) to face the MacBook Pro
- Click the iPad (video) camera app’s version of the “round red blob” recording button
- Click the “red blob” recording button back at the MacBook Pro QuickTime Player desktop application
- On the MacBook Pro, perform the procedure you want to show and document, noting that keyboard involvement could be filmed and be relevant, as well as what shows on the MacBook Pro’s screen
- When finished with the procedure steps of interest, click the “black blob” stop recording button back at the MacBook Pro QuickTime Player desktop application
- Click the iPad (video) camera app’s version of the “square red blob” stop recording button
- In the iPad’s Photos app you will have the Movie Video Recording to use as you wish
- In the MacBook Pro you will have QuickTime Player’s version of the Movie Video Recording which can then have File > Export output it in a better variety of ways, including to the MacBook Pro’s iTunes application, and this or the Movie Recording on the iPad could be sent to YouTube, as required
This can also be done just with the iPad’s Camera app’s Video recording mode of use, for a simpler product, but the procedure above has greater Export possibilities (as you can see regarding the “much reduced in file size” (less than a sixth of the size)) presentation (of us plugging in the blog posting content of that previous blog posting into the TextWrangler editing session of us piecing together today’s blog posting, illustrating Mac OS X keyboard Select All (via Command A), Copy (via Command C) and Paste (via Command V)) today, which is an example of File > Export to iPad,iPhone,iPod touch & Apple TV.. export from .mov to .m4v video format) because of the interface established to the QuickTime Player MacBook Pro desktop application.
By the same token, you can not record on the iPad, by leaving out the itallicized steps above, for a simpler Movie Recording product that ends up just existing on the MacBook Pro’s QuickTime Player application, as we did with today’s presentation.
Think about placing the iPad on a stand, to make the Movie Recording better, as we did with today’s presentation, or, of course, get a second person to hold the iPad (video) camera, to record.
We hope you get some documentation and/or presentation ideas from today’s tutorial.
Stop Press
Tomorrow we “visually” crop (not the other “crop”) this video, and share on YouTube, a sneak peek being …
Previous relevant YouTube iPhone Screen Recording via QuickTime Player Primer Tutorial is shown below.
We’ve spoken before about the wonderful Mac OS X QuickTime Player application, and its use on a MacBook Pro, and its capabilities to upload videos to YouTube.
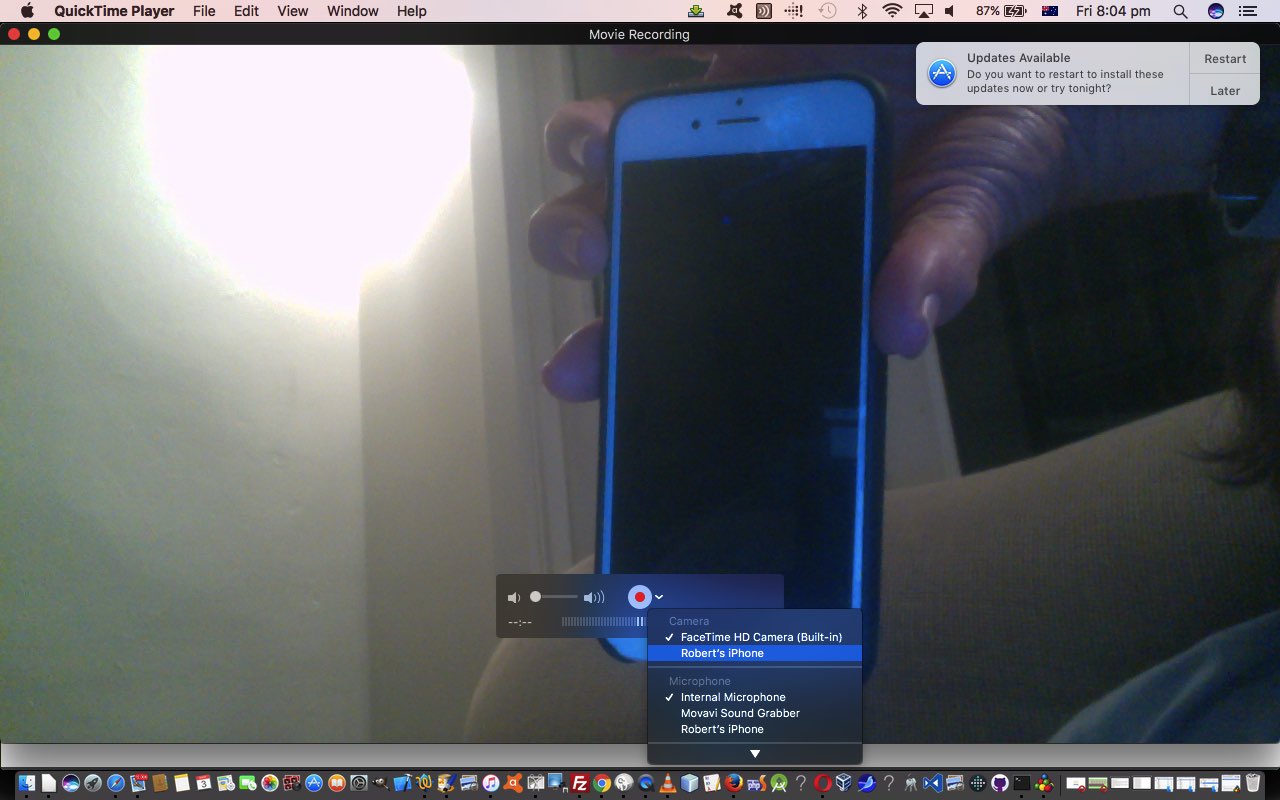
That’s all fine and good for Movie and Audio Recordings or Screen Capture Recordings related to the MacBook Pro, but did you know you can Screen Capture an iPhone (or iPad) by using a Mac USB white lead hooked up from the MacBook Pro to that other device, in our case an iPhone 6. So we record a session playing the Target Word Game you can read more about at PHP Target Word Game Mobile Friendly Tutorial.
We wanted to thank this great link, thanks, for the idea to use QuickTime Player for this job, never having used that arrow next to the red recording “blob” before. Makes me want to re-view The Blob in case I missed some useful subliminally embedded arrow.
We hope this is food for thought for you.
If this was interesting you may be interested in this too.
If this was interesting you may be interested in this too.
If this was interesting you may be interested in this too.
If this was interesting you may be interested in this too.
If this was interesting you may be interested in this too.

