Lots of websites have a menu of options somewhere near to the top of their landing pages (and the others that follow), to put the navigable parts of the website close to the user’s attention. So you definitely see those major options up above the “fold” (in web design parlance) … and that is great. The other thing people who surf the net (on laptops or desktops, and even though the hover event is not a mobile device thing, the innards of WordPress are helping it work for mobile devices as well) often instinctively do, is to hover over those menus looking to see if there are any submenus coming off those menus, and “gettable toable” without having clicked (or touched) anything yet. These submenus are a win-win for everybody in a lot of ways, because the user may be interested in that functionality, and the web designer can fit more functionality in without overcrowding the look of the web design.
In WordPress, and here we are specifically exemplifying the “Twenty Ten” theme used for this WordPress Blog website, it is a pretty simple procedure to add a submenu (or dropdown menu) …
- Log on as the Administrator using the Meta Menu option “Site Admin” over to the right (of the WordPress “Twenty Ten” theme, anyway) and down the bottom
- Hover over Page icon and pick “Add New Page” option (this type of work is the essence of CMS (Content Management System) … your easier way of “uploading” content to your blog (or forum or whatever))
- Make sure the viewing option tag is set to “HTML”, rather than “Visual” … it’s easier to learn some HTML
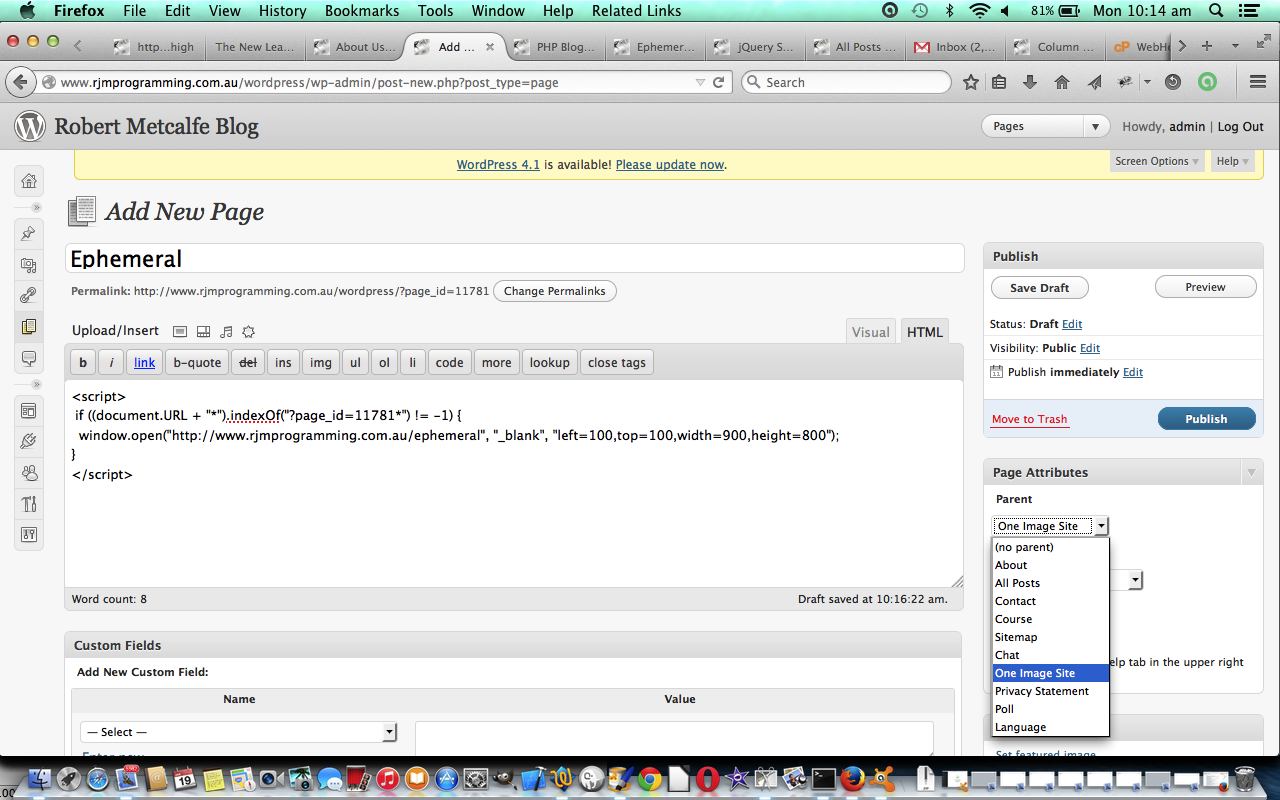
- Enter in a good submenu webpage Title … after a bit you get underneath that title a message from WordPress … example for our pictured “Ephemeral” submenu is “Permalink: http://www.rjmprogramming.com.au/wordpress/?page_id=11781”
- At right in Page Attributes section with the Parent dropdown we pick “One Image Site” as the parent menu under which we want to see “Ephemeral” … by the way, the order of this versus the next step is not important …
- Now you have the job of putting in content, which is up to you, but for “Ephemeral” we want to navigate directly to “Ephemeral” webpages with a popup window, so we use blog page code (note how the 11781 is used) like …
<script>

 if ((document.URL + "*").indexOf("?page_id=11781*") != -1) {

  window.open("http://www.rjmprogramming.com.au/ephemeral", "_blank", "left=100,top=100,width=900,height=800");

}

</script>
- Click or touch the Publish button … and voila, “Ephemeral” appears as a workable submenu (or dropdown menu)
In a way, personally, dropdowns are good for this same basic reason of maximising information for the least amount of space. Whether overcrowding is not your “scene” will determine your feelings on this subject … perhaps you’d like to read about diagonally cut sandwiches while you think about it?
Hope you get something out of our tutorial today, and please note that any self-respecting CMS platform (or other WordPress theme other than “Twenty Ten”) will be able to do this same functionality, as it is commonly asked for by the web design community.
If this was interesting you may be interested in this too.


