As we intimated yesterday with Gimp Guides to HTML Primer Tutorial regarding the GIMP image editor’s “Filter -> Web” menu …
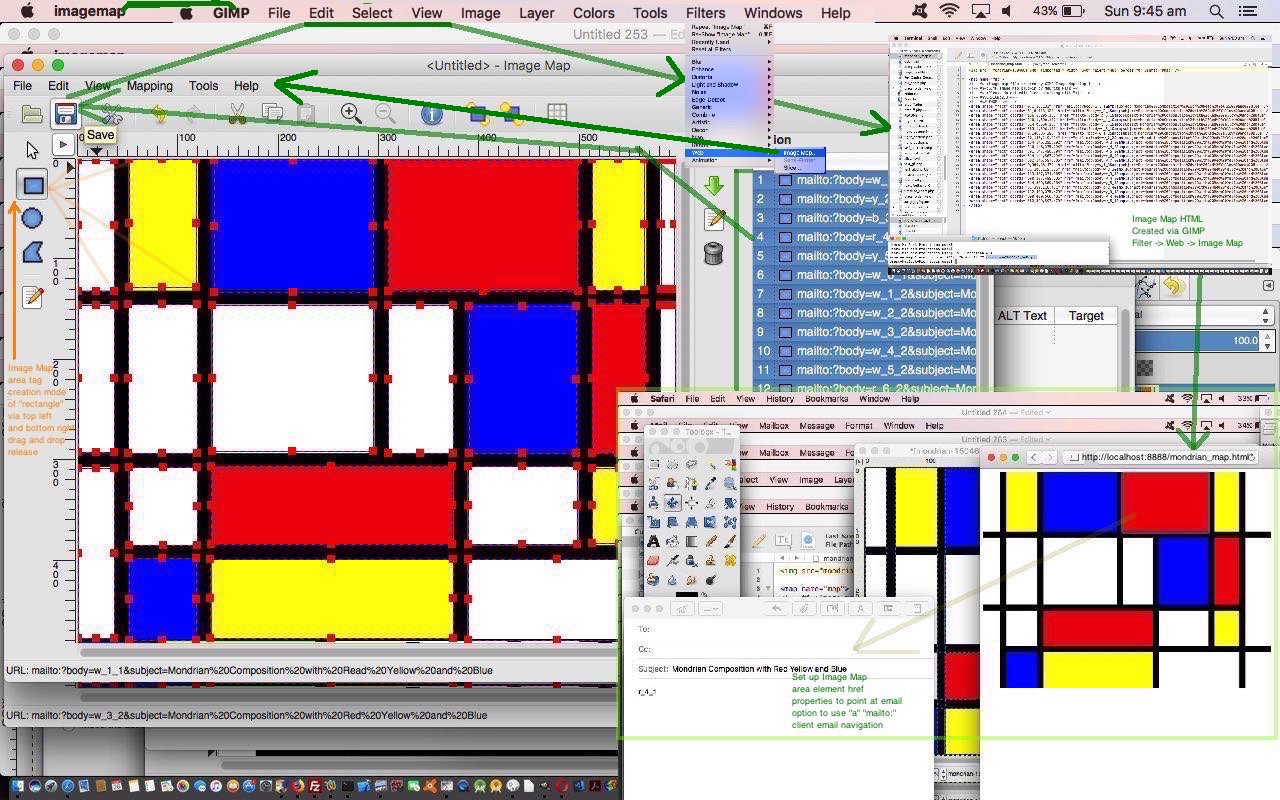
… you would also see an “Image Map” option helping out in a similar fashion to the stupendous mobilefish functionality.
… and so we are here today to show you how that functionality works via a PDF slideshow for your perusal. There are options to shape what goes into the resultant HTML’s map element’s area (as rectangle or ellipse or polygon) tag href property link types as per …
… as a very extensive ideas list on top of options to define event logic for …
- onmouseover
- onmouseout
- onfocus
- onblur
… and that there is the option to define exact co-ordinates, and to define the alt attribute and HTML iframe name as applicable, also.
We’ll leave you with the resultant HTML we had GIMP create for us as a result of the goings on in that PDF slideshow (noting that the only adjustment to HTML in out TextWrangler editing session was to point at the image img element src attribute location properly), and we hope this is of benefit for you …
<img src="mondrian-1504681_640.jpg" width="640" height="480" border="0" usemap="#map" />


<map name="map">

<!-- #$-:Image map file created by GIMP Image Map plug-in -->

<!-- #$-:GIMP Image Map plug-in by Maurits Rijk -->

<!-- #$-:Please do not edit lines starting with "#$" -->

<!-- #$VERSION:2.3 -->

<!-- #$AUTHOR:User -->

<area shape="rect" coords="0,1,36,132" href="mailto:?body=w_1_1&subject=Mondrian%20Composition%20with%20Read%20Yellow%20and%20Blue" />

<area shape="rect" coords="51,0,118,128" href="mailto:?body=y_2_1&subject=Mondrian%20Composition%20with%20Red%20Yellow%20and%20Blue" />

<area shape="rect" coords="136,1,295,133" href="mailto:?body=b_3_1&subject=Mondrian%20Composition%20with%20Red%20Yellow%20and%20Blue" />

<area shape="rect" coords="310,1,500,132" href="mailto:?body=r_4_1&subject=Mondrian%20Composition%20with%20Red%20Yellow%20and%20Blue" />

<area shape="rect" coords="514,0,566,131" href="mailto:?body=y_5_1&subject=Mondrian%20Composition%20with%20Red%20Yellow%20and%20Blue" />

<area shape="rect" coords="583,1,596,130" href="mailto:?body=w_6_1&subject=Mondrian%20Composition%20with%20Red%20Yellow%20and%20Blue" />

<area shape="rect" coords="0,146,36,293" href="mailto:?body=w_1_2&subject=Mondrian%20Composition%20with%20Red%20Yellow%20and%20Blue" />

<area shape="rect" coords="50,145,119,294" href="mailto:?body=w_2_2&subject=Mondrian%20Composition%20with%20Red%20Yellow%20and%20Blue" />

<area shape="rect" coords="134,146,295,292" href="mailto:?body=w_3_2&subject=Mondrian%20Composition%20with%20Red%20Yellow%20and%20Blue" />

<area shape="rect" coords="310,146,375,294" href="mailto:?body=w_4_2&subject=Mondrian%20Composition%20with%20Red%20Yellow%20and%20Blue" />

<area shape="rect" coords="391,147,498,294" href="mailto:?body=w_5_2&subject=Mondrian%20Composition%20with%20Red%20Yellow%20and%20Blue" />

<area shape="rect" coords="514,144,567,294" href="mailto:?body=r_6_2&subject=Mondrian%20Composition%20with%20Red%20Yellow%20and%20Blue" />

<area shape="rect" coords="582,146,597,385" href="mailto:?body=w_7_2&subject=Mondrian%20Composition%20with%20Red%20Yellow%20and%20Blue" />

<area shape="rect" coords="0,309,36,479" href="mailto:?body=w_1_3&subject=Mondrian%20Composition%20with%20Red%20Yellow%20and%20Blue" />

<area shape="rect" coords="51,308,119,386" href="mailto:?body=w_2_3&subject=Mondrian%20Composition%20with%20Red%20Yellow%20and%20Blue" />

<area shape="rect" coords="133,307,374,385" href="mailto:?body=r_3_3&subject=Mondrian%20Composition%20with%20Red%20Yellow%20and%20Blue" />

<area shape="rect" coords="390,307,499,385" href="mailto:?body=w_4_3&subject=Mondrian%20Composition%20with%20Red%20Yellow%20and%20Blue" />

<area shape="rect" coords="514,309,569,384" href="mailto:?body=y_5_3&subject=Mondrian%20Composition%20with%20Red%20Yellow%20and%20Blue" />

<area shape="rect" coords="51,399,118,481" href="mailto:?body=b_2_4&subject=Mondrian%20Composition%20with%20Red%20Yellow%20and%20Blue" />

<area shape="rect" coords="132,400,375,479" href="mailto:?body=y_3_4&subject=Mondrian%20Composition%20with%20Red%20Yellow%20and%20Blue" />

<area shape="rect" coords="390,400,568,481" href="mailto:?body=w_4_4&subject=Mondrian%20Composition%20with%20Red%20Yellow%20and%20Blue" />

<area shape="rect" coords="582,399,597,479" href="mailto:?body=w_5_4&subject=Mondrian%20Composition%20with%20Red%20Yellow%20and%20Blue" />

</map>
Previous relevant Gimp Guides to HTML Primer Tutorial is shown below.
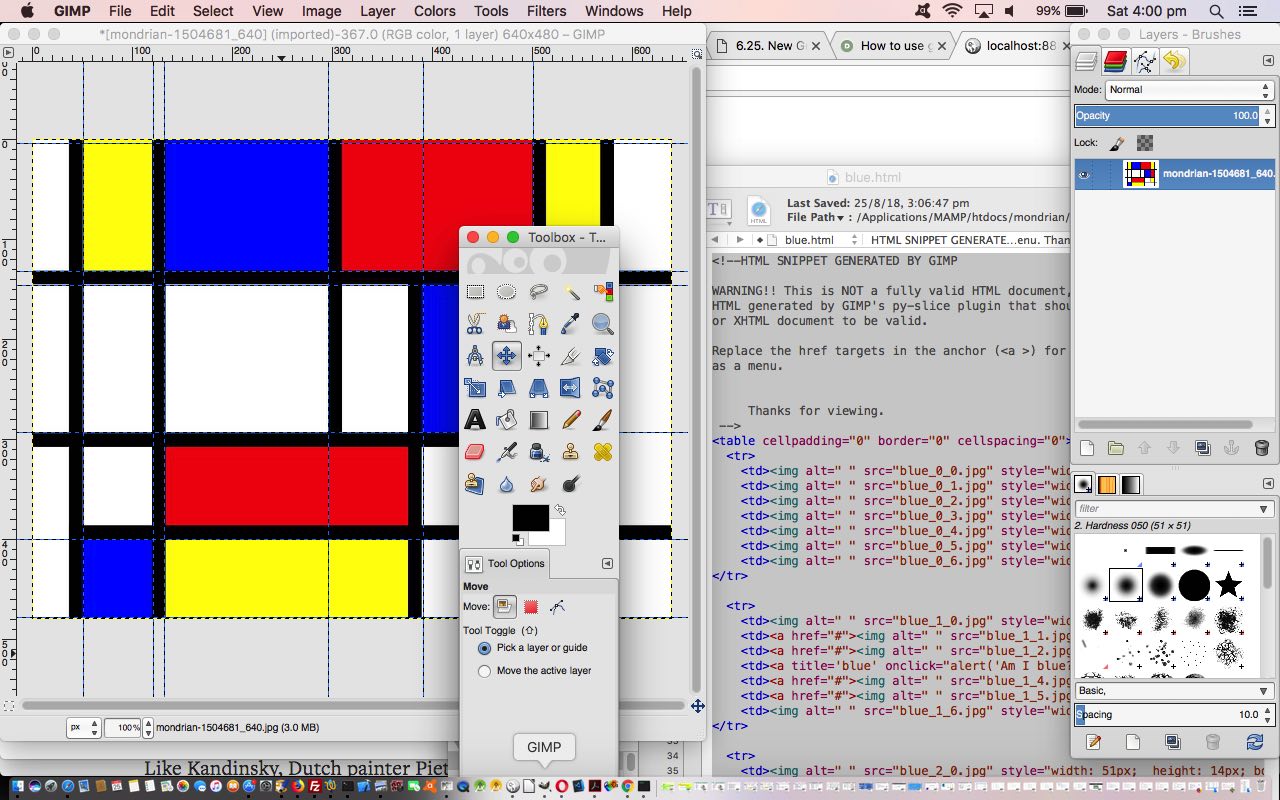
The great GIMP image editor has several ways to create Guides, which are the precursor to being able to break an image into component parts via “Image -> Transform -> Guillotine” or the more enticing, for those web developers out there, “Filter -> Web -> Slice” which effectively does what Guillotine does and writes out some HTML in the form of an HTML table element that includes some “a” link opportunities to do something special for individual images of the new “image jigsaw” surrounded by Guides. Within the options of that last menu you would also see an “Image Map” option helping out in a similar fashion to the stupendous mobilefish functionality.
With this in mind, we almost immediately thought of the great Piet Mondrian and his rectangle paintings in primary colours, wondering if by now you could get image downloads of his work, given he died some time ago now. And yes, there at this Pixabay webpage, thanks, we were able to do that and download an image version of “Composition with Red Yellow and Blue” to open with GIMP.
Which ways, then, in GIMP, can you create Guides?
- precise Horizontal or Vertical position specification in pixels (via Image -> Guides -> New Guide…) or percentage (via Image -> Guides -> New Guide (by Percent)…) values
- position via a Selection (via Image -> Guides -> New Guides from Selection) … and today’s method of choice …
- user long hover then drag of the rulers at the top and left for dynamic Horizontal and Vertical Guides respectively
Best for this is that you can see us doing this with YouTube video we made for the purpose on our MacBook Pro using QuickTime Player “File -> New Screen Recording” resultant presentation you can play below.
… and the resultant HTML code snippet, including our bits, produced looked like …
<!--HTML SNIPPET GENERATED BY GIMP


WARNING!! This is NOT a fully valid HTML document, it is rather a piece of

HTML generated by GIMP's py-slice plugin that should be embedded in an HTML

or XHTML document to be valid.


Replace the href targets in the anchor (<a >) for your URLS to have it working

as a menu.


     Thanks for viewing.

 -->

<table cellpadding="0" border="0" cellspacing="0">

  <tr>

    <td><img alt=" " src="blue_0_0.jpg" style="width: 51px;  height: 4px; border-width: 0px;"></td>

    <td><img alt=" " src="blue_0_1.jpg" style="width: 70px;  height: 4px; border-width: 0px;"></td>

    <td><img alt=" " src="blue_0_2.jpg" style="width: 11px;  height: 4px; border-width: 0px;"></td>

    <td><img alt=" " src="blue_0_3.jpg" style="width: 164px;  height: 4px; border-width: 0px;"></td>

    <td><img alt=" " src="blue_0_4.jpg" style="width: 95px;  height: 4px; border-width: 0px;"></td>

    <td><img alt=" " src="blue_0_5.jpg" style="width: 110px;  height: 4px; border-width: 0px;"></td>

    <td><img alt=" " src="blue_0_6.jpg" style="width: 139px;  height: 4px; border-width: 0px;"></td>

</tr>

  <tr>

    <td><img alt=" " src="blue_1_0.jpg" style="width: 51px;  height: 128px; border-width: 0px;"></td>

    <td><a href="#"><img alt=" " src="blue_1_1.jpg"  style="width: 70px; height: 128px; border-width: 0px;"></a></td>

    <td><a href="#"><img alt=" " src="blue_1_2.jpg"  style="width: 11px; height: 128px; border-width: 0px;"></a></td>

    <td><a title='blue' onclick="alert('Am I blue?');" href="#"><img alt=" " src="blue_1_3.jpg"  style="width: 164px; height: 128px; border-width: 0px;"></a></td>

    <td><a href="#"><img alt=" " src="blue_1_4.jpg"  style="width: 95px; height: 128px; border-width: 0px;"></a></td>

    <td><a href="#"><img alt=" " src="blue_1_5.jpg"  style="width: 110px; height: 128px; border-width: 0px;"></a></td>

    <td><img alt=" " src="blue_1_6.jpg" style="width: 139px;  height: 128px; border-width: 0px;"></td>

</tr>

  <tr>

    <td><img alt=" " src="blue_2_0.jpg" style="width: 51px;  height: 14px; border-width: 0px;"></td>

    <td><a href="#"><img alt=" " src="blue_2_1.jpg"  style="width: 70px; height: 14px; border-width: 0px;"></a></td>

    <td><a href="#"><img alt=" " src="blue_2_2.jpg"  style="width: 11px; height: 14px; border-width: 0px;"></a></td>

    <td><a href="#"><img alt=" " src="blue_2_3.jpg"  style="width: 164px; height: 14px; border-width: 0px;"></a></td>

    <td><a href="#"><img alt=" " src="blue_2_4.jpg"  style="width: 95px; height: 14px; border-width: 0px;"></a></td>

    <td><a href="#"><img alt=" " src="blue_2_5.jpg"  style="width: 110px; height: 14px; border-width: 0px;"></a></td>

    <td><img alt=" " src="blue_2_6.jpg" style="width: 139px;  height: 14px; border-width: 0px;"></td>

</tr>

  <tr>

    <td><img alt=" " src="blue_3_0.jpg" style="width: 51px;  height: 147px; border-width: 0px;"></td>

    <td><a href="#"><img alt=" " src="blue_3_1.jpg"  style="width: 70px; height: 147px; border-width: 0px;"></a></td>

    <td><a href="#"><img alt=" " src="blue_3_2.jpg"  style="width: 11px; height: 147px; border-width: 0px;"></a></td>

    <td><a href="#"><img alt=" " src="blue_3_3.jpg"  style="width: 164px; height: 147px; border-width: 0px;"></a></td>

    <td><a href="#"><img alt=" " src="blue_3_4.jpg"  style="width: 95px; height: 147px; border-width: 0px;"></a></td>

    <td><a title='Blue' onclick="alert('Am i Blue?');" href="#"><img alt=" " src="blue_3_5.jpg"  style="width: 110px; height: 147px; border-width: 0px;"></a></td>

    <td><img alt=" " src="blue_3_6.jpg" style="width: 139px;  height: 147px; border-width: 0px;"></td>

</tr>

  <tr>

    <td><img alt=" " src="blue_4_0.jpg" style="width: 51px;  height: 107px; border-width: 0px;"></td>

    <td><a href="#"><img alt=" " src="blue_4_1.jpg"  style="width: 70px; height: 107px; border-width: 0px;"></a></td>

    <td><a href="#"><img alt=" " src="blue_4_2.jpg"  style="width: 11px; height: 107px; border-width: 0px;"></a></td>

    <td><a href="#"><img alt=" " src="blue_4_3.jpg"  style="width: 164px; height: 107px; border-width: 0px;"></a></td>

    <td><a href="#"><img alt=" " src="blue_4_4.jpg"  style="width: 95px; height: 107px; border-width: 0px;"></a></td>

    <td><a href="#"><img alt=" " src="blue_4_5.jpg"  style="width: 110px; height: 107px; border-width: 0px;"></a></td>

    <td><img alt=" " src="blue_4_6.jpg" style="width: 139px;  height: 107px; border-width: 0px;"></td>

</tr>

  <tr>

    <td><img alt=" " src="blue_5_0.jpg" style="width: 51px;  height: 78px; border-width: 0px;"></td>

    <td><a title='BLUE' onclick="alert('Am i BLUE?');" href="#"><img alt=" " src="blue_5_1.jpg"  style="width: 70px; height: 78px; border-width: 0px;"></a></td>

    <td><a href="#"><img alt=" " src="blue_5_2.jpg"  style="width: 11px; height: 78px; border-width: 0px;"></a></td>

    <td><a href="#"><img alt=" " src="blue_5_3.jpg"  style="width: 164px; height: 78px; border-width: 0px;"></a></td>

    <td><a href="#"><img alt=" " src="blue_5_4.jpg"  style="width: 95px; height: 78px; border-width: 0px;"></a></td>

    <td><a href="#"><img alt=" " src="blue_5_5.jpg"  style="width: 110px; height: 78px; border-width: 0px;"></a></td>

    <td><img alt=" " src="blue_5_6.jpg" style="width: 139px;  height: 78px; border-width: 0px;"></td>

</tr>

  <tr>

    <td><img alt=" " src="blue_6_0.jpg" style="width: 51px;  height: 2px; border-width: 0px;"></td>

    <td><img alt=" " src="blue_6_1.jpg" style="width: 70px;  height: 2px; border-width: 0px;"></td>

    <td><img alt=" " src="blue_6_2.jpg" style="width: 11px;  height: 2px; border-width: 0px;"></td>

    <td><img alt=" " src="blue_6_3.jpg" style="width: 164px;  height: 2px; border-width: 0px;"></td>

    <td><img alt=" " src="blue_6_4.jpg" style="width: 95px;  height: 2px; border-width: 0px;"></td>

    <td><img alt=" " src="blue_6_5.jpg" style="width: 110px;  height: 2px; border-width: 0px;"></td>

    <td><img alt=" " src="blue_6_6.jpg" style="width: 139px;  height: 2px; border-width: 0px;"></td>

</tr>

</table>
We hope you find these GIMP “Slice and Dice” webpage creation ideas of interest.
If this was interesting you may be interested in this too.
If this was interesting you may be interested in this too.


