The tutorial called Multiple Background Image Primer Tutorial, as shown below, dealt with some styling issues to do with the blockquote HTML elements here at this blog.
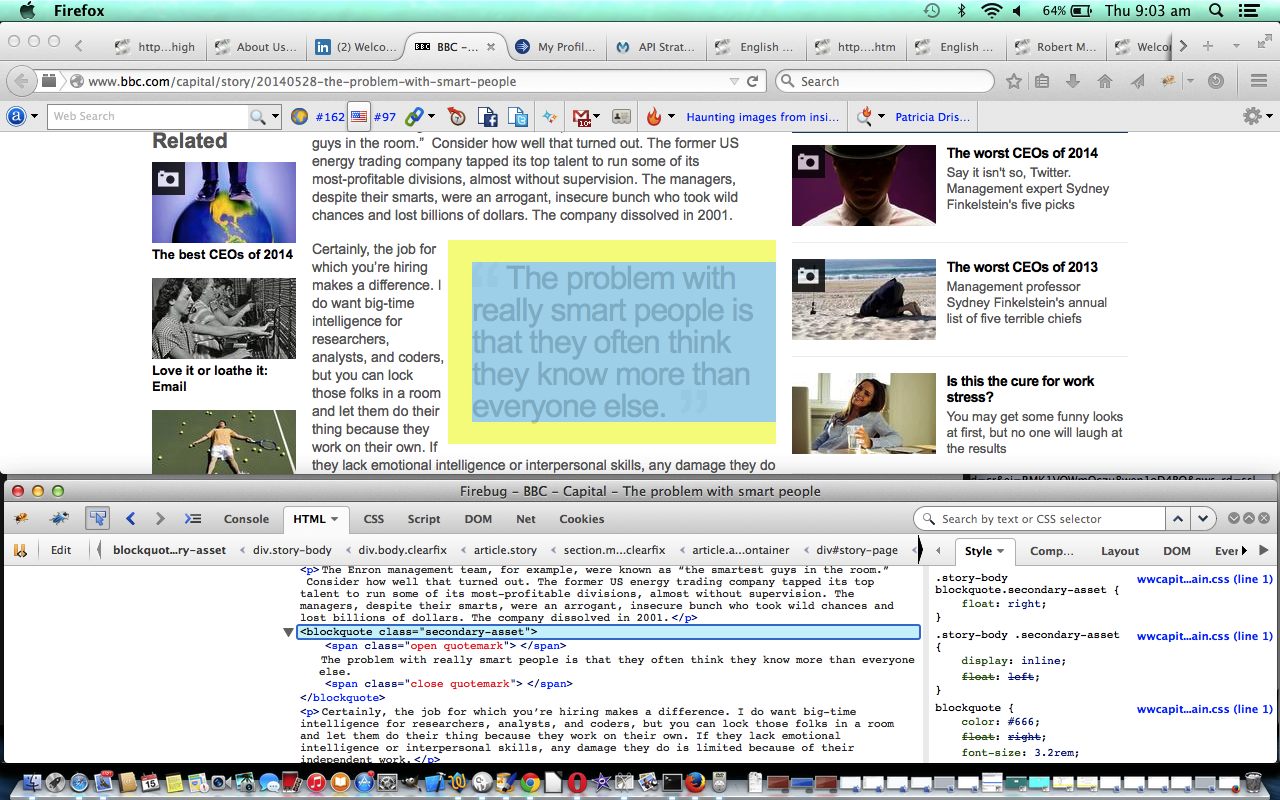
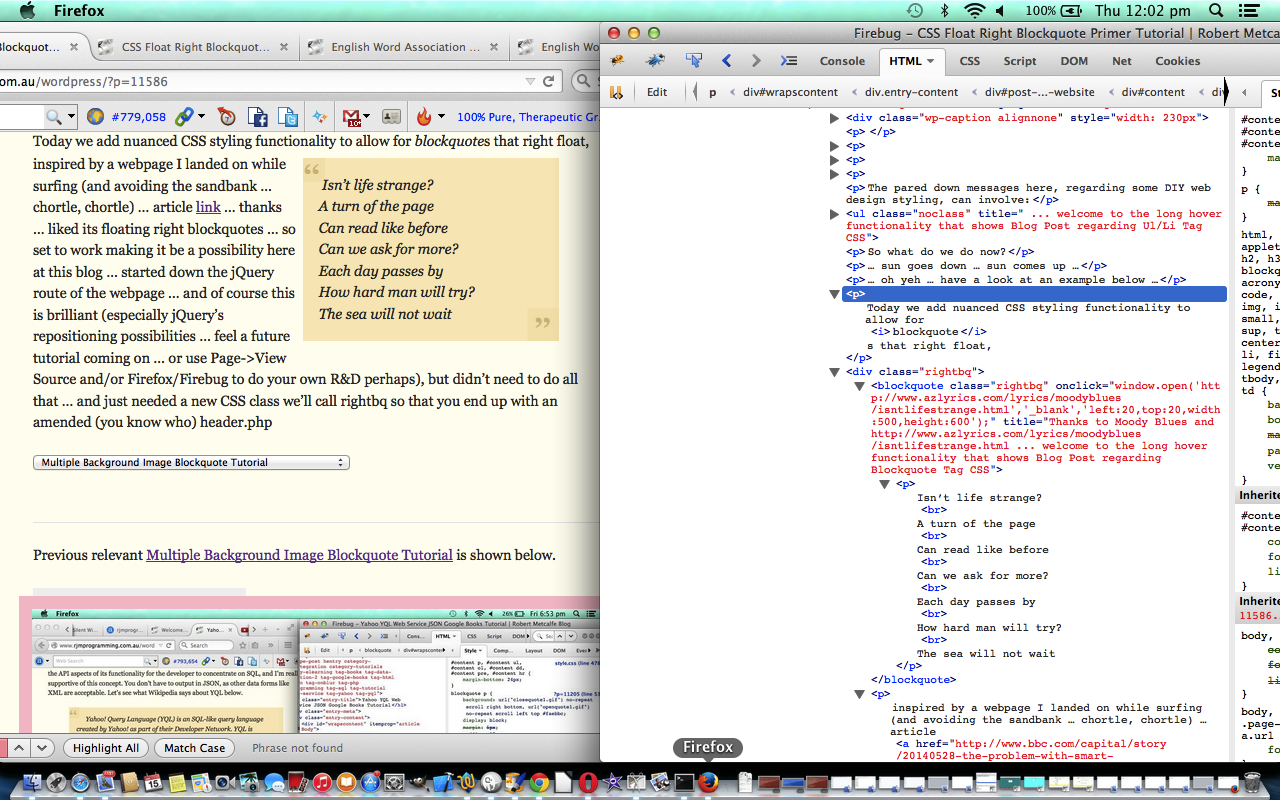
Today we add nuanced CSS styling functionality to allow for blockquotes that float to the right, inspired by a webpage I landed on while surfing (and avoiding the sandbank … chortle, chortle) … article link … thanks … liked its floating right blockquotes … so set to work making it be a possibility here at this blog … started down the jQuery route of the webpage … and of course this is brilliant (especially jQuery’s (conditional) repositioning possibilities … feel a future tutorial coming on … or use Page->View Source and/or Firefox/Firebug to do your own R&D perhaps), but didn’t need to do all that … and just needed a new CSS class we’ll call “rightbq” so that you end up with an amended (you know who) header.php … with bold new …
<style>

...


blockquote.rightbq {

  float: right;

  width: 250px;

}

blockquote.rightbq p {

  display: inline;

  float: right;

  width: 250px;

}

div.rightbq {

  margin-top: -22px;

}


...

</style>
The pared down messages here, regarding some DIY web design styling, can involve:
- identify what you like ( in our case, today, float:right blockquote ) as you surf around (avoiding sandbanks)
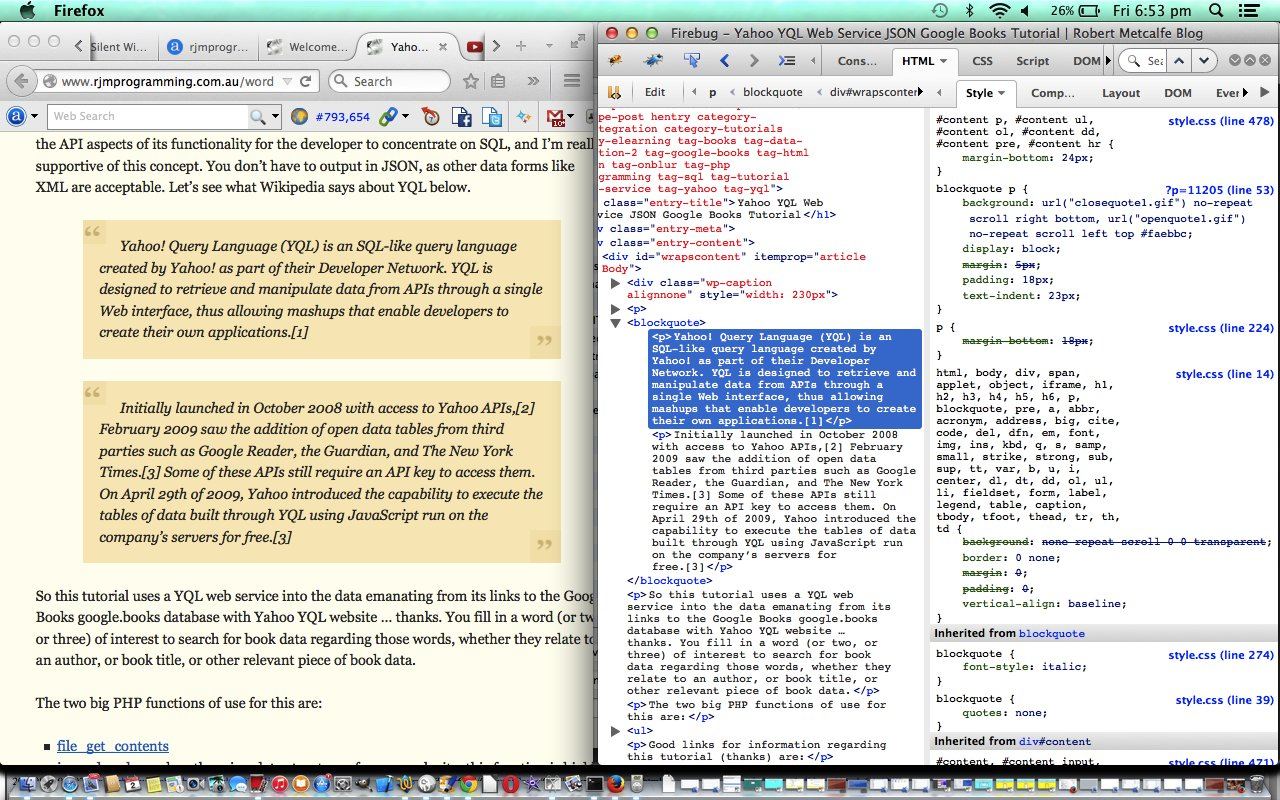
- use Page->View Source and/or Firefox/Firebug to do your own R&D regarding what is going on as per today’s tutorial picture
- if you have your own web server that’s good ( eg. if MAMP create an idea like http://localhost:8888/rightbq.html ), but even if you don’t ( create a rightbq.html that you point at with the web browser’s Open->File functionality ), create some local HTML to (inaccurately … don’t go overboard) piece together the way it might work … doing this, in many incarnations, taught me that the jQuery was not necessary to make it happen
- keep going locally until happy
- apply new logic to whatever your website’s equivalent is for this blog’s header.php … bless its little turquoise socks … (now where are they … Naaaaalaaaaa!)
- deploy to your live website but do not use this new class straight away, but rather test all the other functionality working, and living with the new code, that nothing is being asked of yet
- if all okay in step above, write a blog post using the new class, and test the aesthetics and that it lives okay with other functionality, and that you are happy … aaaaaahhhh
So what do we do now?
… sun goes down … sun comes up …
… oh yeh … have a look at an example below …
Today we add nuanced CSS styling functionality to allow for blockquotes that right float,
Isn’t life strange?
A turn of the page
Can read like before
Can we ask for more?
Each day passes by
How hard man will try?
The sea will not wait
inspired by a webpage I landed on while surfing (and avoiding the sandbank … chortle, chortle) … article link … thanks … liked its floating right blockquotes … so set to work making it be a possibility here at this blog … started down the jQuery route of the webpage … and of course this is brilliant (especially jQuery’s repositioning possibilities … feel a future tutorial coming on … or use Page->View Source and/or Firefox/Firebug to do your own R&D perhaps), but didn’t need to do all that … and just needed a new CSS class we’ll call rightbq so that you end up with an amended (you know who) header.php
Previous relevant Multiple Background Image Blockquote Tutorial is shown below.
Yesterday’s tutorial called Multiple Background Image Primer Tutorial, as shown below, made use of multiple background images. Today we find another use for them.
Today we offer an idea for styling of the HTML blockquote element (at this WordPress blog, for example).
We use separate background images for the opening and closing quote background images we put into play, and before we go further, we must thank the great CSS-Tricks website for this idea which was modified a little for our circumstances.
Think it is good to draw attention to the blockquote because it is usually used when important information is being imparted, and because that information is coming from a source offsite.
This multiple background image idea has great application for some of the “overlay” ideas that web designers often want to put into play. As far as this WordPress blog goes, its header.php changed as per the bold code below …
<style>

.

.

.


blockquote {

  display: block;

  padding: 18px;

  border-top: 1px solid #e1cc89;

  border-bottom: 1px solid #e1cc89;

  margin: 5px;

  text-indent: 4px;

  background: url('closequote1.gif') bottom right no-repeat,url('openquote1.gif') top left no-repeat;

  background-color: #faebbc;

}

blockquote p {

  display: block;

  padding: 18px;

  margin: 5px;

  text-indent: 4px;

  background: url('closequote1.gif') bottom right no-repeat,url('openquote1.gif') top left no-repeat;

  background-color: #faebbc;

}


.

.

.

</style>
Hope this tutorial is useful for you, or somebody with whom you want to share the information, and will leave you with an example, here, at this blog … How do I love thee? Let me count the ways. (Sonnet 43) by Elizabeth Barrett Browning …
How do I love thee? Let me count the ways.
I love thee to the depth and breadth and height
My soul can reach, when feeling out of sight
For the ends of Being and ideal Grace.
I love thee to the level of everyday’s
Most quiet need, by sun and candle-light.
I love thee freely, as men strive for Right;
I love thee purely, as they turn from Praise.
I love thee with the passion put to use
In my old griefs, and with my childhood’s faith.
I love thee with a love I seemed to lose
With my lost saints – I love thee with the breath,
Smiles, tears, of all my life! – and, if God choose,
I shall but love thee better after death.
Previous relevant Multiple Background Image Primer Tutorial is shown below.
The last time we talked about the PHP web application called “Learning Programming” at this blog was with regard to some software integration that linked the “Learning Programming” web and (Android (at Google Play)) mobile application with this Blog web application with Xcode Learning Programming Blog Course Cookies Tutorial as shown below.
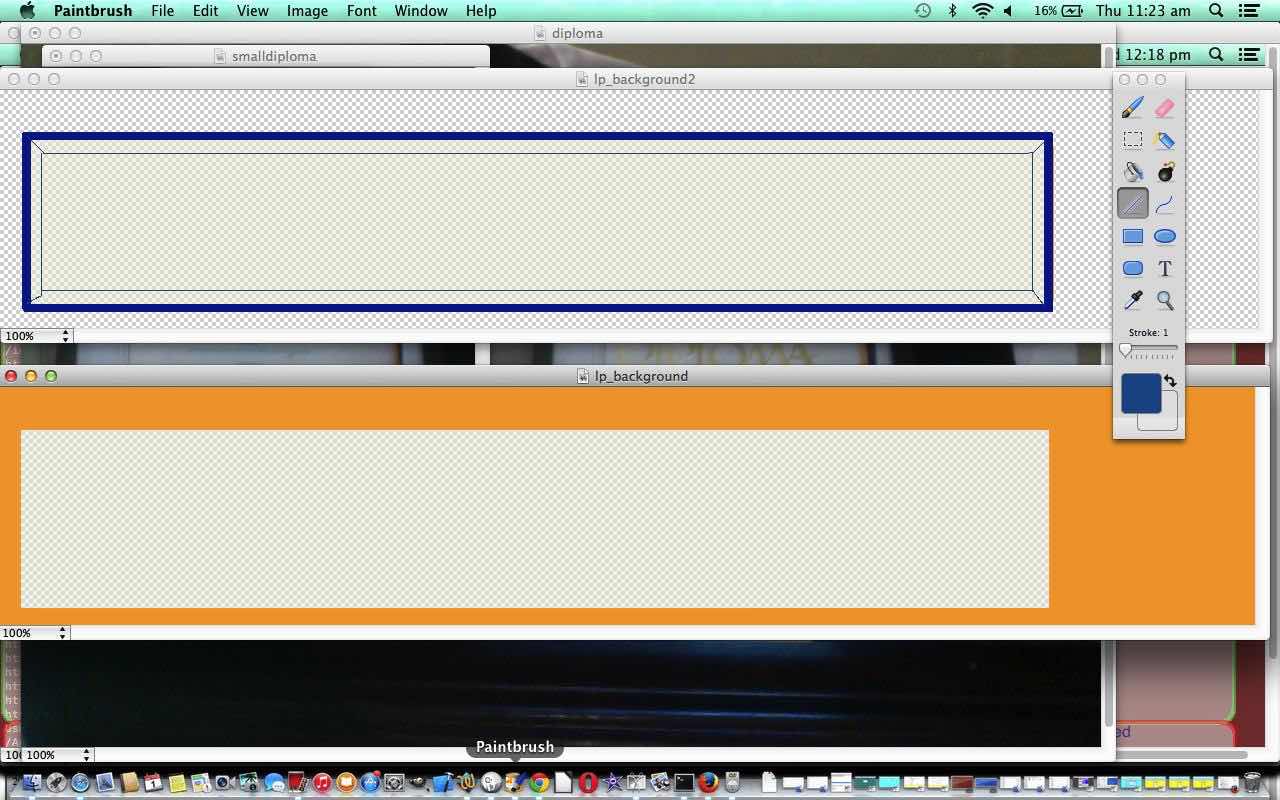
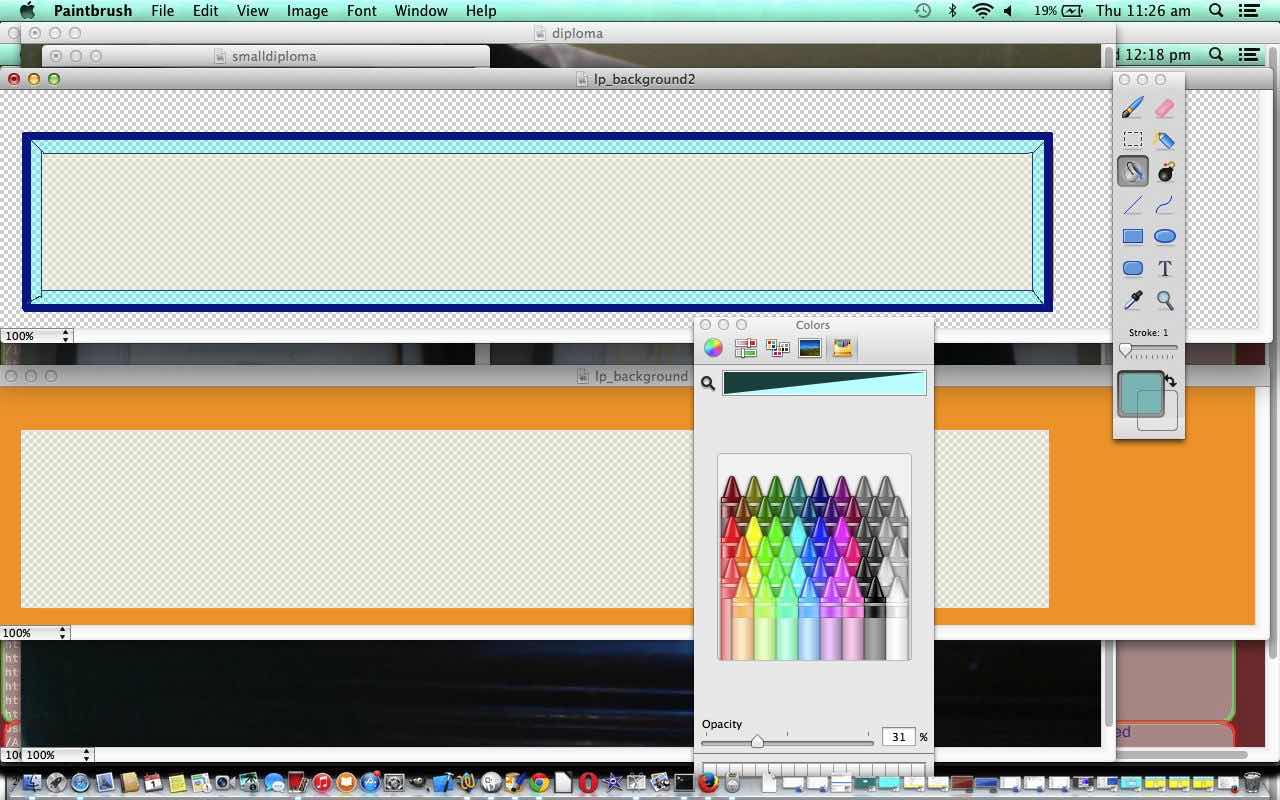
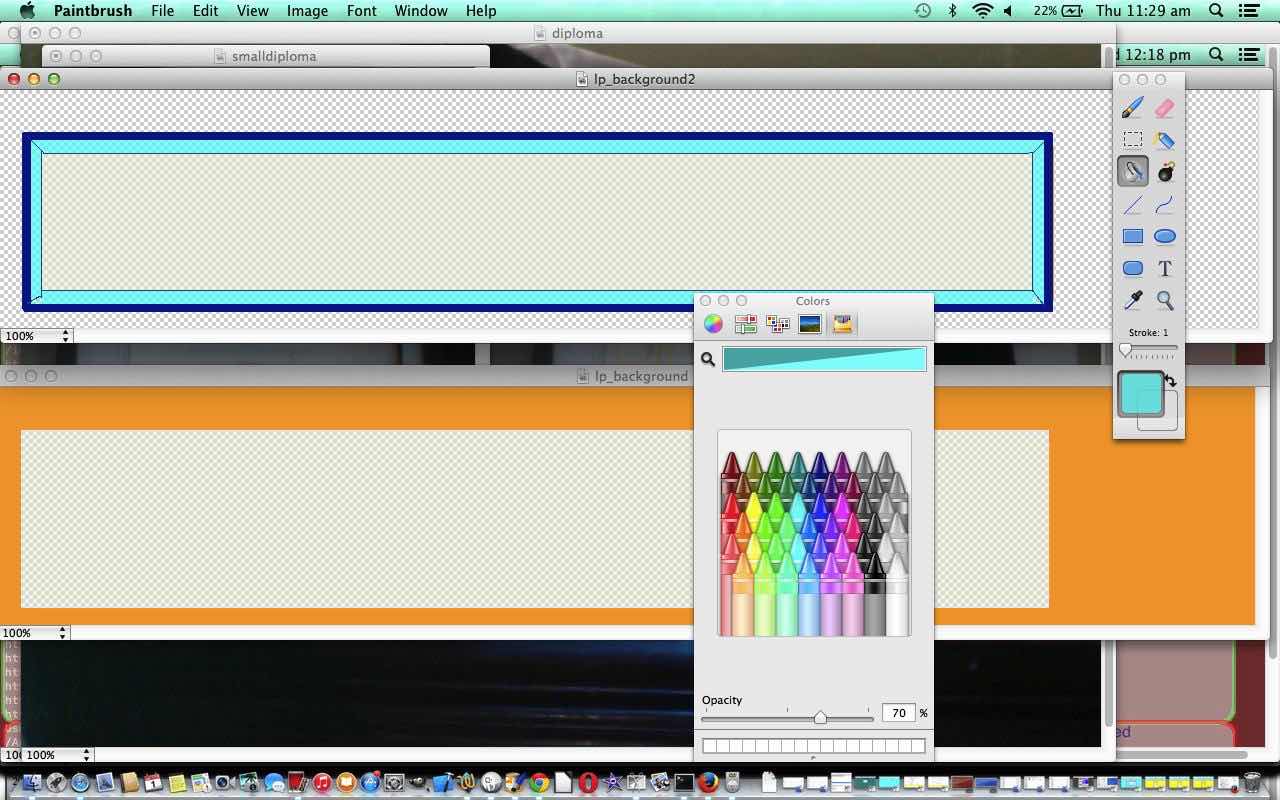
Today we do a bit of CSS working on the “Learning Programming” web and (Android) mobile application to add interest to the top functional area. Firstly thought of doing clipart or real photography to do a diploma border idea, but found that with the latter the mix of realia with stark web functionality was a bit jarring, and, on a first look, didn’t gel with any of the free clip art border image ideas out there, so plumped for a background image to the HTML table element involved, and realized, working with Paintbrush PNG image opacity (before it needs the CSS approach to opacity), that it would be okay to hive off that first image another one with a bit of transparent design to add a hint of educational paperwork to the project. Of course, an expert in graphic design would be throwing many more ideas at this, and implementing a great result, but am, today, showing you how multiple background images can be quite effective and refreshing … aaaaahhhhh.
So the Before 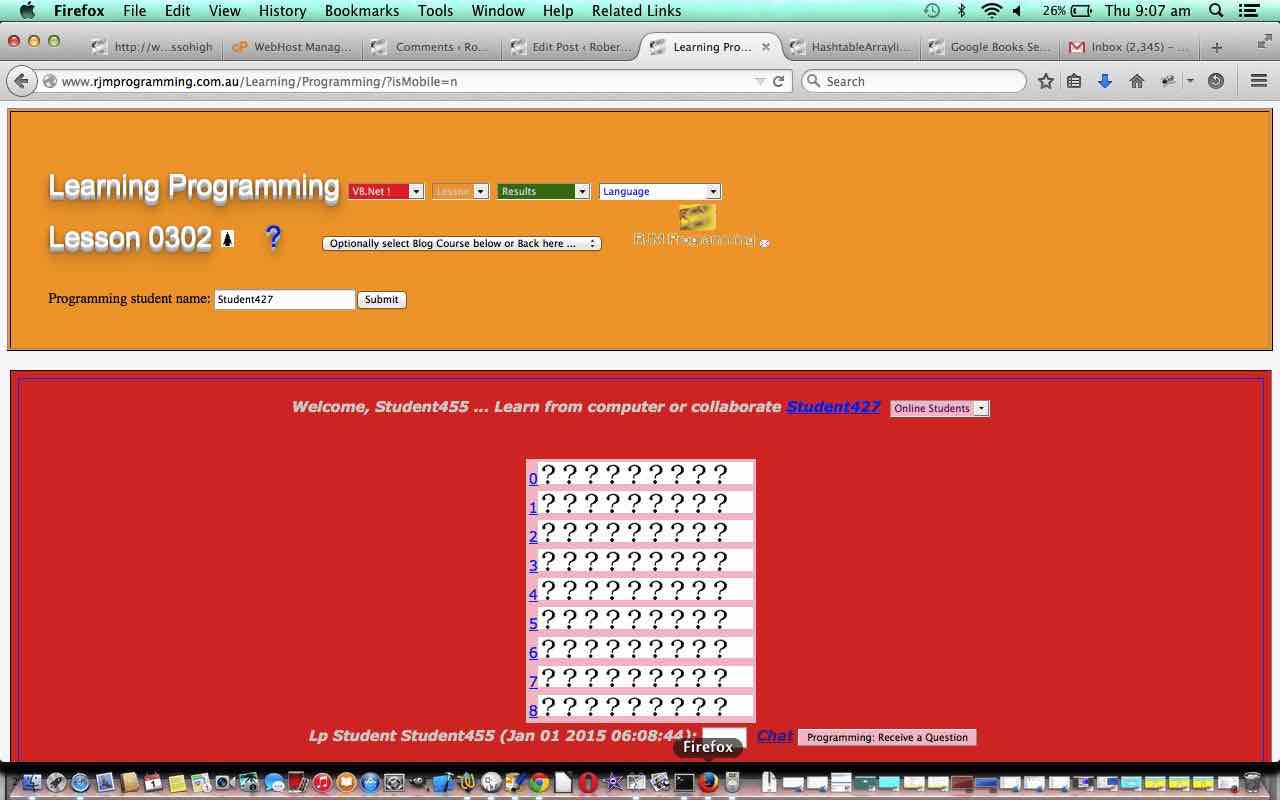 vs
vs 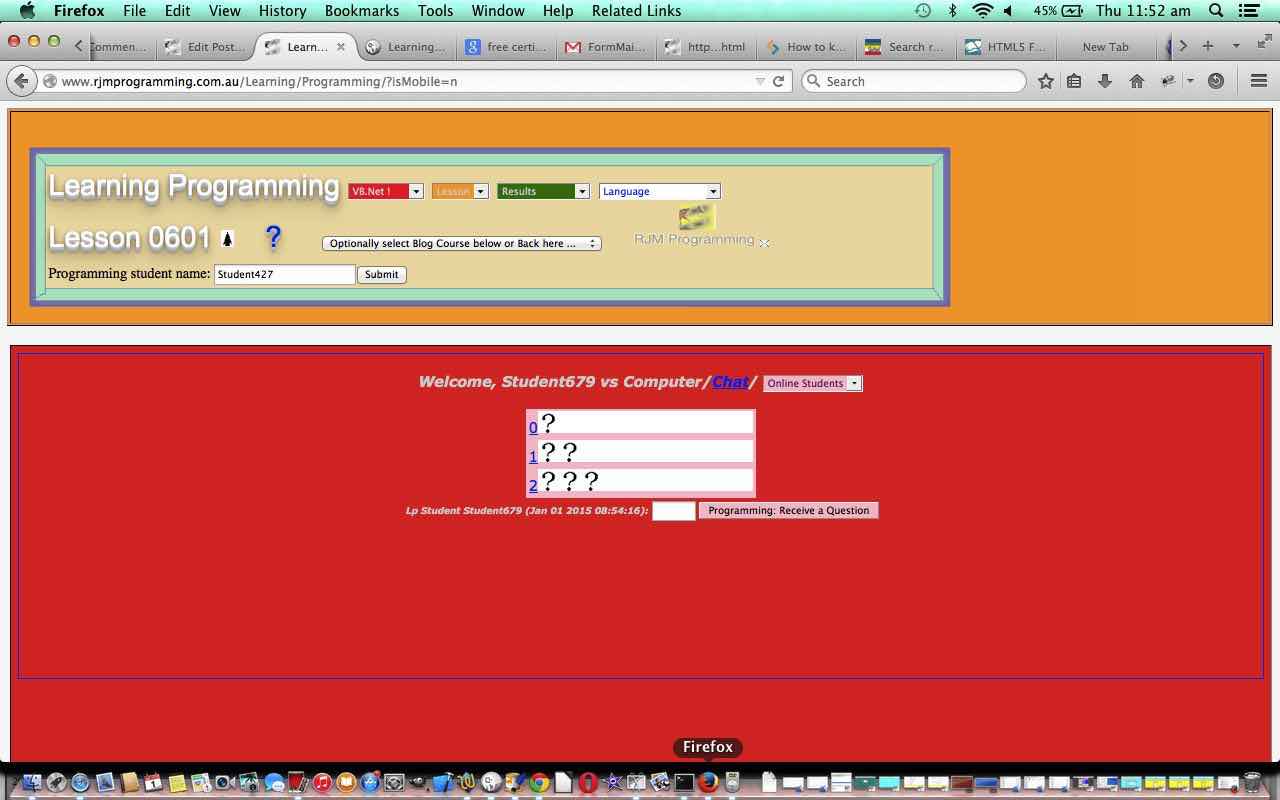 After infomercial today had these steps, roughly:
- Show Before “Learning Programming” in Firefox web browser

- Use Firebug to examine “Learning Programming”
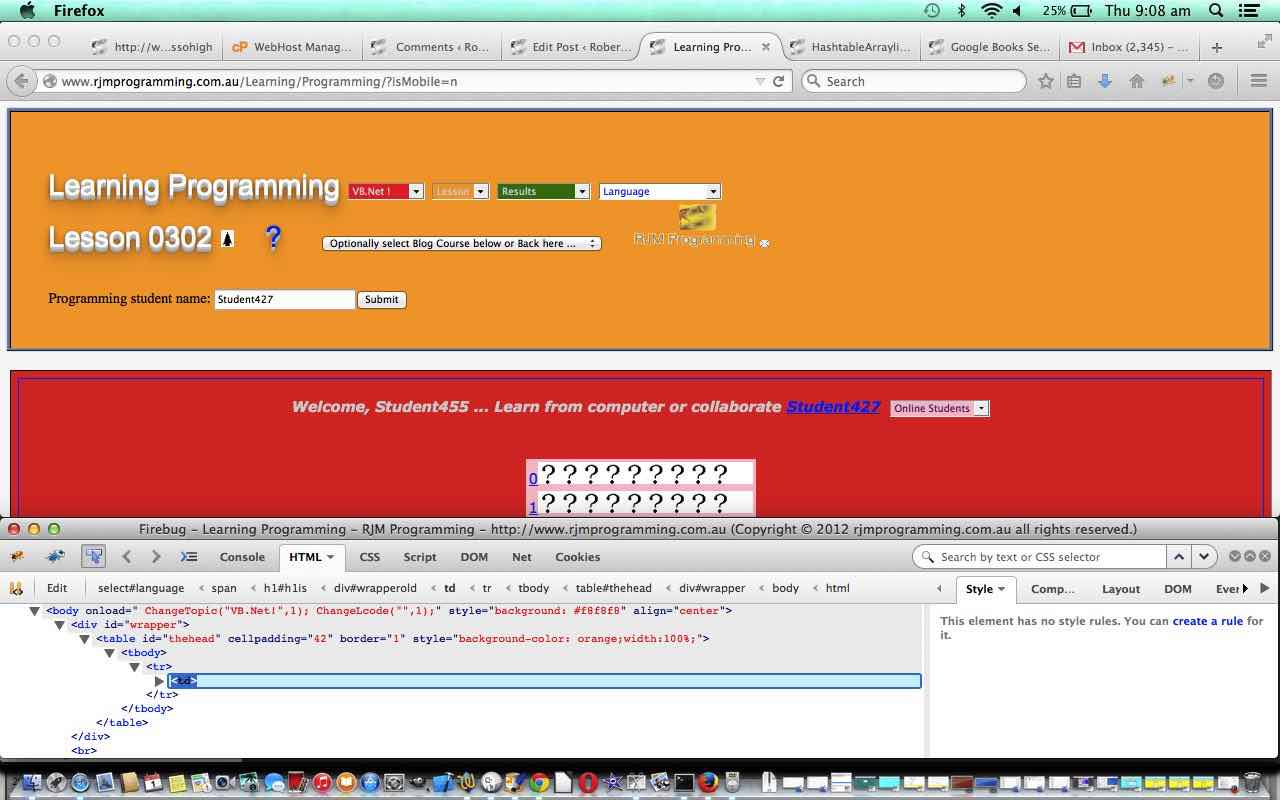
- Use Mac Grab application’s Selection tool to grab one for one copy of that area of webpage

- Use (Mac) Paintbrush application to:
- Make transparent rectangle under web functionality of interest (with the HTML td element)
- Save this image and make a copy
- With the copy make an opaque thick blue border inside the rectangle of above
- Draw in thinner paperwork/stationery lines
- Give a slight 3d look by infilling those lines with a cyan 70% opacity rudimentary shadowing
- Make all the orange areas transparent using the paintcan with a fully transparent colour selected
- Save the second image
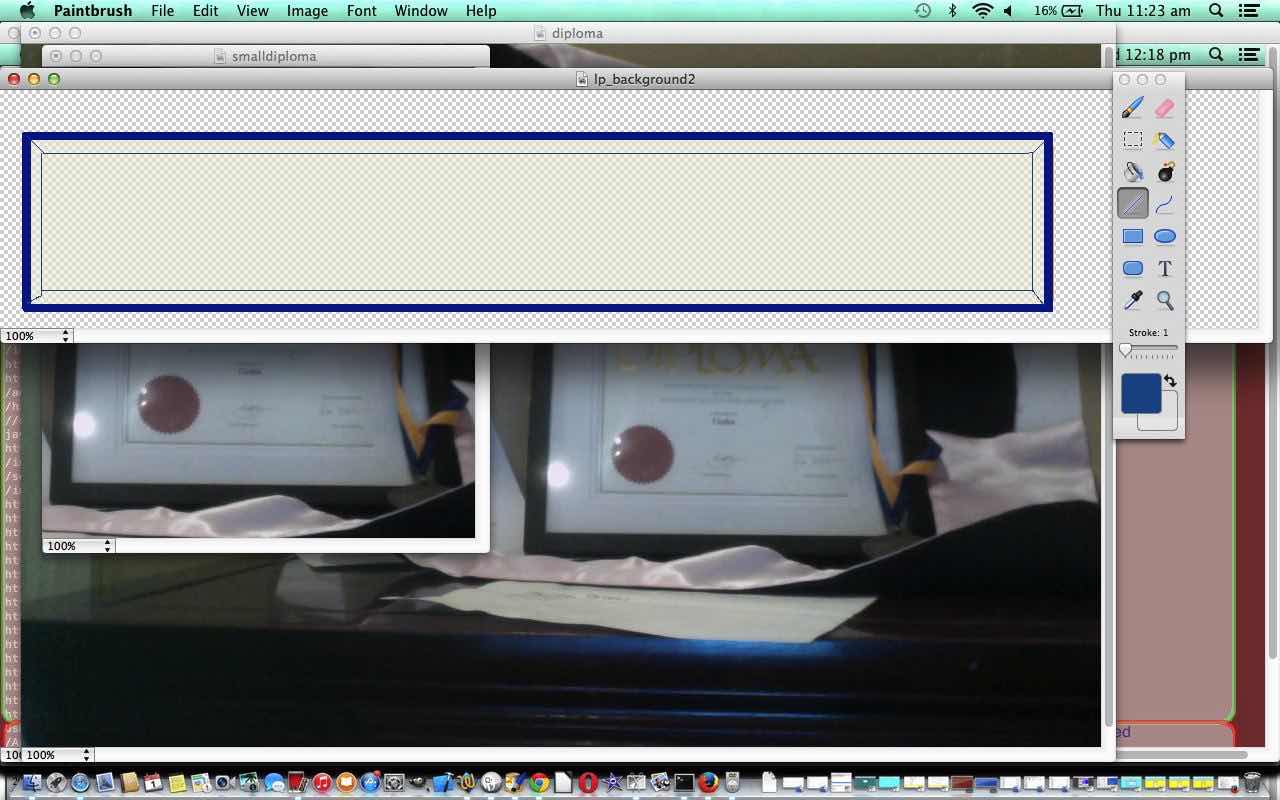
- Copy the images over to the website
- Adjust “Learning Programming” PHP to change (the underlying HTML) as per bold bits below
<style>

#wrapperold h1{

font:normal 24pt Arial;

color:#FFFFFF;

text-shadow: 0 1px 0 #ccc,

0 2px 0 #c9c9c9,

0 3px 0 #bbb,

0 4px 0 #b9b9b9,

0 5px 0 #aaa,

0 6px 1px rgba(0,0,0,.1),

0 0 5px rgba(0,0,0,.1),

0 1px 3px rgba(0,0,0,.3),

0 3px 5px rgba(0,0,0,.2),

0 5px 10px rgba(0,0,0,.25),

0 10px 10px rgba(0,0,0,.2),

0 20px 20px rgba(0,0,0,.15);

}


#thehead {

background: url('lp_background.png'),url('lp_background2.png') no-repeat;

}


</style>
- Show After “Learning Programming” in Firefox web browser
 and see it as a live run
 Have a ham sandwich with rhubarb and vegemite followed by a lemon curry chaser
Why no Gimp? Good question. It’s a public holiday hereabouts, and well, Gimp’s off to Bondi Beach today! Where’s Gimp?
Am hoping you give multiple background images a go one day should it suit your porpoise purpose … the heat’s getting to moi me.
Previous relevant Xcode Learning Programming Blog Course Cookies Tutorial is shown below.
Today we continue to make use of the ideas from two previous tutorials called Xcode iOS Dynamic UIButton Primer Tutorial as below and Xcode iOS Mobile Project Exporting Primer Tutorial as shown way below, covering the Xcode iOS Mobile App issue (ie. the “UIWebView ‘on its lonesome’ issue”) to create an iOS mobile app for our Learning Programming idea extended to include the option of Blog Course Postings, and using dynamic UIButton to …
- show you how to add a dynamic UIButton at loading (if you want to know … thanks to the great Open Source community for all the ideas emanating from this link)
- also is one way to solve the UIWebView “on its lonesome” issue (when pointing at URLs without total navigational integrity (ie. they have a tags with target=’_blank’ for instance)) … ‘(but please know such a scenario is not good without also providing, at least, buttons for the equivalent functionality as the web browser’s back and forward buttons … remember, with UIWebView there is no address bar, and no multiple tabs nor windows … if your webpage has complete forward and backward navigational integrity that could suit a UIWebView “on its lonesome”)’ … mentioned in Xcode iOS Mobile Project Exporting Primer Tutorial as shown below
… but this time we tidy up some loose ends such as …
- fixing a lack of functionality within the iOS mobile app’s UIWebView contents cookie processing regarding the “last” course blog posting used, by setting up our own “Clayton’s” cookies (ie. we use PHP to simulate cookies without there being cookies – which don’t always work in UIWebView without some consideration … another approach is shown with this link)
- fixing an annoying feature of the work whereby with mobile apps any scrolling jumps are quite annoying, and we stop this happening for mobile platforms
- adding an extra link to allow navigation to the top of the blog course posting once nearing the bottom, especially as this can represent a lot of scrolling on occasions and because once you are down the bottom it would be good to also see what you have just viewed in some way shape or form (issues like this are considerations for the UX area of knowledge)
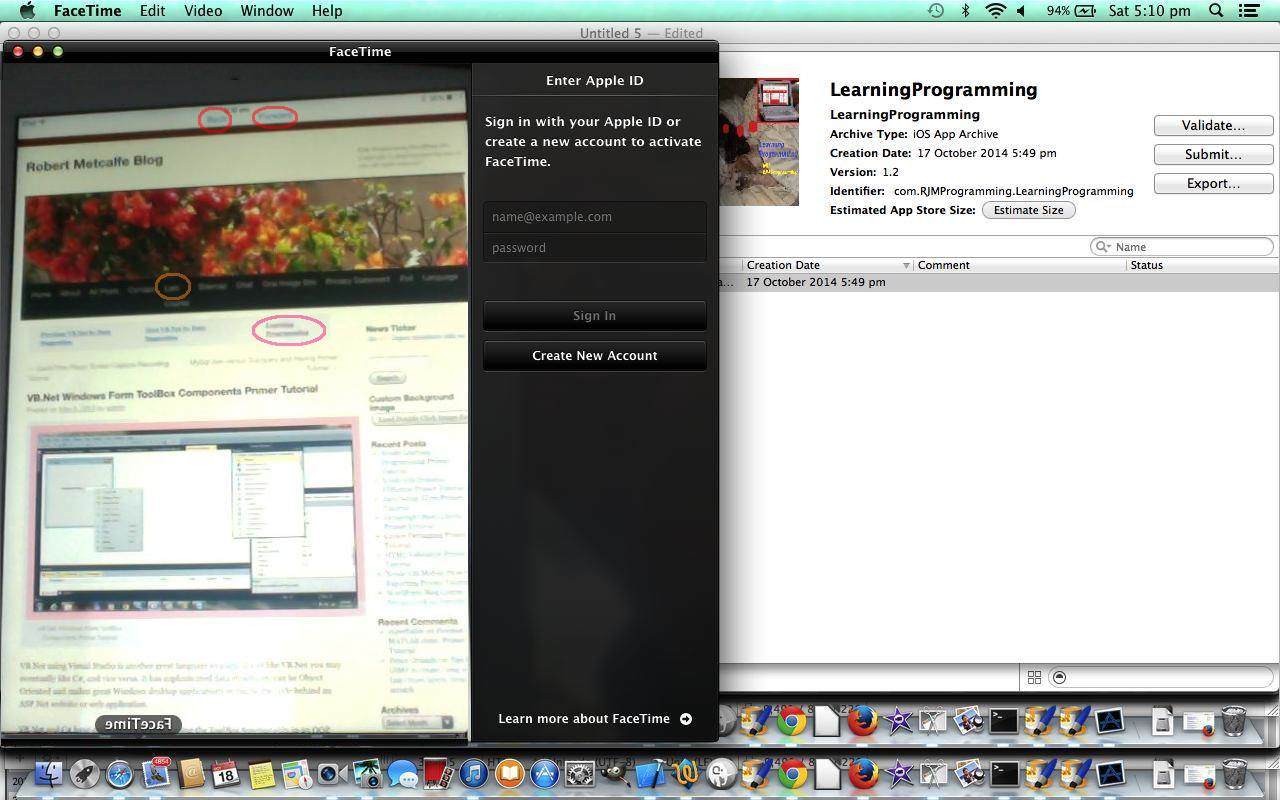
As a general comment about Xcode iOS mobile development (but please note that the idea of step 1. above circumvents the complication … by the way, the two small red circles in the tutorial picture are me showing you where the Back and Forward buttons are (rather than the code ) … now that iOS 8 buttons have no background by default it is sometimes necessary to point them out) you must try to get efficient at the linking (or “connecting”) of “nib” file and/or “storyboard” GUI objects to your ViewController.h code and for this, we’d really like to defer to a YouTube video we mentioned in a tutorial a long time back called Wish me luck … 1 of ?) iOS Hello World on iPhone 5 simulator … since then have worked out, with some web browsers, how to lob you at the exact bit, and am hoping you get straight to that bit with this link (please have sound up to hear of role of the “control” button “while dragging”). By the way, the pink circle shows a new web page link (not the app this time) to link back to the mobile app from the web page iframe element and the orange circle shows the “Last” (Blog Course Posting) link which, in this mobile scenario, on an iPad, would use our PHP “Clayton’s” cookies system.
We test the new changes deployed on a real iPad device today, the idea of which is more than somewhat verging on great, as you can’t rely on simulators forever (by the way, with iOS 8 simulators we had problems and we needed to consult with this link … where you may notice that we ended up reverting to iOS version 7.1 simulators … thanks), though the options in this field grow, as you can imagine, because it is impossible to keep up owning all the gadgetry you’d need as a programmer to test for everything with real devices. Don’t confuse this “middle game” “quality assurance” or “unit test” concept with the concept of an “end game” deployment as an Apple App Store app (where there are quite a few extra steps to undertake). When dealing with real devices you will need:
- the device … doh, chortle, doh, chortle
- the Mac OS X laptop that runs Xcode
- the white lead that temporarily connects your iPad or iPhone or iPod mobile device with your Mac OS X laptop that runs Xcode
- a lack of fear of all things “sync”
- the iTunes device (up arrow eject) button to safely eject the device (similar functionality as Windows icon right-click Eject options (in Windows Explorer))
Here is a link to some downloadable PHP programming source code for an iOS Web App’s UIWebView’s underlying content, that is used when the platform is a mobile one, while the pre-existant coursecookies.html is still okay for non-mobile platforms which still use real cookies:
… and there were changes needed for PHP code in wp-content/themes/twentyten/header.php (the bold parts of which are particularly relevant to the last modifications) because it establishes the header Javascript and two sections of code are involved …
var ourck=location.search.split('ck=')[1] ? location.search.split('ck=')[1].split('&')[0] : '';

var ourpp=location.search.split('pp=')[1] ? location.search.split('pp=')[1].split('&')[0] : '';

var ourpn=location.search.split('pn=')[1] ? location.search.split('pn=')[1].split('&')[0] : '';

var ourpage=location.search.split('page_id=')[1] ? location.search.split('page_id=')[1].split('&')[0] : '';

var ourp=location.search.split('p=')[1] ? location.search.split('p=')[1].split('&')[0] : '';

var ourcourseurl='';

var ourcoursetitle='';


var ua = navigator.userAgent;

var isiPad = /iPad/i.test(ua) || /iPhone OS 3_1_2/i.test(ua) || /Android/i.test(ua) || /iPhone OS 3_2_2/i.test(ua);
if (isiPad) {
<?php
//echo "n alert('*" . $_SERVER['REQUEST_URI'] . "*'); n";
if (strpos(($_SERVER['REQUEST_URI'] . "*"), "?p*") !== false) {
//echo "n alert('" . $_SERVER['QUERY_STRING'] . "'); n";
$cstuffis = "";
$rma = $_SERVER['REMOTE_ADDR'];
$ua = strtolower($_SERVER['HTTP_USER_AGENT']);
// you can add different browsers with the same way ..
if(preg_match('/(chromium)[ /]([w.]+)/', $ua))
$rma = '000000'.$rma;
elseif(preg_match('/(chrome)[ /]([w.]+)/', $ua))
$rma = '00000'.$rma;
elseif(preg_match('/(safari)[ /]([w.]+)/', $ua))
$rma = '0000'.$rma;
elseif(preg_match('/(opera)[ /]([w.]+)/', $ua))
$rma = '000'.$rma;
elseif(preg_match('/(msie)[ /]([w.]+)/', $ua))
$rma = '00'.$rma;
elseif(preg_match('/(mozilla)[ /]([w.]+)/', $ua))
$rma = '0'.$rma;
echo "n alert('" . $ua . "'); n";
if (file_exists(dirname(__FILE__) . "/../PHP/cookie_" . $rma . ".is")) {
$cstuffis = file_get_contents(dirname(__FILE__) . "/cookie_" . $rma . ".is");
} else if (file_exists(dirname(__FILE__) . "/../../../PHP/cookie_" . $rma . ".is")) {
$cstuffis = file_get_contents(dirname(__FILE__) . "/../../../PHP/cookie_" . $rma . ".is");
}
if ($cstuffis != "") {
$actfs = explode("lastcourse=", $cstuffis);
if (sizeof($actfs) > 1) {
$aactfs = explode(";", $actfs[1]);
if ($aactfs[0] != "") echo "n location.href = '" . $aactfs[0] . "'; n";
}
}
}
?>
}
… at the top just under <script type=’text/javascript’> and …
function topViaDelay() {
parent.scroll(0, 0);
}
function courseCookies() {
var ext = ".html"; // ".php"
var extp = ".html?"; // ".php"
var huhd = new Date();
if (isiPad) {
ext = ".php?date=" + huhd;
extp = ".php?date=" + huhd + "&";
if ((ourpp != "" || ourpn != "") && ourpp != ourp && ourpn != ourp) {
<?php
if ((isset($_GET['pp']) || isset($_GET['pn']))) {
if ($_GET['p'] != $_GET['pp'] && $_GET['p'] != $_GET['pn'] && ($_GET['pn'] . $_GET['pp']) != "") {
$rma = $_SERVER['REMOTE_ADDR'];
$ua = strtolower($_SERVER['HTTP_USER_AGENT']);
// you can add different browsers with the same way ..
if(preg_match('/(chromium)[ /]([w.]+)/', $ua))
$rma = '000000'.$rma;
elseif(preg_match('/(chrome)[ /]([w.]+)/', $ua))
$rma = '00000'.$rma;
elseif(preg_match('/(safari)[ /]([w.]+)/', $ua))
$rma = '0000'.$rma;
elseif(preg_match('/(opera)[ /]([w.]+)/', $ua))
$rma = '000'.$rma;
elseif(preg_match('/(msie)[ /]([w.]+)/', $ua))
$rma = '00'.$rma;
elseif(preg_match('/(mozilla)[ /]([w.]+)/', $ua))
$rma = '0'.$rma;
if (file_exists(dirname(__FILE__) . "/../PHP/coursecookies.html")) {
file_put_contents(dirname(__FILE__) . "/../PHP/cookie_" . $rma . ".is", "lastcourse=" . "http://" . $_SERVER['SERVER_NAME'] . ":" . $_SERVER['SERVER_PORT'] . $_SERVER['REQUEST_URI'] . "; ");
} else if (file_exists(dirname(__FILE__) . "/../../../../PHP/coursecookies.html")) {
// echo "n alert('" . dirname(__FILE__) . "/../../../../PHP/coursecookies.html" . "'); n";
file_put_contents(dirname(__FILE__) . "/../../../../PHP/cookie_" . $rma . ".is", "lastcourse=" . "http://" . $_SERVER['SERVER_NAME'] . ":" . $_SERVER['SERVER_PORT'] . $_SERVER['REQUEST_URI'] . "; ");
}
}
}
?>
}
}
if (document.URL.indexOf("#content") != -1) {
setTimeout(topViaDelay, 2000);
} else {
if ((ourpp != "" || ourpn != "") && ourpp != ourp && ourpn != ourp) {
document.getElementById("content").innerHTML = "<iframe width=1 height=1 src='" + document.URL.replace("/wordpress/?", "/PHP/coursecookies" + extp).replace("/wordpress/", "/PHP/coursecookies" + ext) + "'></iframe>" + document.getElementById("content").innerHTML;
setTimeout(topViaDelay, 2000);
} else {
document.getElementById("content").innerHTML = "<iframe width=1 height=1 src='../PHP/coursecookies" + ext + "'></iframe>" + document.getElementById("content").innerHTML;
}
}
}
</script>
</head>
<body onload="courseCookies();" <?php body_class(); ?>>
… around </script>
Thanks for visiting today’s tutorial.
Previous relevant Xcode Learning Programming Primer Tutorial is shown below.
Today we make use of the ideas from two previous tutorials called Xcode iOS Dynamic UIButton Primer Tutorial as below and Xcode iOS Mobile Project Exporting Primer Tutorial as shown way below, covering the Xcode iOS Mobile App issue (ie. the “UIWebView ‘on its lonesome’ issue”) to create an iOS mobile app for our Learning Programming idea extended to include the option of Blog Course Postings, and using dynamic UIButton to:
- show you how to add a dynamic UIButton at loading (if you want to know … thanks to the great Open Source community for all the ideas emanating from this link)
- also is one way to solve the UIWebView “on its lonesome” issue (when pointing at URLs without total navigational integrity (ie. they have a tags with target=’_blank’ for instance)) … ‘(but please know such a scenario is not good without also providing, at least, buttons for the equivalent functionality as the web browser’s back and forward buttons … remember, with UIWebView there is no address bar, and no multiple tabs nor windows … if your webpage has complete forward and backward navigational integrity that could suit a UIWebView “on its lonesome”)’ … mentioned in Xcode iOS Mobile Project Exporting Primer Tutorial as shown below
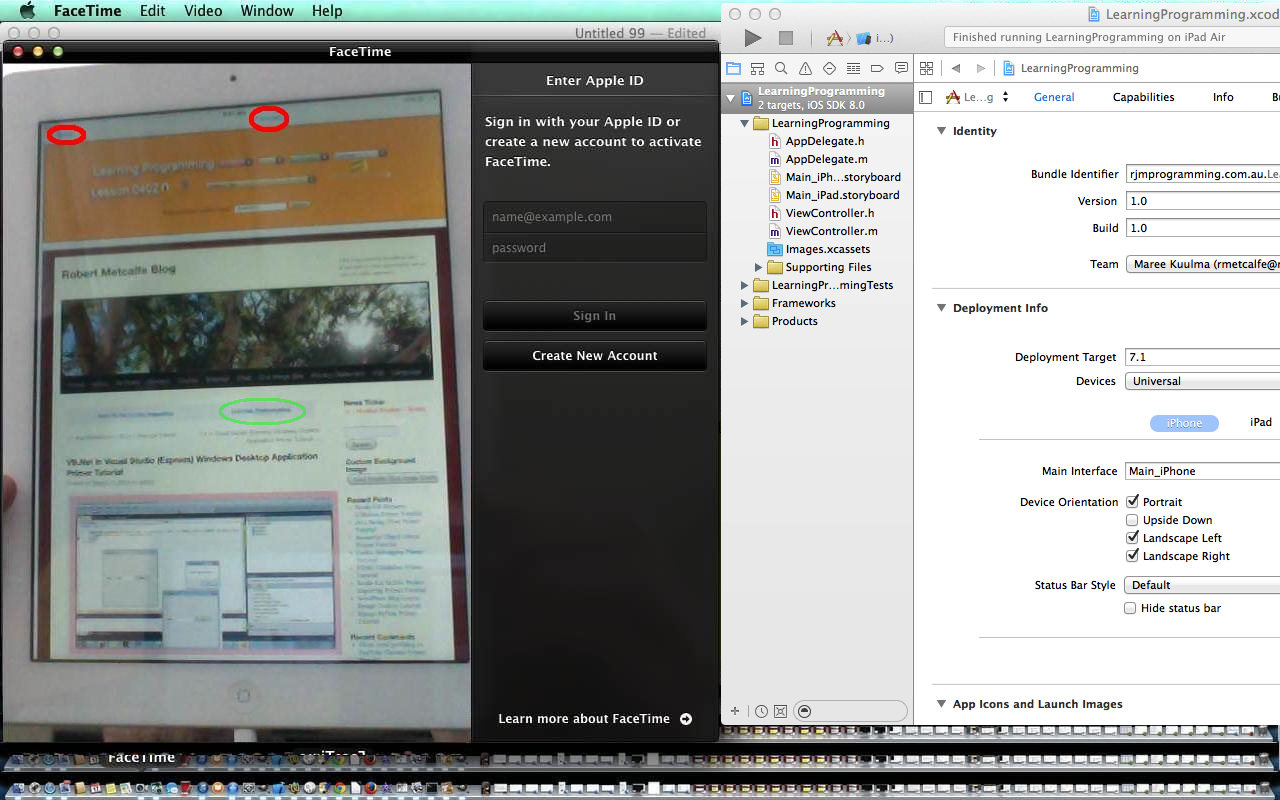
As a general comment about Xcode iOS mobile development (but please note that the idea of step 1. above circumvents the complication … by the way, the two small red circles in the tutorial picture are me showing you where the Back and Forward buttons are (rather than the code ) … now that iOS 8 buttons have no background by default it is sometimes necessary to point them out) you must try to get efficient at the linking (or “connecting”) of “nib” file and/or “storyboard” GUI objects to your ViewController.h code and for this, we’d really like to defer to a YouTube video we mentioned in a tutorial a long time back called Wish me luck … 1 of ?) iOS Hello World on iPhone 5 simulator … since then have worked out, with some web browsers, how to lob you at the exact bit, and am hoping you get straight to that bit with this link (please have sound up to hear of role of the “control” button “while dragging”). By the way, the green circle shows a new web page link (not the app this time) to link back to the mobile app from the web page iframe element.
We test the change’s deployment on a real iPad device today, the idea of which is somewhat verging on great, as you can’t rely on simulators forever (by the way, with iOS 8 simulators we had problems and we needed to consult with this link … where you may notice that we ended up reverting to iOS version 7.1 simulators … thanks), though the options in this field grow, as you can imagine, because it is impossible to keep up owning all the gadgetry you’d need as a programmer to test for everything with real devices. Don’t confuse this “middle game” “quality assurance” or “unit test” concept with the concept of an “end game” deployment as an Apple App Store app (where there are quite a few extra steps to undertake). When dealing with real devices you will need:
- the device … doh, chortle, doh, chortle
- the Mac OS X laptop that runs Xcode
- the white lead that temporarily connects your iPad or iPhone or iPod mobile device with your Mac OS X laptop that runs Xcode
- a lack of fear of all things “sync”
- the iTunes device (up arrow eject) button to safely eject the device (similar functionality as Windows icon right-click Eject options (in Windows Explorer))
Here is a link to some downloadable Xcode (on a Mac laptop) Objective-C programming source code for an iOS Web App which turns this WordPress Blog into a mobile app (of more use than the one of the tutorial below … because of the addition of two UIButtons for Back and Forward UIWebView navigation (as distinct from the website navigation … ie. the buttons belong to the app, not the website, even though they look as though they could belong to the website)) which you may want to rename to AppDelegate.h, AppDelegate.m, ViewController.h, ViewController.m and main.m
What needed to change to integrate Blog Course Postings as extra functionality into the existing Learning Programming software was:
- changes to design_a_course.php … to get this into context try reading WordPress Blog Course Design Cookies Tutorial and Learning Programming Android App
- changes to the Learning Programming landing page as you can see here
- changes to PHP code in this WordPress Blog’s document root’s wp-content/themes/twentyten/functions.php (in bold below … to get this into context try reading WordPress Blog Course Design Cookies Tutorial):
if ( ! function_exists( 'may_be_obsolete' ) ) :
/**
* Truncate unknown previous/next.
*
* @since October 2014 by RJM Programming
*/
function may_be_obsolete($proposed) {
if (strpos($proposed, ">Previous") !== false) {
if (strpos(($proposed . "&"), "&pp=&") !== false) {
$bitsare = explode(">", $proposed);
$nums = explode("=", str_replace("&", "=", str_replace("&pp=", "", str_replace("&pn", "", str_replace("?p=", "", $proposed)))));
if ($nums[0] == $nums[1]) {
$proposed = str_replace($bitsare[sizeof($bitsare) - 1], "", $proposed);
}
}
} else if (strpos($proposed, ">Next") !== false) {
if (strpos(($proposed . "&"), "&pn=&") !== false) {
$bitsare = explode(">", $proposed);
$nums = explode("=", str_replace("&", "=", str_replace("&pn=", "", str_replace("&pp", "", str_replace("?p=", "", $proposed)))));
if ($nums[0] == $nums[1]) {
$proposed = str_replace($bitsare[sizeof($bitsare) - 1], "", $proposed);
}
}
}
return $proposed;
}
endif;if ( ! function_exists( 'get_other_one' ) ) :
/**
* Get unknown previous/next.
*
* @since October 2014 by RJM Programming
*/
function get_other_one($proposedp, $onetogetprefix, $onep) {
if (file_exists("../PHP/" . $proposedp . "_" . $_SERVER['REMOTE_ADDR'] . ".npg")) {
$prehuh = file_get_contents("../PHP/" . $proposedp . "_" . $_SERVER['REMOTE_ADDR'] . ".npg");
$xxpa = explode(str_replace("&", "", $onetogetprefix), $prehuh);
$xxpaa = explode("&", $xxpa[sizeof($xxpa) - 1]);
return $proposedp . $onetogetprefix . $xxpaa[0];
} else if (file_exists("../PHP/" . $onep . "_" . $_SERVER['REMOTE_ADDR'] . ".npg")) {
$prehuh = file_get_contents("../PHP/" . $onep . "_" . $_SERVER['REMOTE_ADDR'] . ".npg");
$xxpa = explode(str_replace("&", "", $onetogetprefix), $prehuh);
$xxpaa = explode("&", $xxpa[sizeof($xxpa) - 1]);
return $onep . $onetogetprefix . $xxpaa[0];
}
$huh = file_get_contents(dirname(__FILE__) . "/../../../../index.html");
if ($proposedp == "") {
$xxp = explode("?p=" . $onep . "&", $huh);
if (sizeof($xxp) > 1) {
$xxpa = explode(str_replace("&", "", $onetogetprefix), $xxp[1]);
$xxpaa = explode("&", $xxpa[sizeof($xxpa) - 1]);
return $onep . $onetogetprefix . $xxpaa[0];
}
return $onep;
} else {
$xxp = explode("?p=" . $proposedp . "&", $huh);
if (sizeof($xxp) > 1) {
$xxpa = explode(str_replace("&", "", $onetogetprefix), $xxp[1]);
$xxpaa = explode("&", $xxpa[sizeof($xxpa) - 1]);
return $proposedp . $onetogetprefix . $xxpaa[0];
}
return $proposedp;
}
return $proposedp;
}
endif;if ( ! function_exists( 'get_tutorial_topic' ) ) :
/**
* Get tutorial topic (word).
*
* @since October 2014 by RJM Programming
*/
function get_tutorial_topic($thistopic) {
$words = explode(" ", str_replace(" ", "++", str_replace("~~", "#~", $thistopic)));
if (sizeof($words) > 1) {
return " " . $words[0];
}
return "";
}
endif;if ( ! function_exists( 'previous_next' ) ) :
/**
* Allow for next and previous via &pn= and &pp= respectively.
*
* @since October 2014 by RJM Programming
*/
function previous_next($both = true) {
if (isset($_GET['pp']) || isset($_GET['pn'])) {
$prefix = " id='atop";
if ($both) $prefix = " id='abottom";
$topic = "";
$tget = "";
$topsuff = "";
$isuff = "#content";
$isiPad = (bool) strpos($_SERVER['HTTP_USER_AGENT'],'iPad');
if ($isiPad === false) {
$isiPad = (bool) strpos($_SERVER['HTTP_USER_AGENT'],'iPhone');
}
if ($isiPad === false) {
$isiPad = (bool) strpos($_SERVER['HTTP_USER_AGENT'],'Android');
}
if ($isiPad) $isuff = "&content=y";
if (isset($_GET['title'])) {
$tget = "&title=" . $_GET['title'];
$topic = str_replace("~", " ", get_tutorial_topic(str_replace("_", " ", $_GET['title'])));
if ($both) $topsuff = " <a href='#content' title='Back to " . str_replace("~", " ", $_GET['title']) . "'>^</a> ";
} else {
$topic = str_replace("~", " ", get_tutorial_topic($post->title));
}
if (strpos(($_SERVER['QUERY_STRING'] . "&"), "&pp=&pn=&") !== false) {
$prefix = $prefix;
} else {
echo "<table style='width:98%; background-color: #F6F5F1;'><tbody><tr>";
$cbackto = "";
if (isset($_GET['backto'])) $isuff = "&content=y";
if (isset($_GET['backto'])) $cbackto = "&backto=" . urldecode($_GET['backto']);
if (isset($_GET['pp'])) {
echo "<th><a" . $prefix . "p' target=_blank title='Previous' href='" . str_replace("?" . $_SERVER['QUERY_STRING'], "", $_SERVER['REQUEST_URI']) . "?p=" . may_be_obsolete(get_other_one($_GET['pp'], "&pp=", $_GET['p']) . "&pn=" . $_GET['p'] . $tget . $cbackto . "'>Previous" . $topic . " Suggestion") . "</a>" . $topsuff . "</th>";
$topsuff = "";
}
if (isset($_GET['pn'])) {
echo "<th>" . $topsuff . "<a" . $prefix . "n' target=_blank title='Next' href='" . str_replace("?" . $_SERVER['QUERY_STRING'], "", $_SERVER['REQUEST_URI']) . "?p=" . may_be_obsolete(get_other_one($_GET['pn'], "&pn=", $_GET['p']) . "&pp=" . $_GET['p'] . $tget . $cbackto . "'>Next" . $topic . " Suggestion") . "</a><th>";
}
if (isset($_GET['backto'])) echo "<th><a target=_top href='" . urldecode($_GET['backto']) . "' title='Back to Learning Programming'>Learning Programming</a></th>";
if ($both) {
echo "</tr><tr>";
if (isset($_GET['pp'])) {
echo "<td><iframe src='" . str_replace("?" . $_SERVER['QUERY_STRING'], "", $_SERVER['REQUEST_URI']) . "?p=" . $_GET['pp'] . $isuff . "' width=400 height=800></iframe></td>";
}
if (isset($_GET['pn'])) {
echo "<td><iframe src='" . str_replace("?" . $_SERVER['QUERY_STRING'], "", $_SERVER['REQUEST_URI']) . "?p=" . $_GET['pn'] . $isuff . "' width=400 height=800></iframe></td>";
}
echo "<td><a href='#content' title='Back to " . $topic . "'>" . $topic . "</a></td>";
}
echo "</tr></tbody></table>";
}
}
}
endif;
Thanks for visiting today’s tutorial.
Previous relevant Xcode iOS Dynamic UIButton Primer Tutorial is shown below.
Today we come at an Xcode iOS Mobile App issue (ie. the “UIWebView ‘on its lonesome’ issue” … codename Uiol) from two sides:
- to show you how to add a dynamic UIButton at loading (if you want to know … thanks to the great Open Source community for all the ideas emanating from this link)
- also is one way to solve the UIWebView “on its lonesome” issue (when pointing at URLs without total navigational integrity (ie. they have a tags with target=’_blank’ for instance)) … ‘(but please know such a scenario is not good without also providing, at least, buttons for the equivalent functionality as the web browser’s back and forward buttons … remember, with UIWebView there is no address bar, and no multiple tabs nor windows … if your webpage has complete forward and backward navigational integrity that could suit a UIWebView “on its lonesome”)’ … mentioned in Xcode iOS Mobile Project Exporting Primer Tutorial as shown below
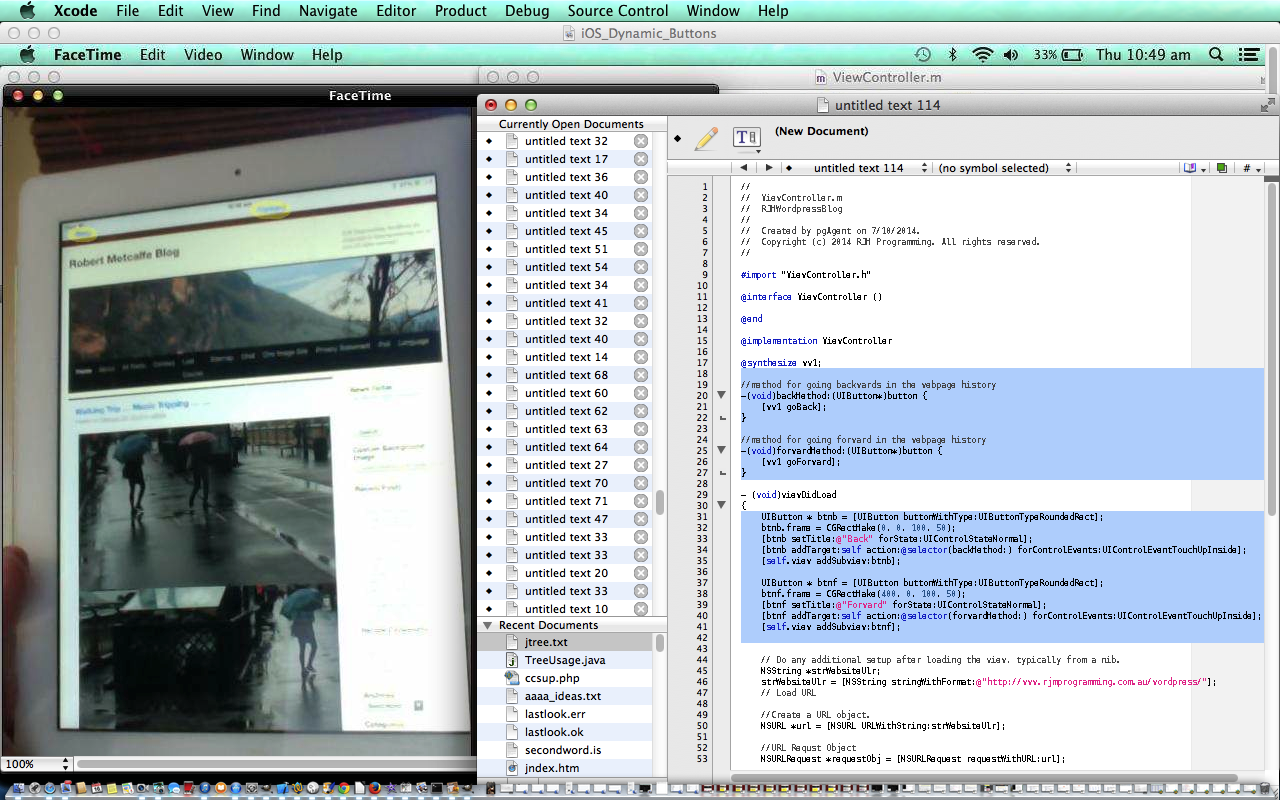
As a general comment about Xcode iOS mobile development (but please note that the idea of step 1. above circumvents the complication … by the way, the two small yellow circles in the tutorial picture are me showing you where the Back and Forward buttons are (rather than the code (which is still stuck on working out how to make toast in the morning before you get up, even before you thought you knew you wanted it … codename Wohtmtitmbygu_Ebutykywi)) … now that iOS 8 buttons have no background by default it is sometimes necessary to point them out) you must try to get efficient at the linking (or “connecting”) of “nib” file and/or “storyboard” GUI objects to your ViewController.h code and for this, we’d really like to defer to a YouTube video we mentioned in a tutorial a long time back called Wish me luck … 1 of ?) iOS Hello World on iPhone 5 simulator … since then have worked out, with some web browsers, how to lob you at the exact bit, and am hoping you get straight to that bit with this link (please have sound up to hear of role of the “control” button “while dragging”).
We test the change’s deployment on a real iPad device today, the idea of which is somewhat verging on great, as you can’t rely on simulators forever, though the options in this field grow, as you can imagine, because it is impossible to keep up owning all the gadgetry you’d need as a programmer to test for everything with real devices. Don’t confuse this “middle game” “quality assurance” or “unit test” concept with the concept of an “end game” deployment as an Apple App Store app (where there are quite a few extra steps to undertake). When dealing with real devices you will need:
- the device … doh, chortle, doh, chortle
- the Mac OS X laptop that runs Xcode
- the white lead that temporarily connects your iPad or iPhone or iPod mobile device with your Mac OS X laptop that runs Xcode
- a lack of fear of all things “sync”
- the iTunes device (up arrow eject) button to safely eject the device (similar functionality as Windows icon right-click Eject options (in Windows Explorer))
Here is a link to some downloadable Xcode (on a Mac laptop) Objective-C programming source code for an iOS Web App which turns this WordPress Blog into a mobile app (of more use than the one of the tutorial below … because of the addition of two UIButtons for Back and Forward UIWebView navigation (as distinct from the website navigation … ie. the buttons belong to the app, not the website, even though they look as though they could belong to the website)) which you may want to rename to AppDelegate.h, AppDelegate.m, ViewController.h, ViewController.m and main.m
The only code that needed to change for Dynamic UIButton purposes is described via the link … ViewController.m
Previous relevant Xcode iOS Mobile Project Exporting Primer Tutorial is shown below.
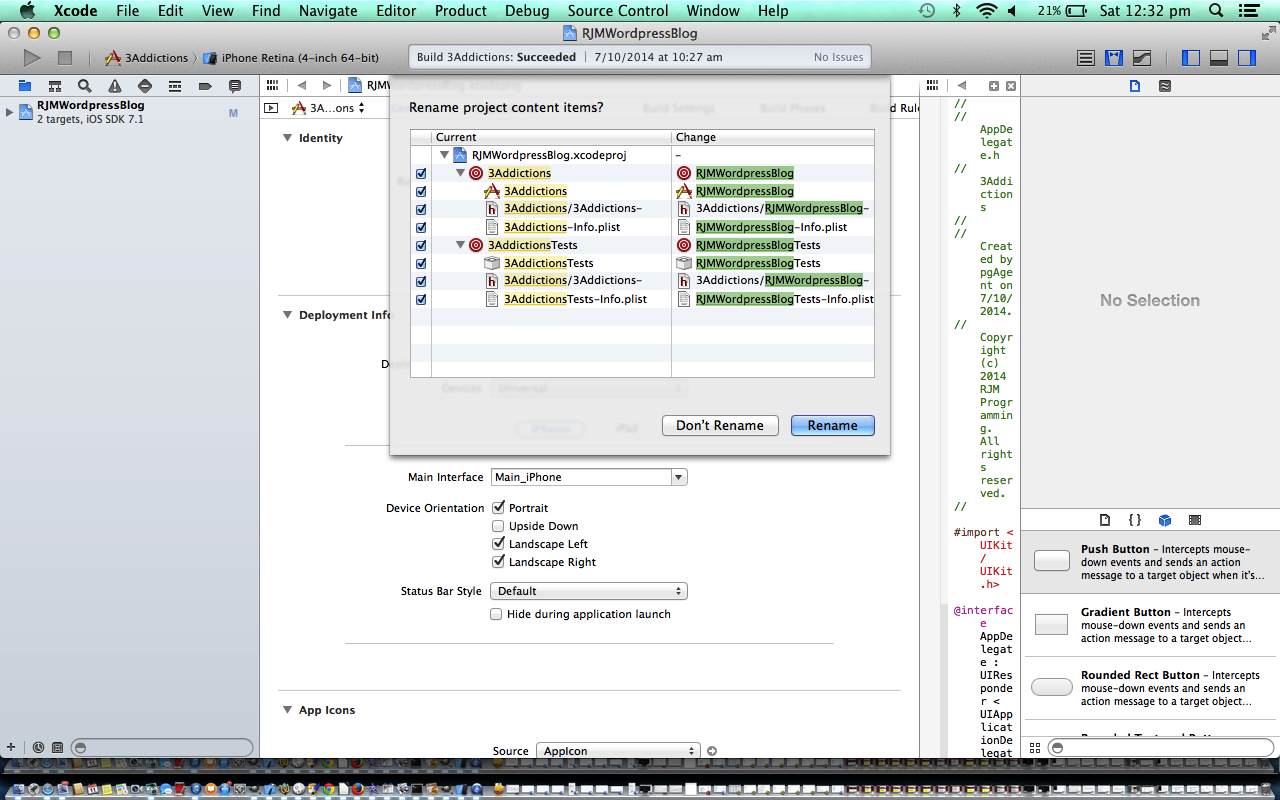
The Xcode IDE, like many IDEs, holds that special fascination for the occasions when you, the user, (or youse, the users (chortle, chortle)) can go “File->New Project” as we showed, below, with the previous Xcode iOS Utility Application Primer Tutorial. With a couple more button presses the user will feel that satisfaction of making the fastest progress they can expect to ever feel progressing on a project. Today, though, we take that a little further along and say “we’ve got this Xcode iOS Mobile Project that we would like to ‘clone’ into a new project with a few tweaks because it is so close to what we want”. So you look around the File menu for mention of the word Export, as a first instinct, and, lo and behold it isn’t there … boo hoo. So we go off and find this very useful link, from which we “cherry pick” Diago’s advice, because it is all “déjà vu” all over again for me, and think we’ve gone through this mild pain before … thanks.
Do all the workings of “nib” files and/or “storyboards” come across? … Well, I hate to give away too many surprises so if you want to find out for yourself, view the tutorial, and/or have a sneak peek ?
Today, we show how, with the Xcode IDE and a bit of work the creation of a mobile application showing the use of a UIWebView, the contents being this WordPress Blog (but please know such a scenario is not good without also providing, at least, buttons for the equivalent functionality as the web browser’s back and forward buttons … remember, with UIWebView there is no address bar, and no multiple tabs nor windows … if your webpage has complete forward and backward navigational integrity that could suit a UIWebView “on its lonesome”).
And today we show you some steps in deploying it to an iPad … say some steps, because it ignores all the first steps regarding registering with Apple as an iOS Developer and getting your iPad registered as a development device associated with your iOS Developer Account (accessible by its associated Apple ID) … your (provisioning) profile … because this had already been done with the iPad involved … but if you are into “thrills and spills” (it wasn’t quite as straightforward as shown) take a geek at the upgrade of the iPad’s iOS (operating system) to 8.0.2 and Xcode (on the laptop) to an SDK to suit iOS 8 … the “it’s a great bag of fruit, it’s a Silvertex iOS 8 suit” … very lame chortle, very lame chortle.
So, as with Android development, all this is like the “middle game” that we talked about in Android development, and put into context with Eclipse Android App Google Play Ready Primer Tutorial … with mobile development there are not so big “start games”, big to huge “middle games” and big “end games” (less big with Android “end games”).
As a general comment about Xcode iOS mobile development you must try to get efficient at the linking (or “connecting”) of “nib” file and/or “storyboard” GUI objects to your ViewController.h code and for this, we’d really like to defer to a YouTube video we mentioned in a tutorial a long time back called Wish me luck … 1 of ?) iOS Hello World on iPhone 5 simulator … since then have worked out, with some web browsers, how to lob you at the exact bit, and am hoping you get straight to that bit with this link (please have sound up to hear of role of the “control” button “while dragging”).
This deployment to real devices, of course, is great, as you can’t rely on simulators forever, though the options in this field grow, as you can imagine, because it is impossible to keep up owning all the gadgetry you’d need as a programmer to test for everything with real devices. Don’t confuse this “middle game” “quality assurance” or “unit test” concept with the concept of an “end game” deployment as an Apple App Store app (where there are quite a few extra steps to undertake). When dealing with real devices you will need:
- the device … doh, chortle, doh, chortle
- the Mac OS X laptop that runs Xcode
- the white lead that temporarily connects your iPad or iPhone or iPod mobile device with your Mac OS X laptop that runs Xcode
- a lack of fear of all things “sync”
- the iTunes device (up arrow eject) button to safely eject the device (similar functionality as Windows icon right-click Eject options (in Windows Explorer))
Here is a link to some downloadable Xcode (on a Mac laptop) Objective-C programming source code which you may want to rename to AppDelegate.h, AppDelegate.m, ViewController.h, ViewController.m and main.m
Previous relevant Xcode iOS Utility Application Primer Tutorial is shown below.
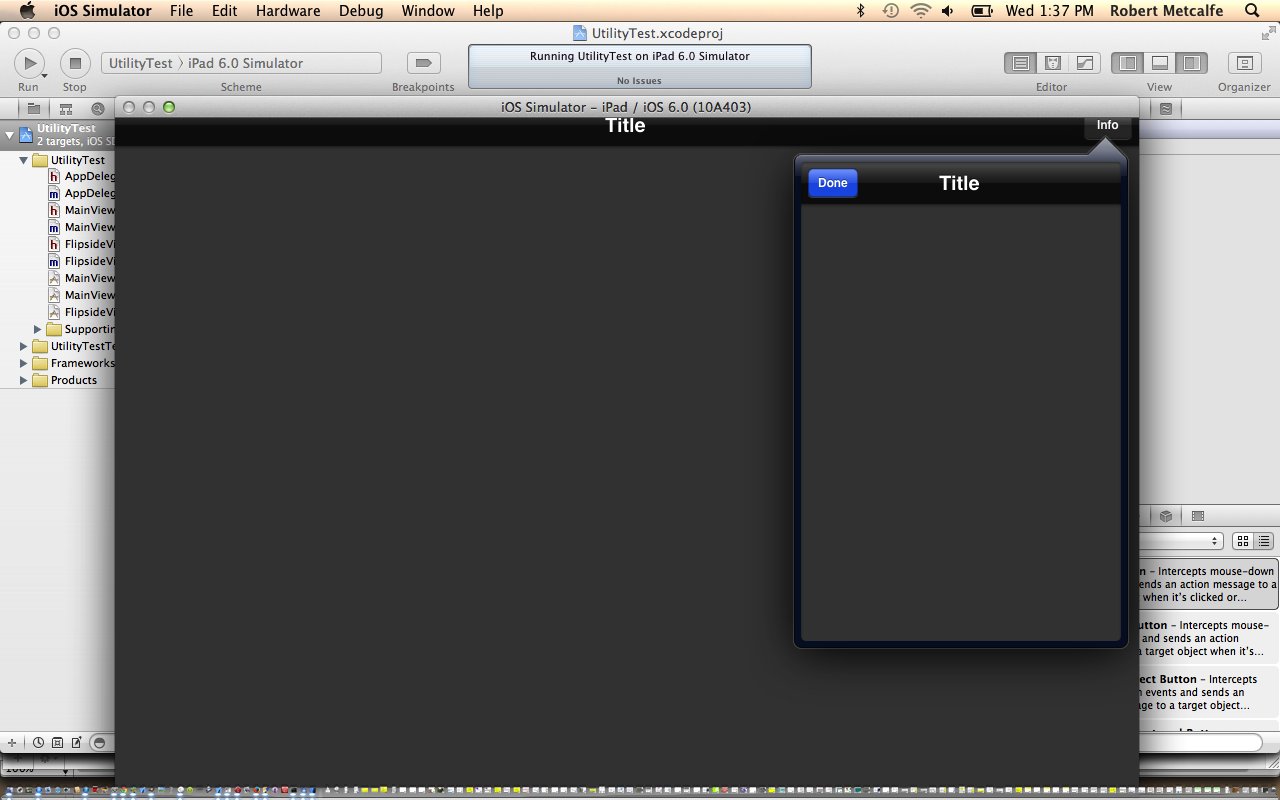
The Xcode IDE, like many IDEs, holds that special fascination for the occasions when you, the user, (or youse, the users (chortle, chortle)) can go “File->New Project”. With a couple more button presses the user will feel that satisfaction of making the fastest progress they can expect to ever feel progressing on a project.
This great feeling is well worth it, as long as the user doesn’t fall into the “post FNP navel gazing” period.
Today, we show how, with the Xcode IDE and a few button presses, with no coding (yet), the user can achieve giant leaps in their Xcode iOS Utility mobile application.
IDEs are worth discussing in relation to pros and cons with respect to this:
Pros are …
- speed of initial progress
- the clarity you get to do with the design aspects of seeing what you have after the initial non-coding FNP phase
- the main files you will ever need have been created in the right places with the correct permissions, etcetera
- any makefiles required will have been created and any additional files added will be handled by the IDE as far as keeping the (underlying) makefile up to date
- there is online help with IDE procedures and search engines are good with your IDE keyword
- multi-device scenarios catered for
- debugging facilities are great
Cons might be (my argument is that you can control lots of these with awareness) …
- what to do after speed of initial progress (“post FNP navel gazing”?), and the hard slog begins (take some time between this and your next bit of work planning the first few more important bits of the “hard slog” to do)
- the design has a lot of similarities to other products “out there” (plan for some things you want to do that can be done in a variety of ways and pick a way that you have never tried before, if applicable)
- you may have lost that intimate awareness of where each file is and what its role is for your project (go to the Finder or Windows Explorer or other, and locate your project, and see what’s there, now, preferably)
- you lack intimate understanding of how to compile your code when it comes to porting it to another environment (the next IDE along, if applicable, may help with this (we hope))
- the relationship of code to GUI can be baffling (practice the GUI to code linkage points, and look around more when succeeding, and remember that the more you practice the better you get)
- the diversity of choice of environment is sometimes unnecessary and confusing (this is worth putting up with, especially as the more scenarios you test, the more solid your project is)
- you may debug your way to a less efficient and elegant solution (leave debugging to only deeply embedded issues or problems, rather than using it in any way like a design tool)
Think Pro 2. on its own, makes it worth while to use IDEs, as you can see what is behind you and ahead of you, and it helps you envisage the “big picture” of what you want to achieve overall.
Here is a link to some downloadable Xcode (on a Mac laptop) Objective-C programming source code which you may want to rename to AppDelegate.h, AppDelegate.m, MainViewController.h, MainViewController.m, FlipsideViewController.h, FlipsideViewController.m and main.m
If this was interesting you may be interested in this too.
If this was interesting you may be interested in this too.
If this was interesting you may be interested in this too.
If this was interesting you may be interested in this too.
If this was interesting you may be interested in this too.
If this was interesting you may be interested in this too.
If this was interesting you may be interested in this too.
If this was interesting you may be interested in this too.

