The recent “Marquee Placeholder” ideas have hit a “usefulness” mark, involving it with the “Gimp Guillotine Followup” web application of Gimp Guillotine Local Datetime Token Subject Tutorial.
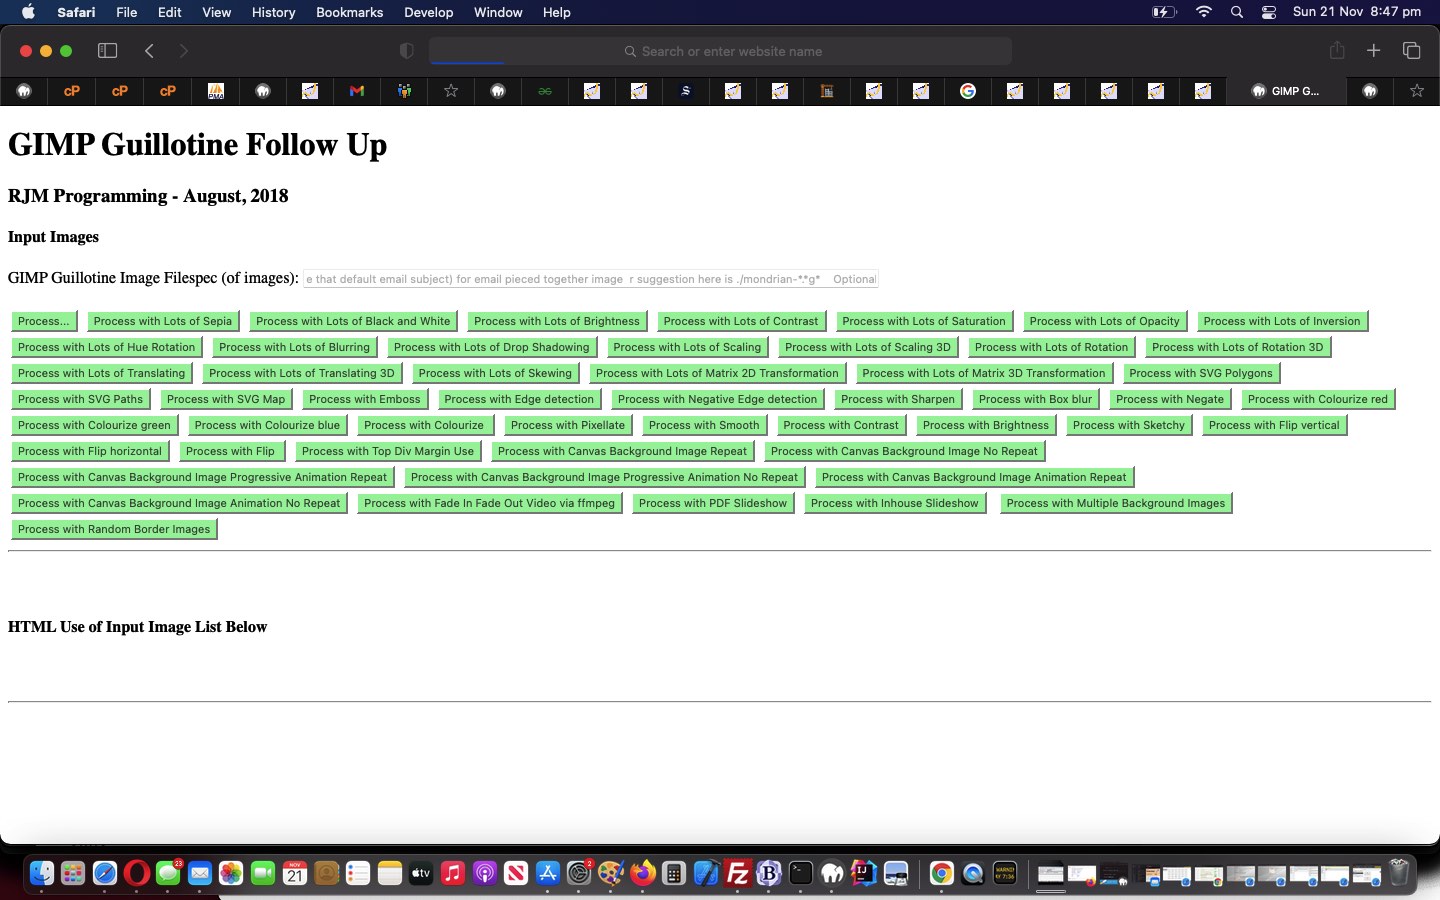
This “Marquee Placeholder” packs a puch, and over mobile platforms too, as an explainer of a “wordy” requirement. And the “Gimp Guillotine Followup” web application’s use of its major textbox is quite an involved thaing, because it is asking you to conjoin …
- a desktop application’s (ie. Gimp’s) output … to …
- an online “Gimp Guillotine Followup” web application’s input
… all feasible and possible via “URL definition” or “upload, then download” methodologies. Onto previous textbox blurb (within the placeholder attribute) here we add (ie. prefix) …
Our suggestion here is ./mondrian-*.*g*
… because we now feel we can, as it is probable an interested user will want to get the most out of the changed gimp_guillotine_followup.php that you can try out at this live run link.
To add in the “Marquee Placeholder” we add Javascripting “on the fly” because we don’t want any mixing of code with email attachment HTML, as per, within document.body “onload” event logic …
      var tag = document.createElement('script');

      tag.type='text/javascript';

      tag.src='/marquee_placeholder.js';

      document.head.appendChild(tag);
Cute, huh?!
Stop Press
We found improvement performances “throttling down” the changed external Javascript marquee_placeholder.js‘s involvement once the textbox value is being actively entered by the user.
Previous relevant Gimp Guillotine Local Datetime Token Subject Tutorial is shown below.
Let’s combine work of …
- the recent Gimp Guillotine Token Subject Tutorial … with …
- the recent Colour Systems Localized Internationalized Date Emails Tutorial … and its promise …
we saw this integration as a “test guinea pig” going onto “genericization afterwards” case
… to try to honour the “test guinea pig” with a bit of combing, and a colour tint for winter.
The integration’s “genericity drive” (feeling a bit more “next cab off the rank” than “genericization star”) is that much more difficult because there is no “onload” event “immediate answer” feel to this “Intl” object client side Javascript work. For the first time we can recall we needed to combine …
- HTML iframe “onload” event function … containing a …
- setTimeout based “relook” at that iframe’s content that little bit later on
… as per …
function postglt() {

  var iois=document.getElementById('ifintl');

  var fabih='', ewi=0, tzs='';

  if (aconto) {

  if (iois != null) {

    aconto = (iois.contentWindow || iois.contentDocument);

    if (aconto != null) {

     if (aconto.document) { aconto = aconto.document; }

     acontobih=aconto.body.innerHTML;

     fabih=acontobih;

     if (acontobih.trim().indexOf('var options') != -1) {

       eval("options" + acontobih.split('var options')[1].split('<')[0].split(';')[0]);

       if (elsewise) { // via div intldiv

     if (acontobih.trim().indexOf('<b>') != -1) {

       eval("lcode='" + acontobih.split('<b>')[1].split('<')[0] + "';");

              //alert("lcode='" + acontobih.split('<b>')[1].split('<')[0] + "';");

    d = new Date();

    timedatenow = new Date(d.getFullYear(), d.getMonth(), d.getDate(),  d.getHours(), d.getMinutes(), d.getSeconds(), d.getMilliseconds());

    localdatetime = new Intl.DateTimeFormat(lcode, options).format;

    //document.title=localdatetime(timedatenow);

      if (aconto.getElementById('ejc1').innerHTML) {

        if (aconto.getElementById('ejc1').innerHTML.indexOf('timeZone:') != -1) {

        tzs=' (' + aconto.getElementById('ejc1').innerHTML.split('timeZone:')[eval(-1 + aconto.getElementById('ejc1').innerHTML.split('timeZone:').length)].split('"')[1].split('"')[0] + ')';

        if (tzs.replace(' (UTC)','') == '') { tzs=goodtzs; }

    if (window.parent) {

     if (document.URL.indexOf('inlineldt') == -1 && document.URL.indexOf('?') != -1 && (document.URL.indexOf('%40') != -1 || document.URL.indexOf('@') != -1)) {

       //location.href=document.URL.replace('?', '?inlineldt=' + encodeURIComponent(localdatetime(timedatenow) + tzs.replace(' (UTC)','')) + '&');

       document.body.innerHTML+="<iframe style=display:none; src='" + document.URL.replace('?', '?inlineldt=' + encodeURIComponent(localdatetime(timedatenow) + tzs.replace(' (UTC)','')) + '&') + "'></iframe>";

       return false;

     }

    }

        }

      }

    var theforms=document.getElementsByTagName('form');

    for (var iiforms=0; iiforms<theforms.length; iiforms++) {

     if (theforms[iiforms].innerHTML.indexOf('inlineldt') == -1) {

      elsewisea.push('' + Math.floor(Math.random() * 178654));

      theforms[iiforms].innerHTML+='<input type=hidden id=inlineldt' + elsewisea[eval(-1 + elsewisea.length)] + ' name=inlineldt value="' + localdatetime(timedatenow) + tzs.replace(' (UTC)','') + '"></input>';

     } else {

      document.getElementById('inlineldt' + elsewisea[ewi]).value=localdatetime(timedatenow) + tzs.replace(' (UTC)','');

      ewi++;

     }

    }

     }

       }

     } else {

       fabih='';

     }

     if (acontobih.trim().indexOf('<b>') != -1) {

       eval("lcode='" + acontobih.split('<b>')[1].split('<')[0] + "';");

     } else {

       fabih='';

     }

     acontobih=fabih;

    }

  }

  }

}


function glt(iois) {

  var fabih='', ewi=0, tzs='';

  if (!aconto) {

  if (iois != null) {

    aconto = (iois.contentWindow || iois.contentDocument);

    if (aconto != null) {

     if (aconto.document) { aconto = aconto.document; }

     acontobih=aconto.body.innerHTML;

     fabih=acontobih;

     if (acontobih.trim().indexOf('var options') != -1) {

       eval("options" + acontobih.split('var options')[1].split('<')[0].split(';')[0]);

       if (elsewise) { // via div intldiv

     if (acontobih.trim().indexOf('<b>') != -1) {

       eval("lcode='" + acontobih.split('<b>')[1].split('<')[0] + "';");

    d = new Date();

    timedatenow = new Date(d.getFullYear(), d.getMonth(), d.getDate(),  d.getHours(), d.getMinutes(), d.getSeconds(), d.getMilliseconds());

    localdatetime = new Intl.DateTimeFormat(lcode, options).format;

      if (aconto.getElementById('ejc1').innerHTML) {

        if (aconto.getElementById('ejc1').innerHTML.indexOf('timeZone:') != -1) {

        tzs=' (' + aconto.getElementById('ejc1').innerHTML.split('timeZone:')[eval(-1 + aconto.getElementById('ejc1').innerHTML.split('timeZone:').length)].split('"')[1].split('"')[0] + ')';

        goodtzs=tzs.replace(' (UTC)','');

      }

      }

    var theforms=document.getElementsByTagName('form');

    for (var iiforms=0; iiforms<theforms.length; iiforms++) {

     if (theforms[iiforms].innerHTML.indexOf('inlineldt') == -1) {

      elsewisea.push('' + Math.floor(Math.random() * 178654));

      theforms[iiforms].innerHTML+='<input type=hidden id=inlineldt' + elsewisea[eval(-1 + elsewisea.length)] + ' name=inlineldt value="' + localdatetime(timedatenow) + tzs.replace(' (UTC)','') + '"></input>';

     } else {

      document.getElementById('inlineldt' + elsewisea[ewi]).value=localdatetime(timedatenow) + tzs.replace(' (UTC)','');

      ewi++;

     }

    }

     }

         setTimeout(postglt, 3000);

       }

     } else {

       fabih='';

     }

     if (acontobih.trim().indexOf('<b>') != -1) {

       eval("lcode='" + acontobih.split('<b>')[1].split('<')[0] + "';");

     } else {

       fabih='';

     }

     acontobih=fabih;

    }

  }

  }

}
And so we continue on with other scenarios here. Here is …
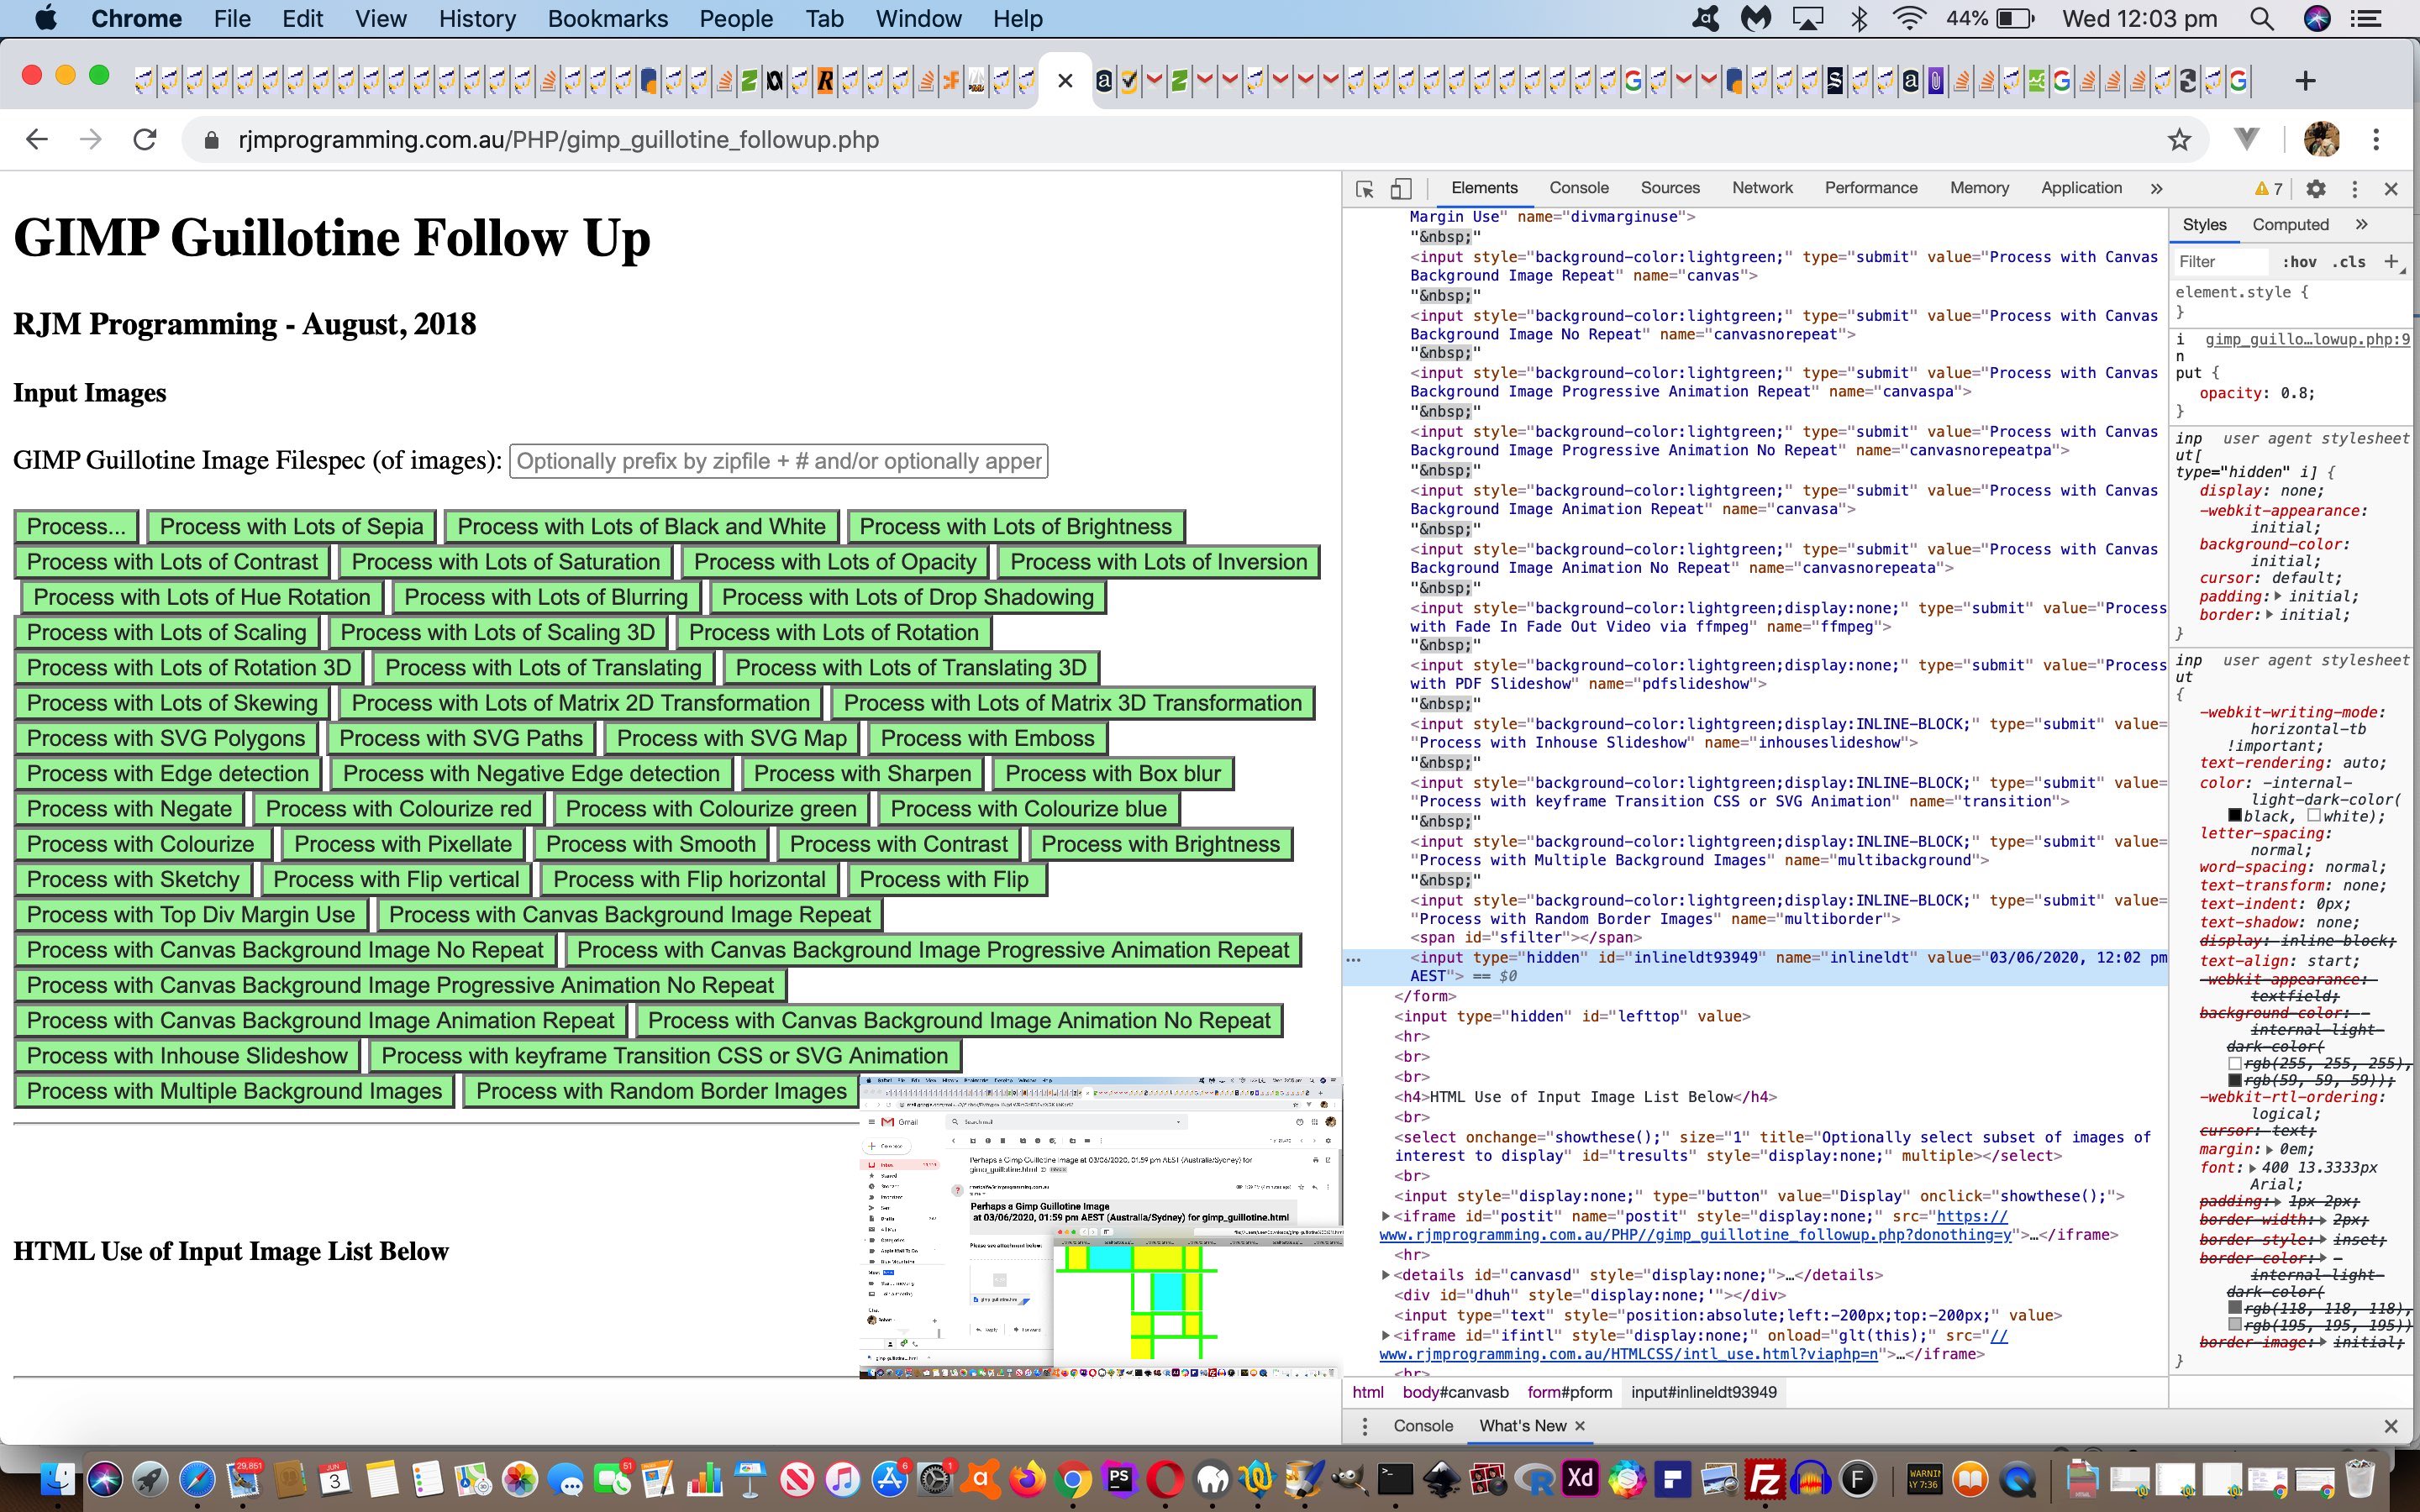
- the changed gimp_guillotine_followup.php that you can try out at this live run link … now can call upon …
- the changed /HTMLCSS/intl_use.js
Previous relevant Colour Systems Localized Internationalized Date Emails Tutorial is shown below.
Huh?! What’s with “Localized Internationalized” in today’s tutorial title?
Well, we’ve been miffed for a couple of days now putting up with our “date token email subject” parts to our emails showing a web server (location) based timestamp. Our web server at RJM Programming, hosted by the wonderful Crazy Domains is located on the other side of our country (as well as our continent), Australia in a timezone called “Australia/Perth”. And as much as we admire Perth, and have to “girt the loins” (you might say “more than somewhat”) when Collingwood takes on West Coast in the AFL, when it comes to timezone relevance for us here in Sydney, the subtraction of two or three hours (depending on daylight saving) is all too much for me. So, what to do? There is the quandary …
- to arrange the inline HTML emails you need a serverside language such as PHP … yet …
- to obtain a “local” timestamp you need Javascript (at the “client”)
… and so, though there are clunky things you can do at the PHP end the more straightforward and less confusing approach is to get between …
… and make a dual purpose arrangement for our FormData “inline” (think of it as a “textbox in midair”) that if it contains a …
- string that contains a “:” semicolon … and contains …
- less than or equal to 5 words (space delimited)
… we’re going to say that the parent (HTML/Javascript) has thus indicated to the (hard working duck paddling hard under the water) child (PHP email creator) that the content of the “inline” “textbox in midair” is a better timestamp to use for “[date]” subject token substitutions than any server timestamp.
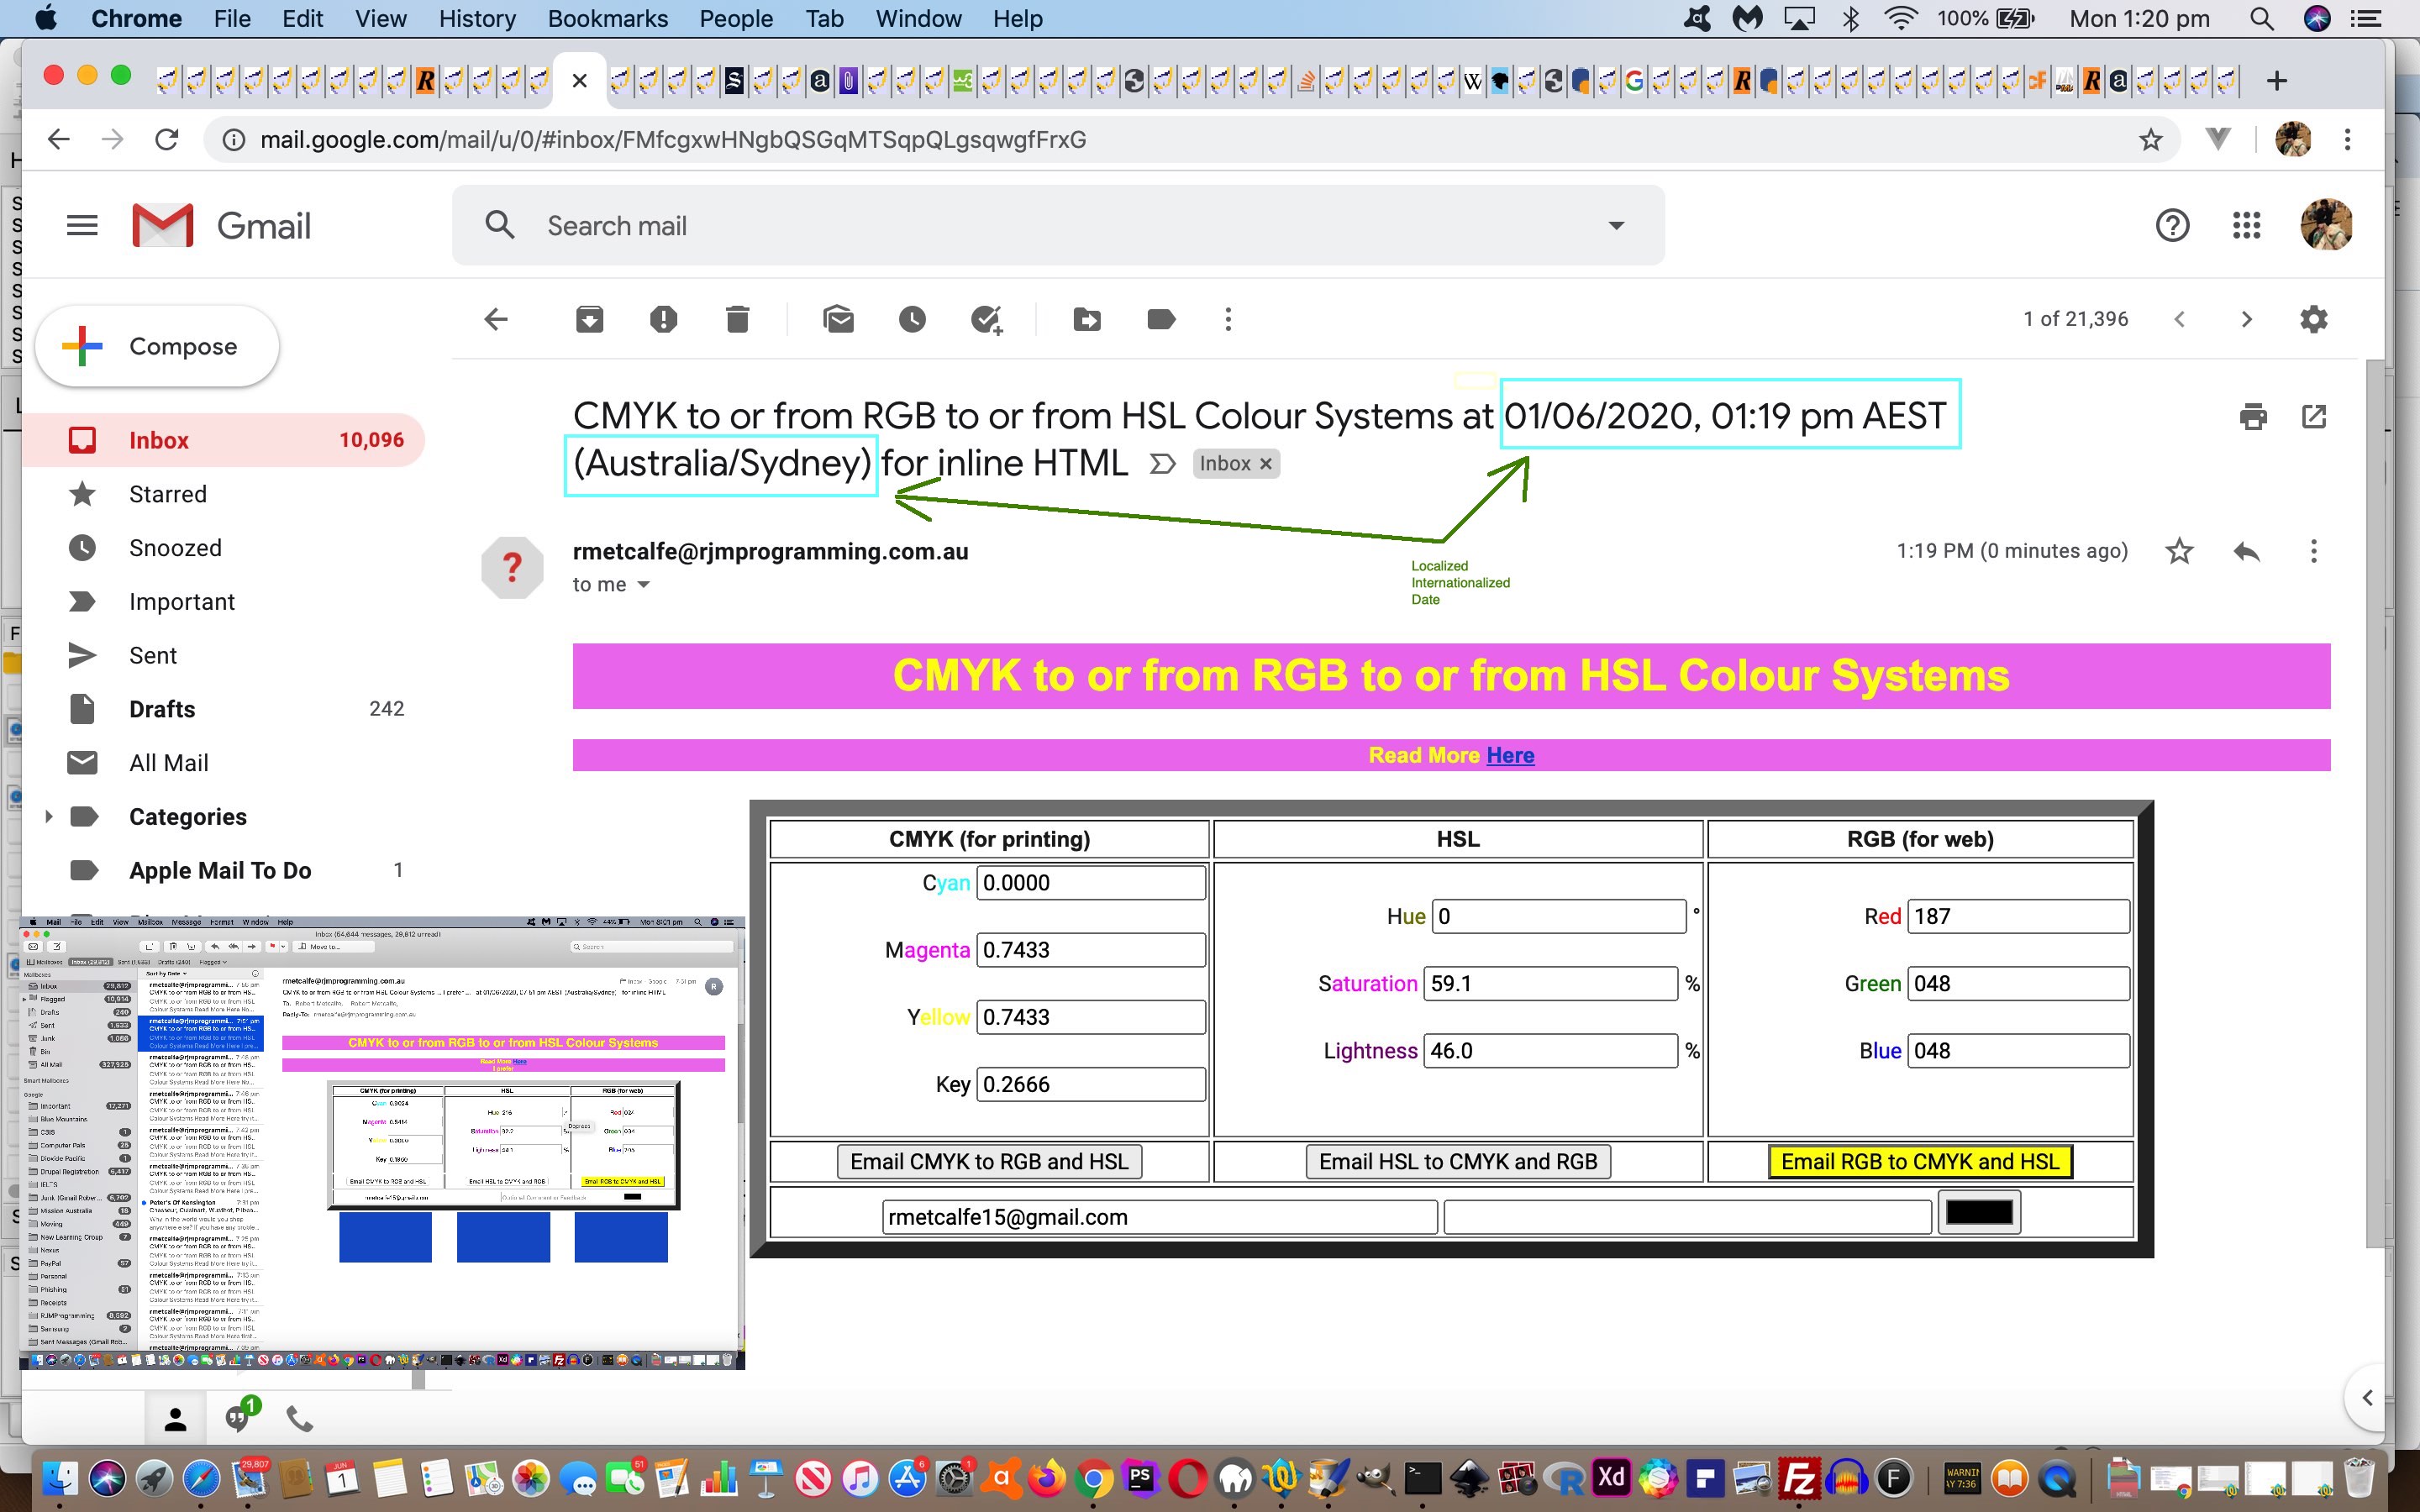
That’s “Localized” covered, but what’s “Internationalized” about this? Well, at the Javascript (client) end, you may recall how we’ve investigated the great “Intl” object possibilities for Date and Number and Currency Internationalization thoughts (at the client side) when we presented Javascript Internationalization Resolved Options Tutorial. Well, we feel some integration coming on. This previously standalone (top.document thinking) web application needed to be adapted to be useful as a “child iframe” one as well (ie. integrate but keep all existant top.document thinking to work as before). This is a bit of work to get going, but by the end, we had this integration changing “date token [date] in subject line” of emails creating timestamps like …
| Localized Internationalized Date Timestamp (at client Javascript) | Web Server Timestamp (at server PHP) |
|---|---|
| 01/06/2020, 07:56 pm AEST (Australia/Sydney) | Monday 1st of June 2020 11:50:24 AM |
… a clarity and relevance improvement (to the email subject line) am sure you’d agree. Though it’s clearly not there yet, we saw this integration as a “test guinea pig” going onto “genericization afterwards” case, and so hived off a lot of these changes to a new …
- integrating external Javascript intl_use.js calls a changed intl_use.html … and in turn called by …
- the changed cmyk_rgb.html live run link … calling …
- the changed PHP email creator helper emailhtml.php
Believe it or not, another job improving on yesterday’s Colour Systems Inline HTML Email Collaboration Tutorial that took equally as long was figuring out what to do about the HSL Hue unit of measure’s symbol ° for the Apple Mail macOS application email client, where all the encoding combinations we could think of caused a spurious “A” (but gobbledygooky) type of character to preceed the ° to look annoyingly like A° … ugh! It took a long time to nut out, but eventually we tweaked to …
- for all the web browser usage incarnations just show the degree symbol via HTML …
<span id="ds" title="Degrees">°</span>
- but then on its way to the email clients map that via the relevant Javascript DOM …
document.getElementById('htmlis').innerHTML='<body>' + document.body.innerHTML.split('<ifr' + 'ame')[0].replace(document.getElementById('ds').outerHTML, "<div title=Degrees style='display:inline-block;max-width:6px;width:6px;max-height:10px;height:10px;overflow:hidden;'><span title=Degrees style='float:right;text-align:right;transform:scaleX(1);'>" + String.fromHtmlEntities(String.fromCodePoint(176)) + "</span></div>"); // many other replace clauses have been left out for clarity purposes
… to end up with the email client “Show original” view (of the inline HTML of email) as …
<div title=Degrees style='display:inline-block;max-width:6px;width:6px;max-height:10px;height:10px;overflow:hidden;'><span title=Degrees style='float:right;text-align:right;transform:scaleX(1);'>°</span></div>
… effectively asking good ol’ CSS to cover up for our Javascript pickle
Intrigued by “transform:scaleX(1)”? Yes, we experimented with flip “transform:scaleX(-1)” and flop “transform:scaleY(-1)” at various stages, but did not seem to need these in the end. But the degree (°) symbol being that “even handed” character, we can flip it and flop it, and it remains its old self … if only we had three of them … oh! fancy that?!
We also added any Feedback or Comments into the email subject line, as well as in the “inline HTML” body section of the email.
Previous relevant Colour Systems Inline HTML Email Collaboration Tutorial is shown below.
Yesterday’s Colour Systems Inline HTML Email Tutorial featured Inline HTML Email functionality, that we find very useful, but almost denuded of personalization. We think adding personalization aspects to a web application should never be mandatory to its functionality, but on the flipside, if you want a web application with “collaboration” thoughts we figure for …
- the scenario that the rjmprogramming.com.au mail server serves as an “honest broker” between …
- an emailee (as we established yesterday) … and …
- an emailer (we allow the user to define (and so not have to bother the users again regarding email addresses), optionally, starting today) … teamed with …
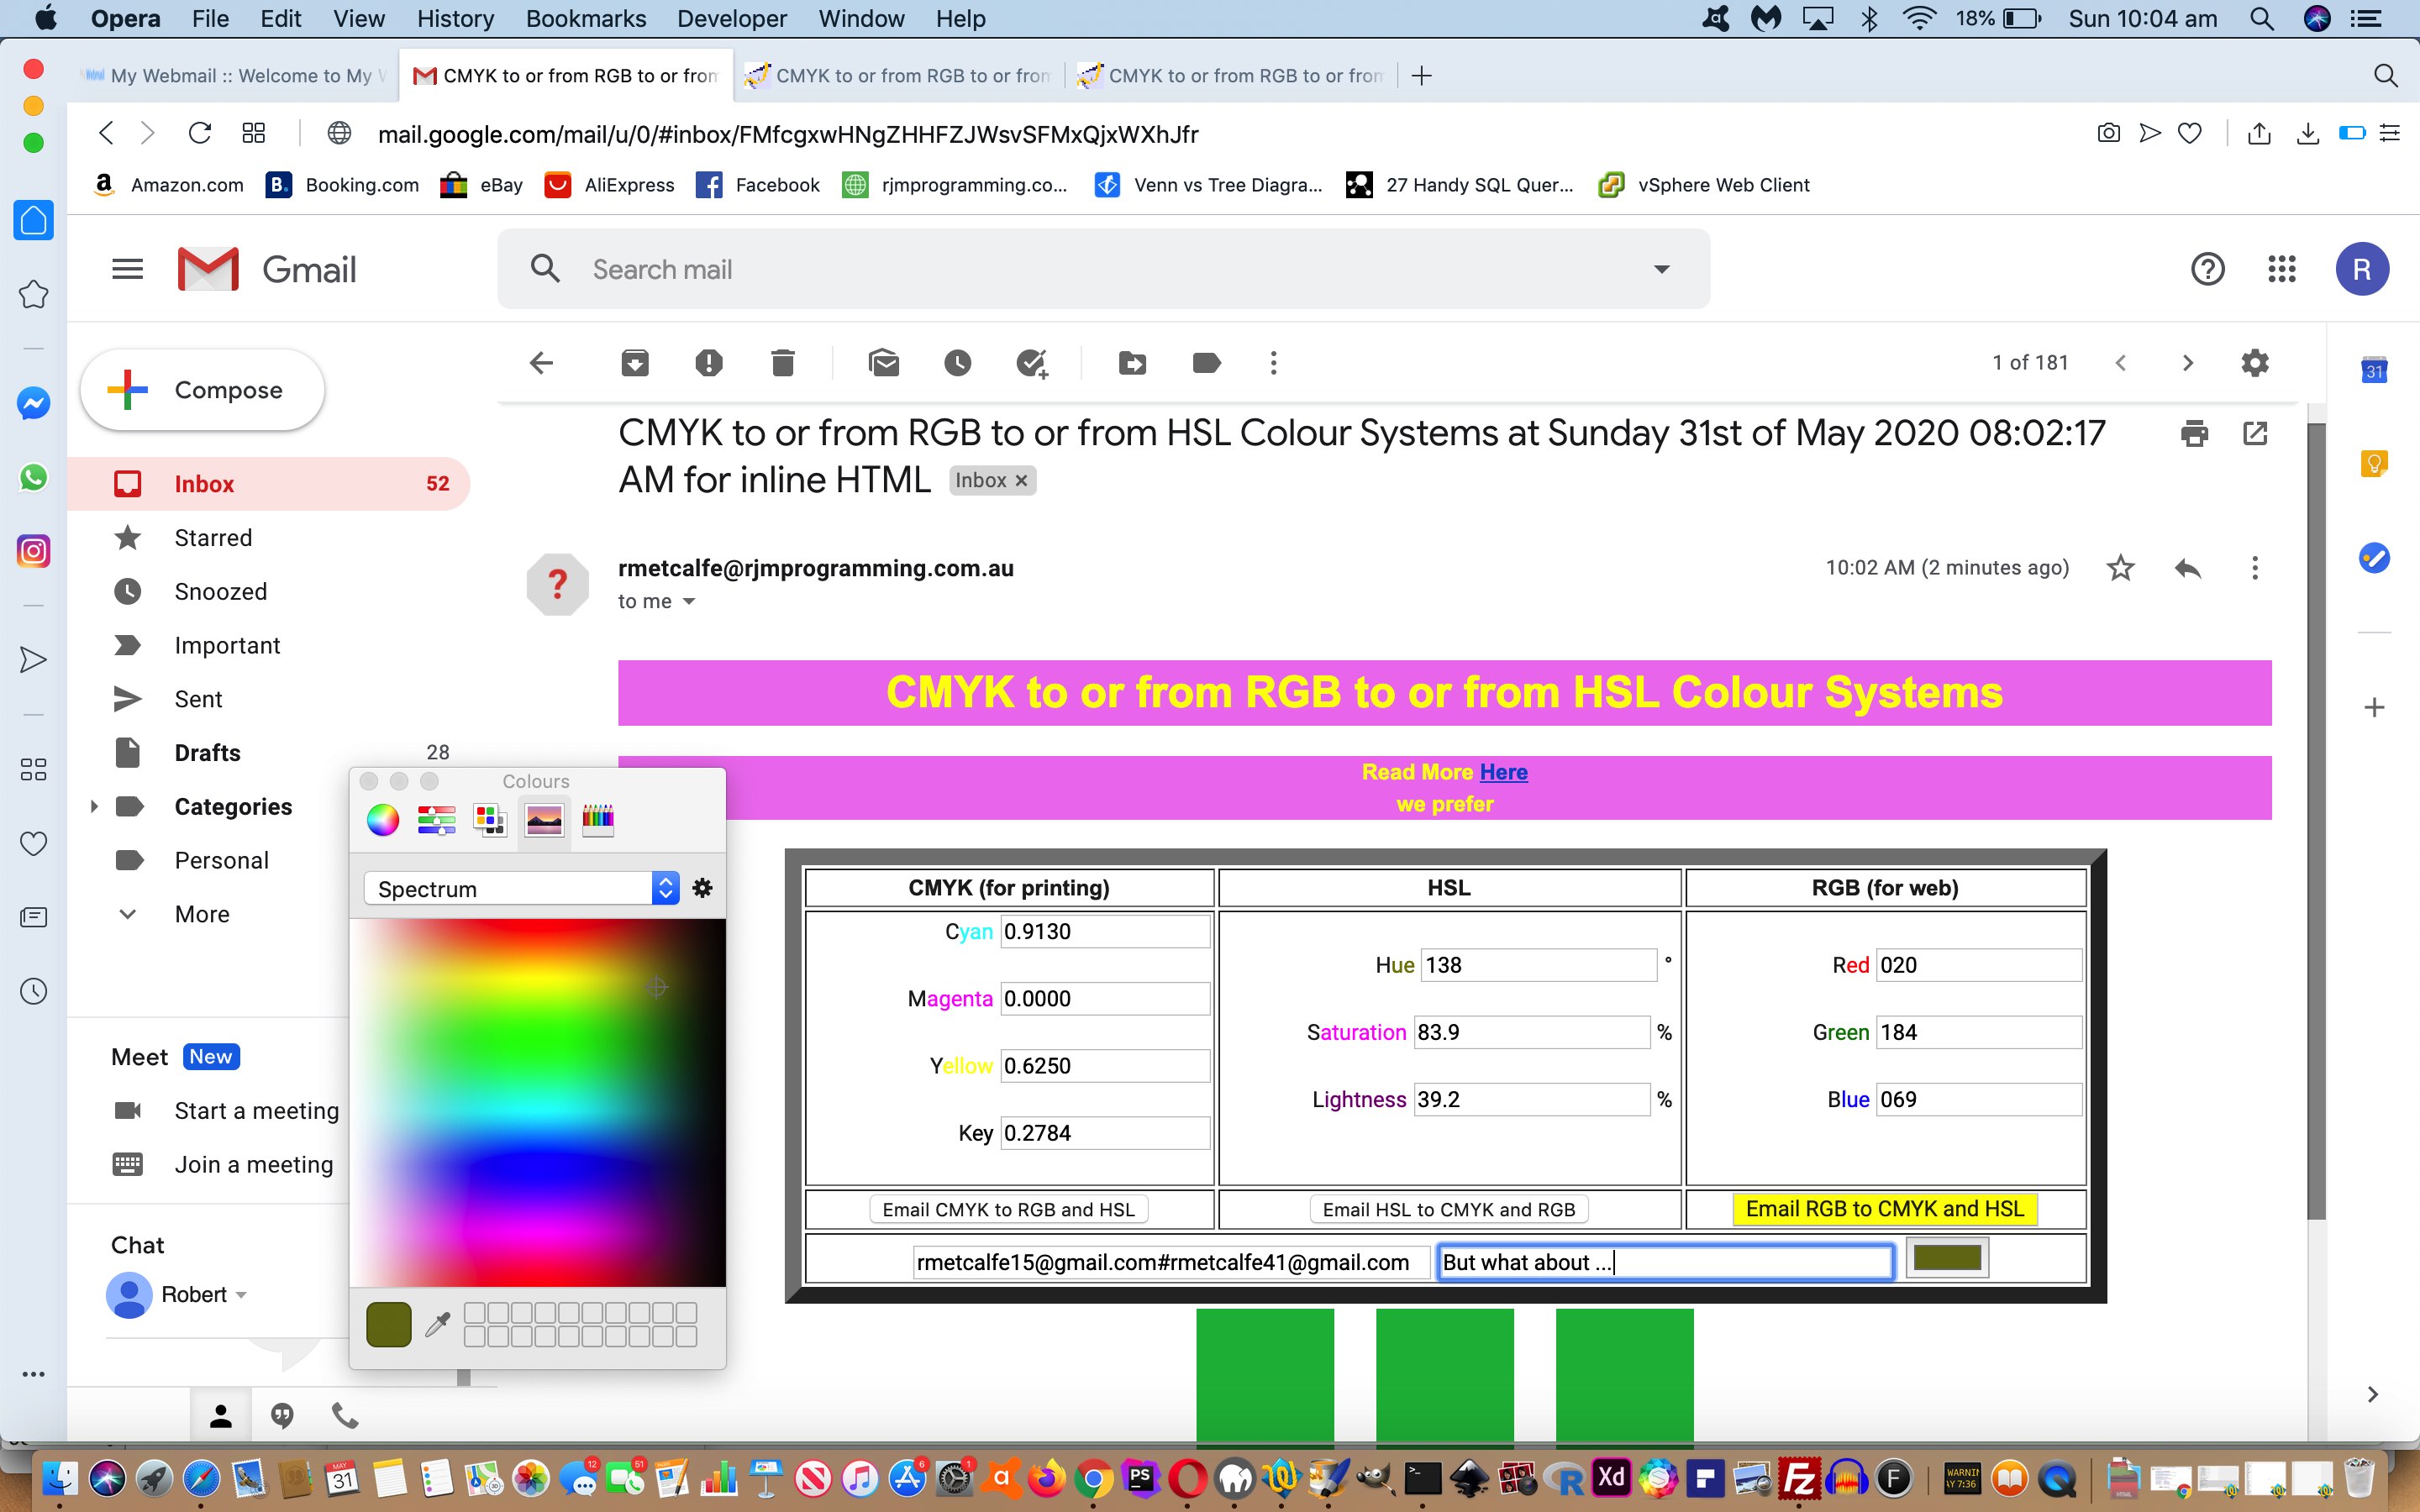
- a comment or feedback textbox (new today), to add some personalization, into the colour discussion and collaboration and sharing experience (… what’s come over me!)
… meaning, though, that collaboration can occur between collaborators through (straight at your face content) email.
Today, also, we’ve added another HSL (Hue/Saturation/Lightness) Colour System, and would like to thank this useful link regarding the formulae needed to make this happen.
Try collaboration via the changed cmyk_rgb.html live run link yourself, and with a colourful friend!
Previous relevant Colour Systems Inline HTML Email Tutorial is shown below.
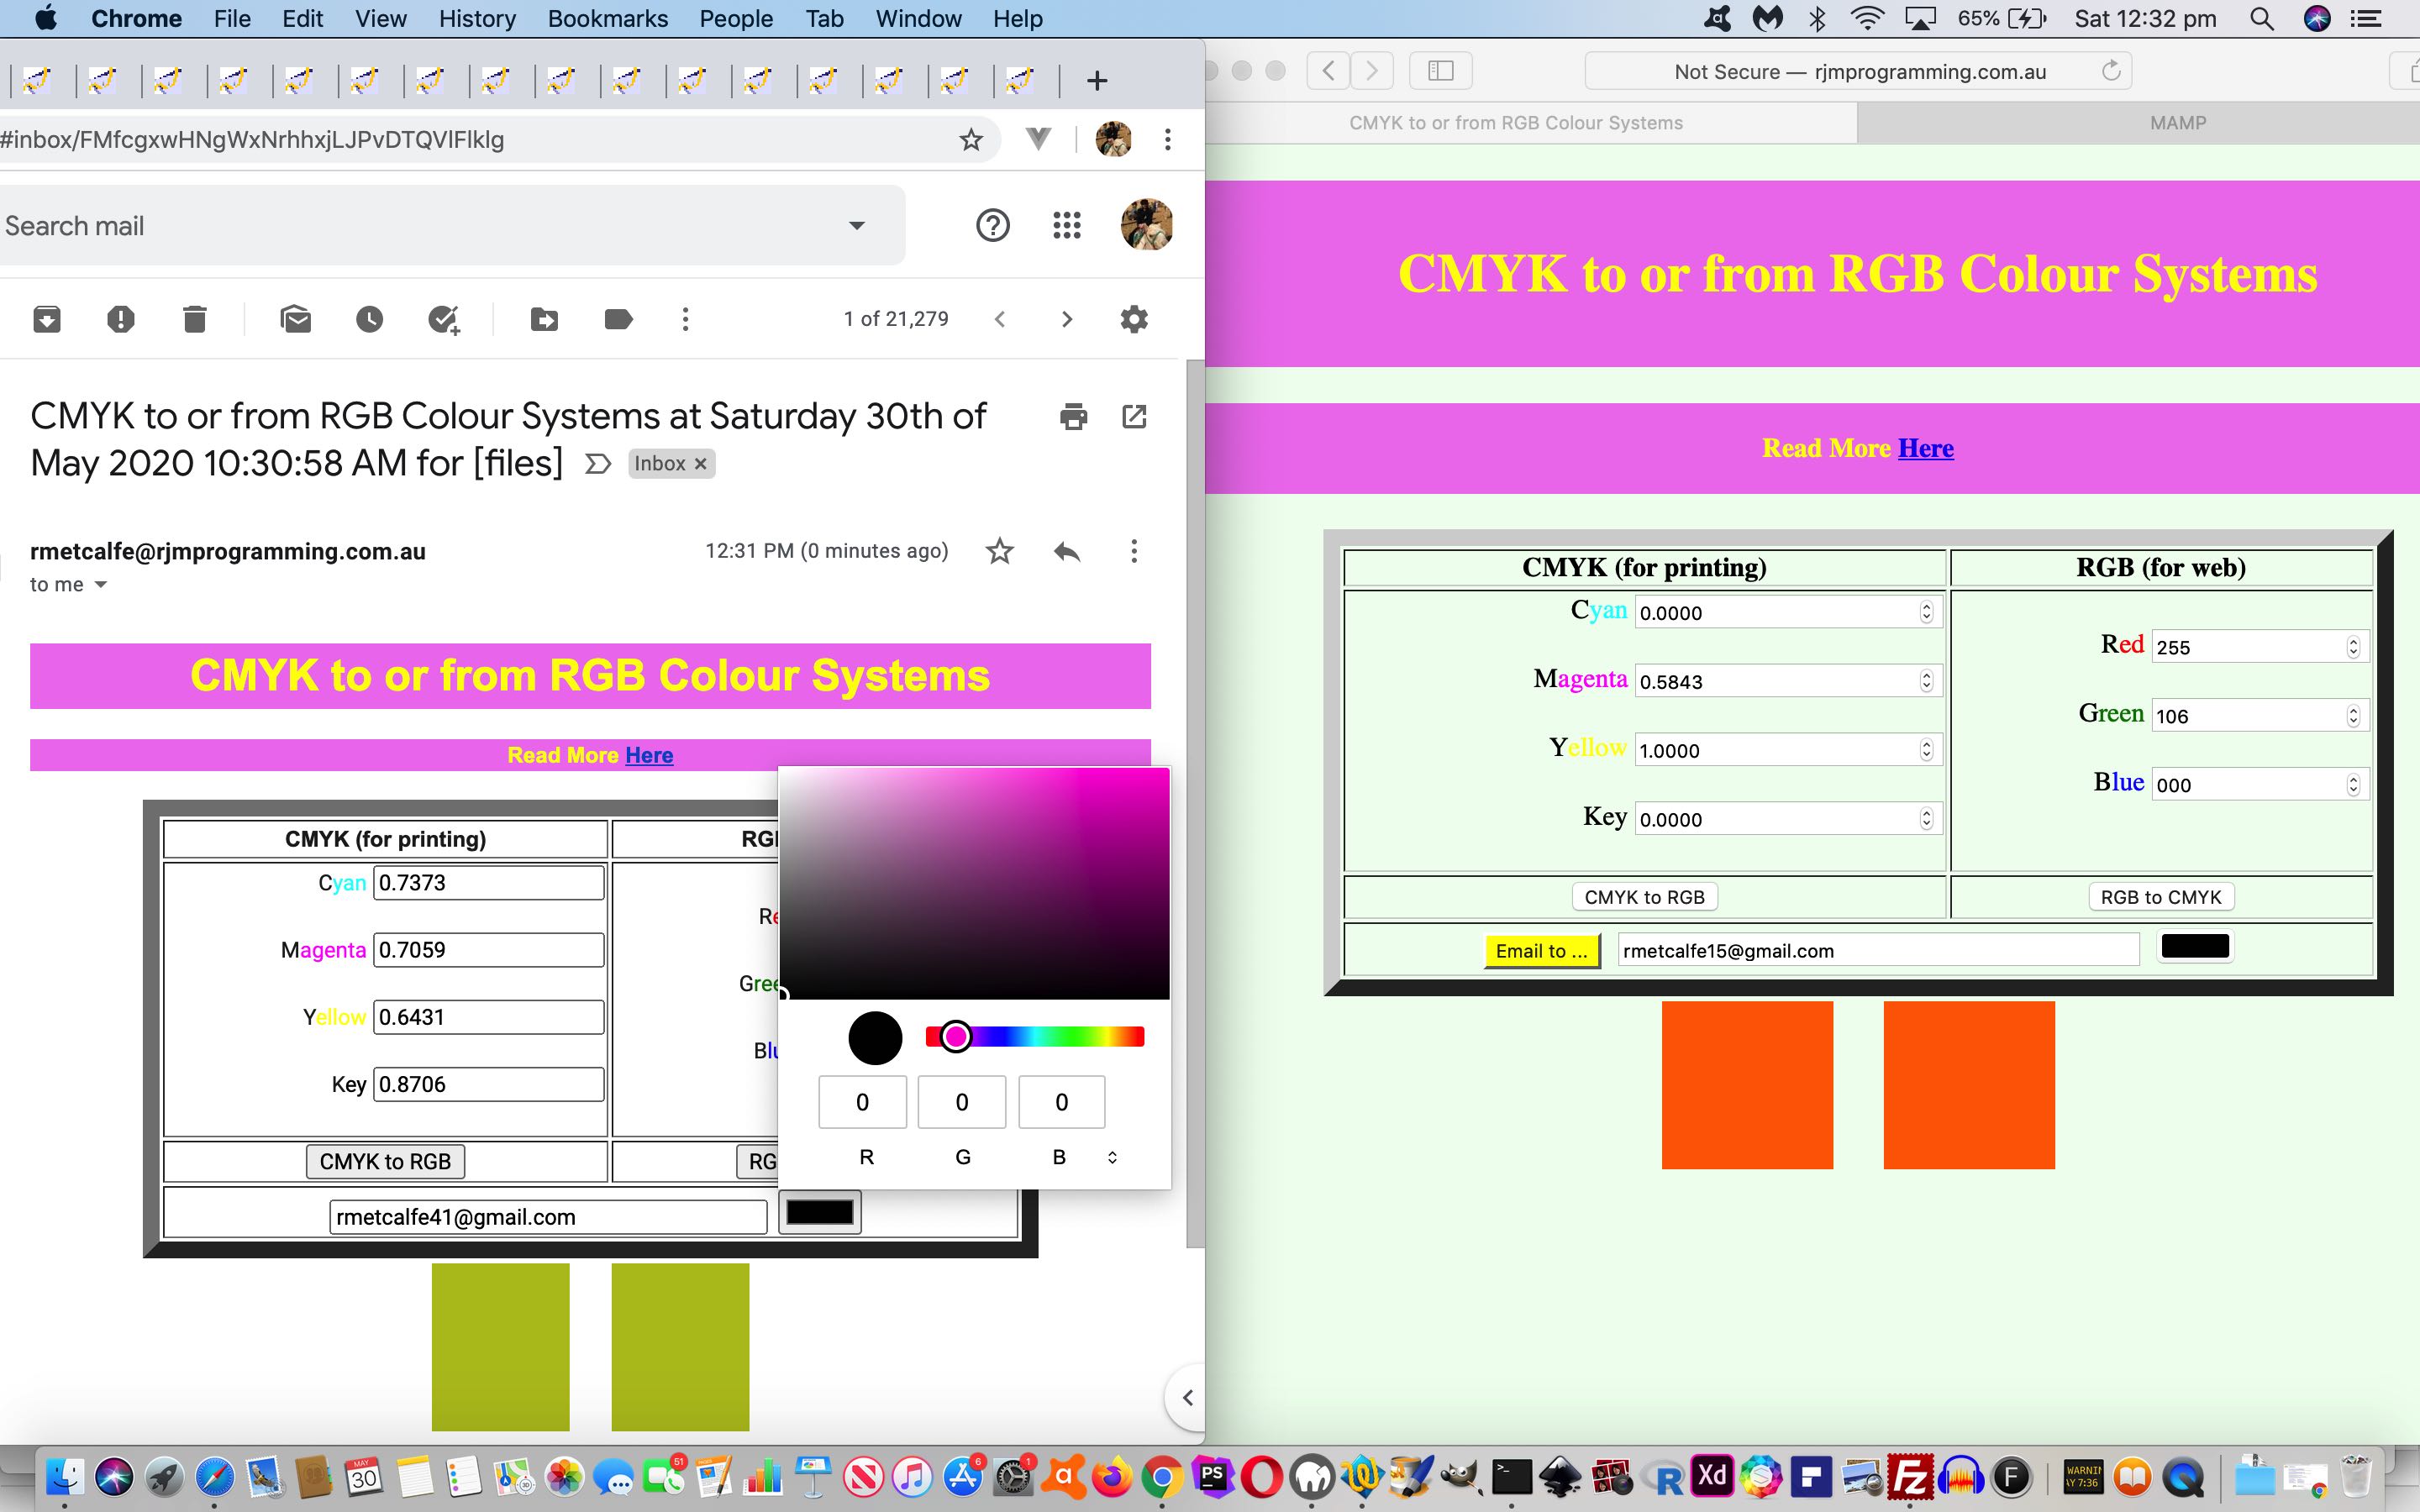
In undertaking the makeover for the Colour Systems web application of Colour Systems Primer Tutorial we were integrating Inline HTML Email functionality via Ajax/FormData techniques (entrenched as a favourite “midair” feeling email conduit approach) when we were surprised trying something that we did not expect to work. We have intimated that as far as email clients go it is touch and go whether much HTML5 works nor CSS3 when you try to get something going, so when we tried integrating …
- inline HTML email … with …
- HTML input type=”color” as per …
<input onchange="findc(this.value);" style='display:INLINE-BLOCK;' type="color" name="cinput" id="cinput" value="#000000"></input>
… we were really expecting “tears before bedtime” rather than an approach using the HTML input type=”color” element above that really made it good at the emailee end, in particular, as we …
- have an emailer start the ball rolling (with the changed cmyk_rgb.html) at this link … then …
- set up a colour of interest via any of the following approaches …
- fill out Red, Green, Blue … 0 to 255 … RGB Colour System numbers
- fill out Cyan, Magenta, Yellow, Key … 0.0000 to 1.0000 … CMYK Colour System numbers
- click our new HTML input type=”color” element and follow your nose
- and then, optionally, collaborate (or just share) with an emailee (textbox) they fill out and press the “Email to …” button … setting off …
- Ajax/FormData functionality sends off the document.body.innerHTML (heavily amended) HTML data directed via our Inline HTML Email “emailhtml.php” (usual PHP) helper …
- email arrives for the emailee who sees a lot of what the emailer last saw … and …
- we highly recommend clicking our new HTML input type=”color” element, then follow your nose (picking a colour , not your … ?) then … click RGB to CMYK button
- fill out Red, Green, Blue … 0 to 255 … RGB Colour System numbers … click RGB to CMYK button
- fill out Cyan, Magenta, Yellow, Key … 0.0000 to 1.0000 … CMYK Colour System numbers … click CMYK to RGB button
… optionally adjusting the return email (as the original emailer’s email address, more than likely) … back out to “the net” with …
- the emailee’s web browser arrives at the same colour systems web application ready to, optionally, send more collaboration or sharing back to the emailer, as required
Colourful discussions can ensue! And don’t we know, lots of people have opinions about colour, even its spelling!
Previous relevant Colour Systems Primer Tutorial is shown below.
We want to talk, today, about Colour (Space) Systems. There are, at least …
- additive colour systems … used in science … often used to define web colours … red, green and blue are the primary colours
- subtractive colour systems … used by artists (and often the way we learn colours in early school) … often used with regard to printing … red, yellow and blue are the primary colours
- the CMYK colour system … used by printing industry … cyan, magenta, yellow and black are the primary colours
You can read more about the comparisons and a description of these three at Colour Systems – RGB and CYMK.
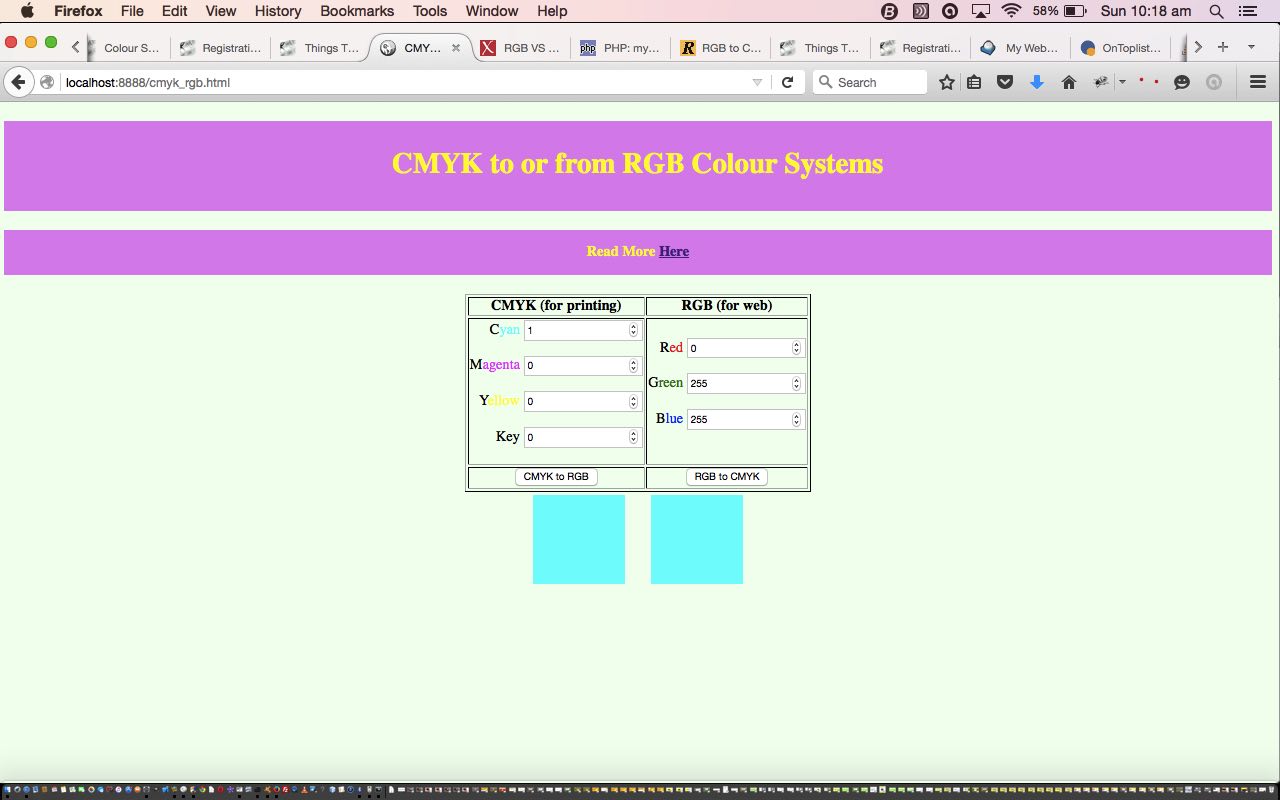
We’ve got a small HTML and Javascript conversion program we call cmyk_rgb.html (and that you can use as a live run) which you can use today to convert a given colour to and from RGB and CYMK colour systems.
If this was interesting you may be interested in this too.
If this was interesting you may be interested in this too.
If this was interesting you may be interested in this too.
If this was interesting you may be interested in this too.
If this was interesting you may be interested in this too.
If this was interesting you may be interested in this too.
