There’s a good chance you’ve heard of the term “Virtual Private Network”? If not, how about VPN? We got a heads up on this from the excellent “7 major benefits of VPN services: no room for doubt”, thanks, and let’s hear what Wikipedia has to say about this networking topic …
A virtual private network (VPN) extends a private network across a public network, and enables users to send and receive data across shared or public networks as if their computing devices were directly connected to the private network. Applications running across a VPN may therefore benefit from the functionality, security, and management of the private network.[1]
VPN technology was developed to allow remote users and branch offices to access corporate applications and resources. To ensure security, the private network connection is established using an encrypted layered tunneling protocol and VPN users use authentication methods, including passwords or certificates, to gain access to the VPN. In other applications, Internet users may secure their transactions with a VPN, to circumvent geo-restrictions and censorship, or to connect to proxy servers to protect personal identity and location to stay anonymous on the Internet. However, some Internet sites block access to known VPN technology to prevent the circumvention of their geo-restrictions, and many VPN providers have been developing strategies to get around these roadblocks.
In a past role, I can remember frequent use of these VPNs, and/or GoToMeeting (that we talked about with at GoTo Meeting Primer Tutorial), as two examples of means by which we could troubleshoot issues remotely for a client’s software, and had a need the other day to revisit how this is done at the mac OS (with a MacBook Pro laptop for example). We’ll detail some of the company specific requirements on another posting, but you may be wondering where all this happens on a macOS such as our macOS Mojave version 10.14 on our MacBook Pro.
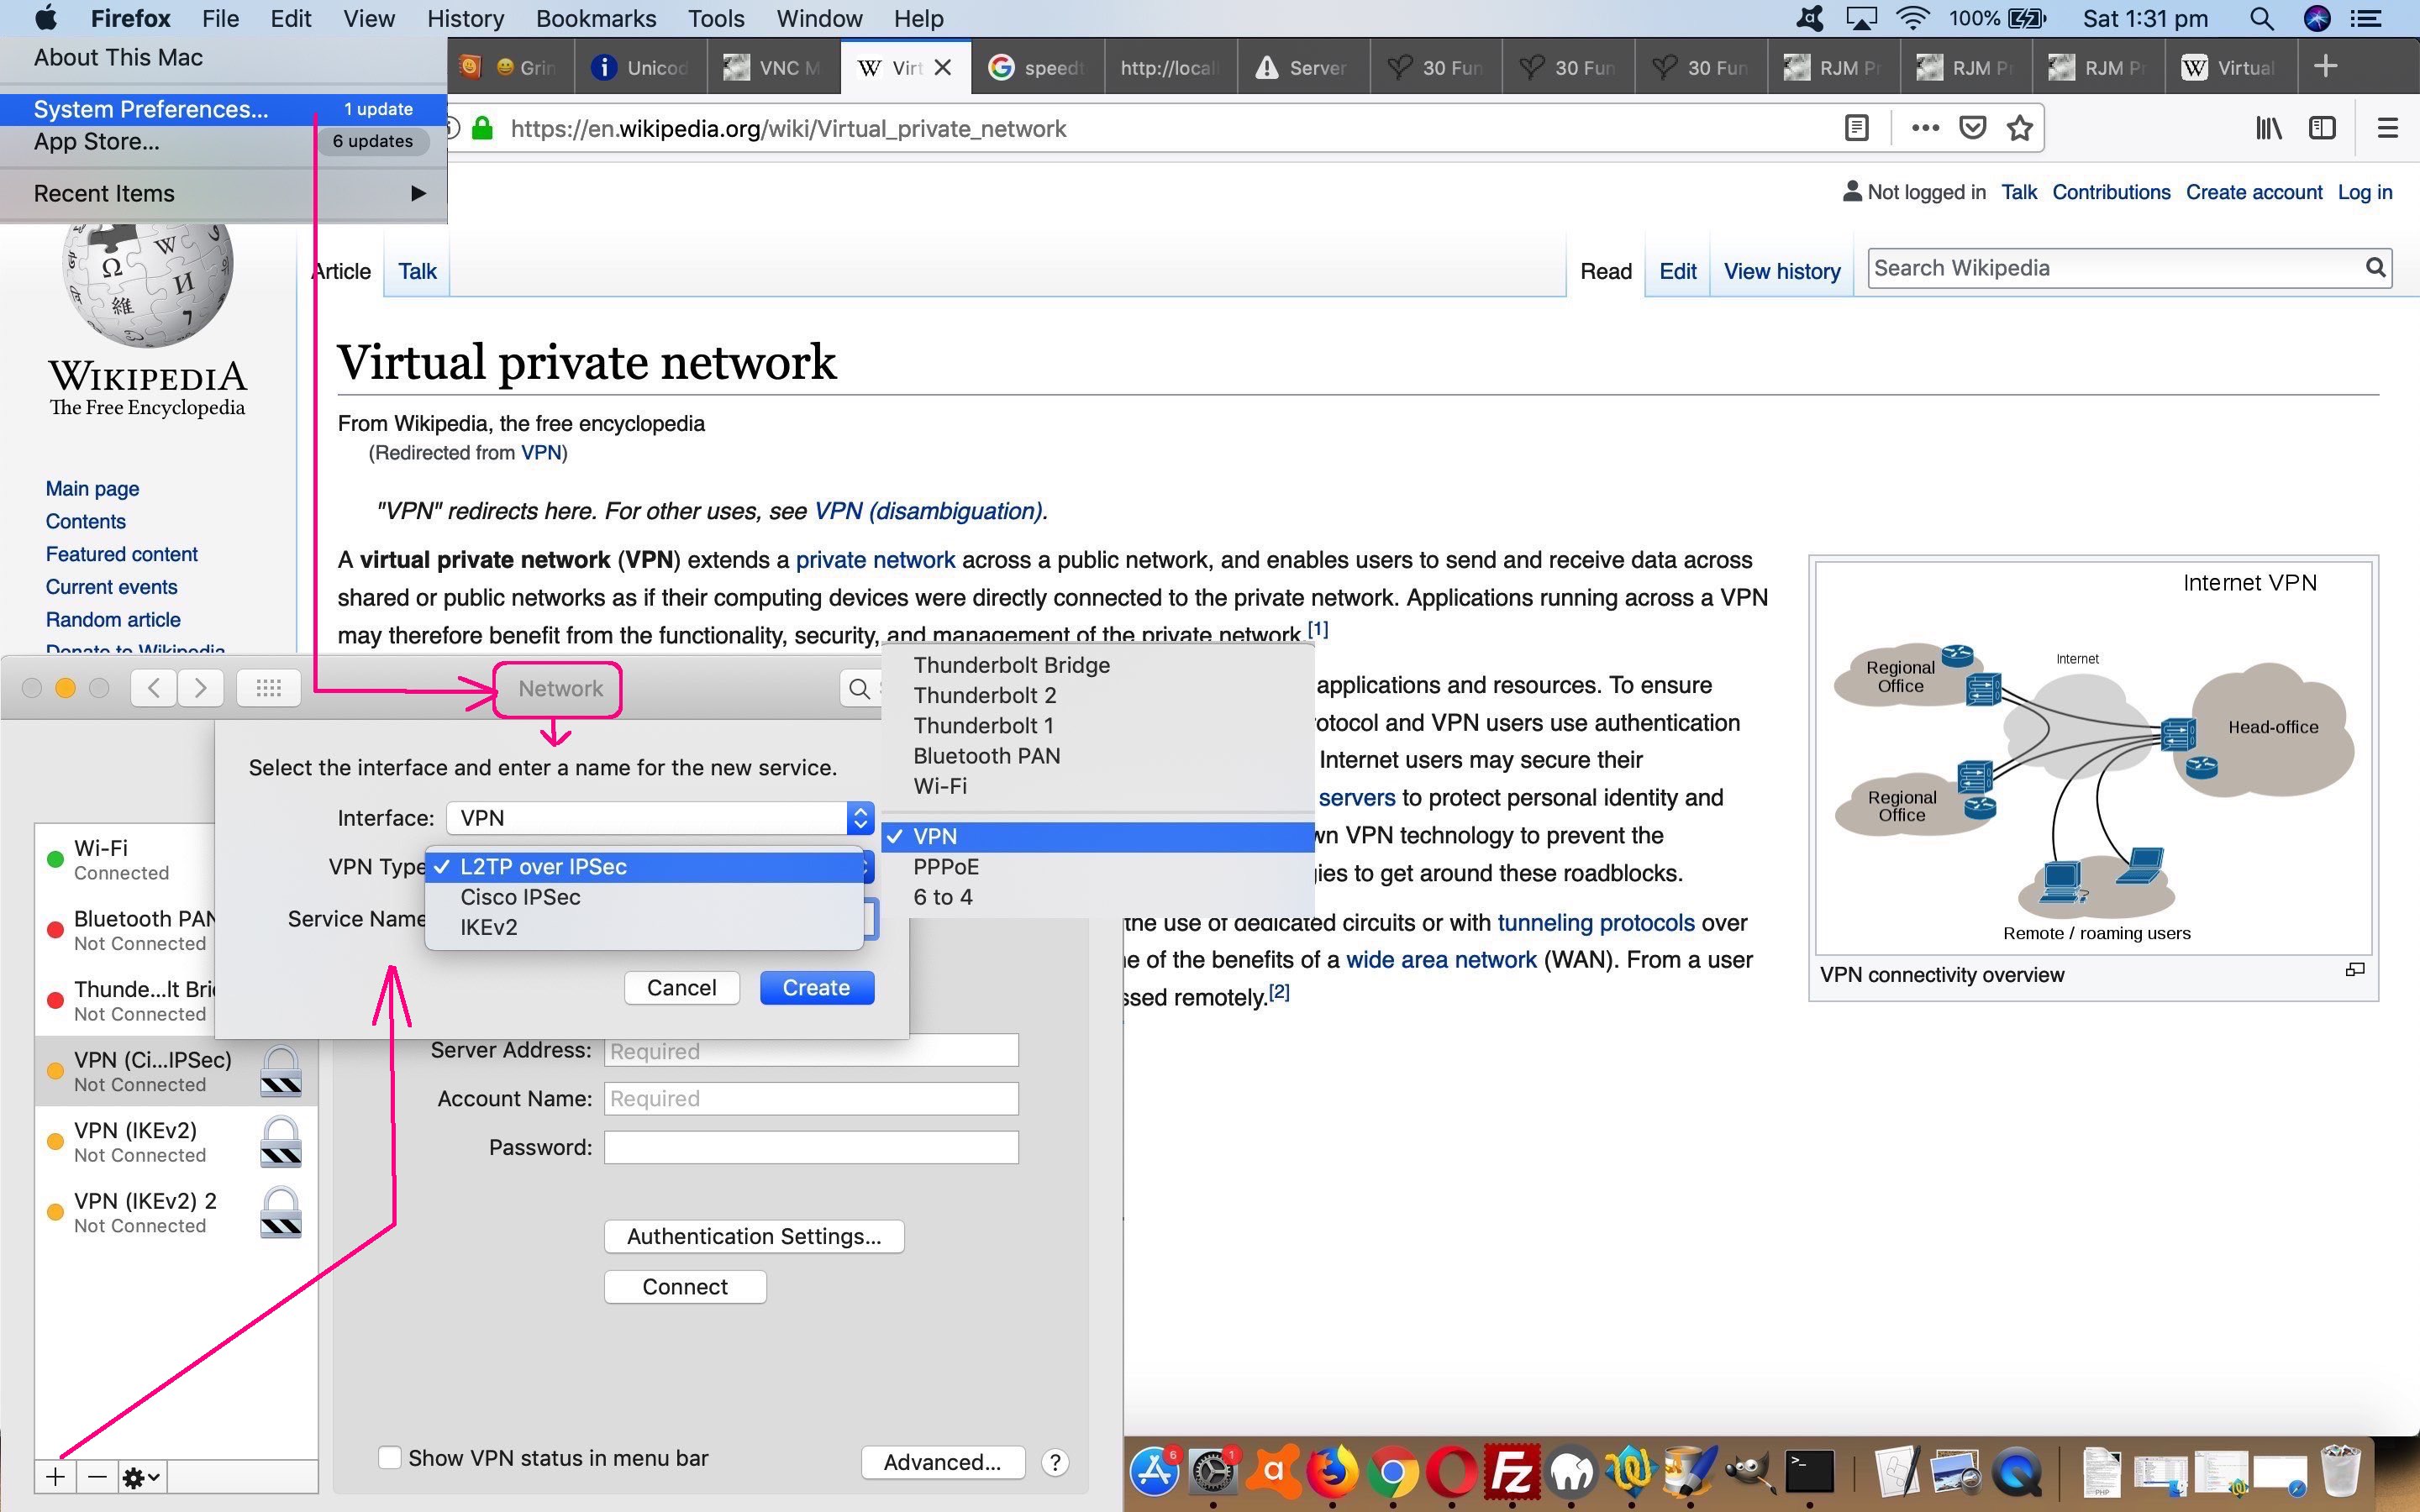
- Click the Apple logo at the top left
- Click System Preferences…, and, as necessary “left arrow” back to the main screen of System Preferences (if you were doing something else there, that is)
- Click Network icon to arrive at a Network screen with existant Network connection possibilities listed at the left column … perhaps you already have the VPN of interest listed there, and if so, that is what you click to establish the relevant VPN connection, else to start a VPN connection configuration …
- Click the “+” button at bottom left to configure a new Network connection, and a window opens up offering “Interface” and “Service Name”
- For “Service Name” pick a name for the VPN connection that will ring bells for you about what VPN connection you will be attempting
- For “Interface” choose “VPN” from the dropdown list, and a window opens up offering “Interface” and “VPN Type” and “Service Name” (filled in okay because of last step)
- The company you are connecting with will supply the “VPN Type” out of …
- L2TP over IPSec
- Click Create button to a “Configuration” (as distinct from the “Default” one) and “Service Name” and “Account Name” and “Authentication Settings” (made up of “User Authentication” via Password/RFSA SecurID/Certificate/Kerberos/CrypotoCard and “Machine Authentication” via SharedSecretCertificate and optional “Group Name”)
- Click “Connect” button to establish a VPN connection, as required (now)
- Cisco IPSec
- Click Create button to a “Server Address” and “Account Name” and “Password” and “Authentication Settings” (made up of “Machine Authentication” via SharedSecretCertificate and optional “Group Name”)
- Click “Connect” button to establish a VPN connection, as required (now)
- IKEv2
- Click Create button to a “Server Address” and “Remote ID” and “Local ID” and “Authentication Settings” (made up of “Username” (Username and Password) or Certificate (that is a file you browse for (as for mentions above too)) or “None”)
- Click “Connect” button to establish a VPN connection, as required (now)
- L2TP over IPSec
That VPN connection becomes like a layer on top (so the local broadband or other connection speed needs to be up to it, which “SpeedTest” into a search engine can measure for you, and/or see it discussed at LAN Speed Testing Primer Tutorial, and should yield a “Download Speed” of 15Mbps (megabits per second) or faster), so don’t be surprised if some public URLs that used to work stop working while your VPN connection is active. If so, they are resurrected once any temporary VPN connection is later “Disconnected”.
Enough for now. We think so, but later we might follow up on this, and tell you some specifics of a real case, to be able to “Remote Desktop” on a MacBook Pro via a VPN connection enabling the logging on and working with a Windows Desktop PC (left on at an office). That Windows Desktop PC in turn has access to the relevant company’s File Servers and Intranet, so that work can be achieved remotely, the VPN offering similar company security arrangements as would be the case in the office.
Did you know?
VPN and VNC or (Virtual Network Computing) that we discussed with Windows Remote Desktop Primer Tutorial are two different networking concepts. We used a VNC within our local networking environment of the house here (ie. not a “remote connection” as such) to share screens between a MacBook Pro (Mac OS X=macOS) and a Windows Desktop PC. What is common to all these networking activities is the word “connection”, as a general term to describe the means by which two computers or devices (or concepts like databases) can “communicate” (or be “linked”).
If this was interesting you may be interested in this too.


One Response to Virtual Private Networks on macOS Primer Tutorial