

Panoramic Image via iOS Camera App Tutorial
In the past we’ve talked about the creation of panoramic presentations via existant single photographs when we presented Panoramic Image Presentation Primer Tutorial.
Today we create a panoramic presentation via an iPhone Camera app’s “Pano” mode of image capture, creating the effect “at the source”, in a similar mode of thinking that created us our slow motion video when we presented Camera App Video Slow Motion Primer Tutorial a few days back.
You will find, trying this “Pano” mode of image capture on your iOS iPhone or iPad that not every subject works very well. We at first tried a “Pano” version of moving along a wall pointing the iPhone not perpendicularly, but at an angle, down. “Pano” mode does not suit this. “Pano” mode suits subjects where your iPhone is perpendicular to the ground and you swing around the “vista” of a distant view, or as we show you today, a crowded grouping of people at a Flower Show.
“Pano” image creations on an iPhone take a bit of practice and you will get a higgledy piggledy edge look if you do not quite succeed, when swinging around in “Pano” mode, to keep the indicator in the middle of its range, as shown in the Camera app’s view, as below.
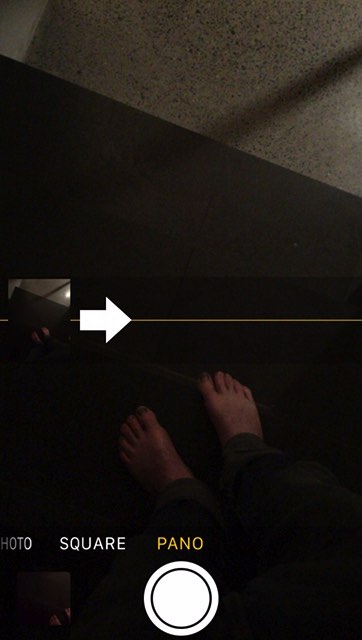
Get it right, and apt, and you will find this “Pano” presentation to be so much better than a gimmick.
Previous relevant Panoramic Image Presentation Primer Tutorial is shown below.

Panoramic Image Presentation Primer Tutorial
If you buy a printer for home or office use, it quite often comes with its own software package augmenting the capabilities of that piece of hardware and networking capability. It used to be on a CD or DVD or floppy, but is now more likely to be a part of a downloadable software package off the net. You may use your printer just as the first of the list below, but it can do quite a bit more as per some or all of …
- print hard copy
- scan hard copy
- be wirelessly connected and so be involved in a print server arrangement
- read in memory cards off digital cameras, for example
… and then, with the use of that additional software package, perhaps, functionality like …
- greeting cards
- flyers
- brochures
- calendars
- photo gifts
- slideshows
- send images to host company for assembly into a presentation of some sort
- other image arrangements, many and various
… and we used this additional Hewlett Packard HP Photosmart Premier (version 6.5) software package that came with our HP Deskject 2050 printer on Windows (desktop computer) to assemble that Panorama arrangement of photographs the other day when we presented Android Disk to Windows Disk Tutorial. Now the word Panorama is more suited to what we show today with a sequence of five photographs taken with an iPad panoramically panning around our back yard, and then assembling into today’s tutorial picture via this HP Photosmart Premier …
View menu tab My Selections checks -> Create tab menu -> New Project -> Panoramas -> Add all (button) -> Next (button) -> Save (link at left) -> c:\back_yard.jpg -> Mid-range quality of jpeg -> Save (button) -> Done (button)

… mode of image display. We were at first a bit dubious, but feel that this type of one image display is quite nifty, especially with those mobile devices that zoom so easily using gestures. The result we feel is like a pared down horizontal slideshow presentation, and so we’re officially adding it to our list of image presentation ideas you can see listed from PDF on Mac OS X via Images and Finder and Preview Tutorial as shown below.
There’s no doubt the number of choices out there in “software land” regarding presentation can present with a witheringly long set of choices, but it is worth noting that a printer, even with today’s less “hard copy” world, can still hold considerable power in a home office, and we dare say, work office, world.
Did you know?
If there is something about this panoramic image technique that appeals, maybe you would be enthusiastic about photogrammetry as that photographic mapping whereby overlapping photographs are placed into the left and right plates of a photogrammetrist machine, control points are matched up, and in the overlap area, the third dimension springs up at the operator for them to be able to map all three dimensions. In practice, photogrammetry has been used with altitude, or Z, as that third dimension, using photography, with overlaps built in, taken from the bottom of an aeroplane.
Previous relevant PDF on Mac OS X via Images and Finder and Preview Tutorial is shown below.

PDF on Mac OS X via Images and Finder and Preview Tutorial
When presenting the recent Cocos Open-Source Game Development Primer Tutorial as shown below, we introduced another technique of presenting a series of images in a presentation format of some use. Putting it into context it’s the green bit of …
If clicking today’s tutorial picture is not your style, below, we’ve broken it into that approach’s two components …
- Preparatory installs and project creation and configurations … and …
- Running project’s animation in situ (recorded off a Windows laptop via an Android Phone Camera app’s Video option and emailed on and downloaded to MacBook Pro and uploaded to the website … so there, ngaaaaa! … sorry if you can’t play .mp4)
- Now in putting this PDF presentation together we used Mac OS X desktop application Preview, that comes with the Mac OS X “out of the box” installation of its operating system. We create a PDF via Preview via Finder window highlighting of all the sequenced images and using two finger gesture (equivalent to Windows right click) option Open With -> Preview
- Once in Preview we Edit -> Select All to highlight all the images, and then we do something a bit counterintuitive, perhaps to some, to create the PDF (that contains all the images).
- We then use File -> Print … believe it or not … to construct our PDF … why? … well, perhaps you should read our Document Fidelity Primer Tutorial which outlines a little the purpose of PDF as a file type on the net … it is there to be the file format “online” that is like you printing out hard copy on your home or office printer, the “fidelity” bit being about how this is interesting for applications not wanting to leave a “paper trail” … chortle, chortle … regarding metadata left on the net (as distinct from the oodles and oodles of metadata “paper trail” information left by HTML) … and so, hope you can see why our final solution to creating a PDF that consists of a series of sequenced images might involve the File menu’s Print option …
- And once there we adjust things like Landscape (versus Portait) orientation and importantly change the bottom left “PDF” dropdown to have the value “Save as PDF…” then hit the Print button … that opens …
- The “Save” dialog box where you can specify what the output name of the PDF file should be for your printout of image data feeding into the resultant output PDF file.
So let’s just present to you today the look of this happening in another of our compiled list of “presentation of image data” techniques, below, that we’ve used at this blog, to date … an animated GIF …
- Single image (with/without annotations added by, primarily, Paintbrush) often snapshotted on Mac OS X via Grab (for further reading, please read Paintbrush and Grab Primer Tutorial) or on Windows via the PrntScn keyboard button
- PDF (as above)
- Our homebrand slideshow (with the “@” link at the left) … whose functionality we “harness” with our “Visual Synopsis” ideas talked about with WordPress Visual Synopsis Automated Scrolling Tutorial
- Another homebrand “inline blog posting” Javascript DOM technique we refer to at this blog, occasionally, as the “Twirl” … first talked about, and you can “View Page Source” in regard to, with PHP/Javascript/HTML Google Chart Motion Chart Tutorial
- Lightbox (which you can read about at Javascript/CSS Lightbox Primer Tutorial)
- HTML Map and Area and Audio Commentary (which you can read about at Apple iOS Siri Audio Commentary Tutorial)
- Animated GIF via Gifpal and via our inhouse approach (via HTML files like this one)
- PowerPoint slideshows (to HTML)
- YouTube via Movavi Video and Audio Slideshow Tutorial
- Inhouse Gallery idea we talked about at PHP/Javascript Dynamic Gallery Primer Tutorial
- Showing eMail attachments, as we used at Visual Studio Code on Mac OS X for .NET Core and C# Tutorial
- Staged Animation inhouse idea talked about at HTML/Javascript Staged Animation Meter Presentation Tutorial
- Mac OS X iPhoto Slideshow to iTunes and iMovie Movie ideas presented at Mac iPhoto Slideshow to iTunes and iMovie Movie Primer Tutorial
- Homegrown Vertical or Angled Slideshow started at Vertical Slideshow Tool Primer Tutorial
- Panoramic Image Presentation at Panoramic Image Presentation Primer Tutorial
Previous relevant Cocos Open-Source Game Development Primer Tutorial is shown below.

Cocos Open-Source Game Development Primer Tutorial
Games development is huge on the net, and so there are good reasons to get into “Open-Source” for collaborative purposes and to pick the brains of experts in forums and blogs and chatrooms about what is good and what is a waste of time.
In our recent foray back into the Visual Studio world, we shaped to try out what was on offer with Visual Studio Express 2015 on Windows 10 related to a Games project, and stumbled on the “Cocos Open-Source Development System” based on the “Cocos2d Framework” information from Wikipedia (thanks) …
Cocos2d is an open source software framework. It can be used to build games, apps and other cross platform GUI based interactive programs. Cocos2d contains many branches with the best known being Cocos2d-objc, Cocos2d-x, Cocos2d-html5 and Cocos2d-XNA. There are some independent editors in the cocos2d community, such as those contributing in the areas of SpriteSheet editing, particle editing, font editing and Tilemap editing as well as world editors including SpriteBuilder and CocoStudio.
We’ve got together a “Hello World” feeling of “stumbling along” getting a sample project to run an animation to dip our toes into the deep deep oceans of knowledge swirling around this topic … ie. we want you to know you can do it … and we don’t work for Nike?!
If clicking today’s tutorial picture is not your style, below, we’ve broken it into that approach’s two components …
- Preparatory installs and project creation and configurations … and …
- Running project’s animation in situ (recorded off a Windows laptop via an Android Phone Camera app’s Video option and emailed on and downloaded to MacBook Pro and uploaded to the website … so there, ngaaaaa! … sorry if you can’t play .mp4)
If this was interesting you may be interested in this too.
If this was interesting you may be interested in this too.
If this was interesting you may be interested in this too.
If this was interesting you may be interested in this too.

