Today we indulge in a few of the personal I.T. interests “swimming around” for me at the moment …
- fonts, and whether they can be zoomed to pixel level with not much more than client side Javascript, not using jQuery or other libraries … yet … more on this, specifically, later
- colour mixing … like at school … when you mix colours with watercolour or even pencil and less so with crayons … can that be simulated by “overlay” thoughts (the usual suspects like position:absolute property and z-index) combined with really small opacity usage?
- [top.]document.all or [top.]document.getElementsByTagName(“*”) … traversing of all the HTML elements of a webpage, regardless of their type … thanks to this useful link for ideas here
… and we, at first, thought this amounts to a few different tutorial strands of thought, but, today, we bring them together into one … and then later they’ll probably need more examination as “a few different tutorial strands of thought”.
Today we take some HTML input (that is, today, the content of a previous blog posting, but we may extend this mode of thinking if we pursue all this some more) … and take it to the zoo … sorry we’ve already used that venue and gather together textual HTML [element].innerHTML data along with containing rectangle information via either ([element].style.left,[element].style.top,[element].style.right,[element].style.bottom) or [element].getBoundingClientRect() (we first talked about with HTML5 Canvas Map Clickaround Overlay Tutorial) information …
- an array things … initialized to “[]” via things=[]; … populated via things.push([stringPrefixedBy8CharZeroLeftPaddedStringLength]) … sorted via things.sort(); … considered at the “top.document.body” onload event
- a mouse click or touch … things “rectangles” are scanned through to see whether they surround our clicked/touched co-ordinate … considered at the “top.document.body” onmousedown event (leaving the usual action event onclick to keep “doin’ its thang,
manperson”)
Today, for simplicity’s sake, we’ve added our own clobbery CSS up the top of our (pretty experimental, at this stage) HTML and Javascript font_zoom.html …
<style>

img { width:0; height:0; }

</style>
… between <head> and </head> just to, for now, alleviate co-ordinate issues (we can’t ignore forever you’d have thought) regarding text after HTML img data.
Think this “early days” “clicker of textual information” may be of interest to us and maybe to you, and as time goes on we’ll return, we think.
Oh … what do you do with the live run?
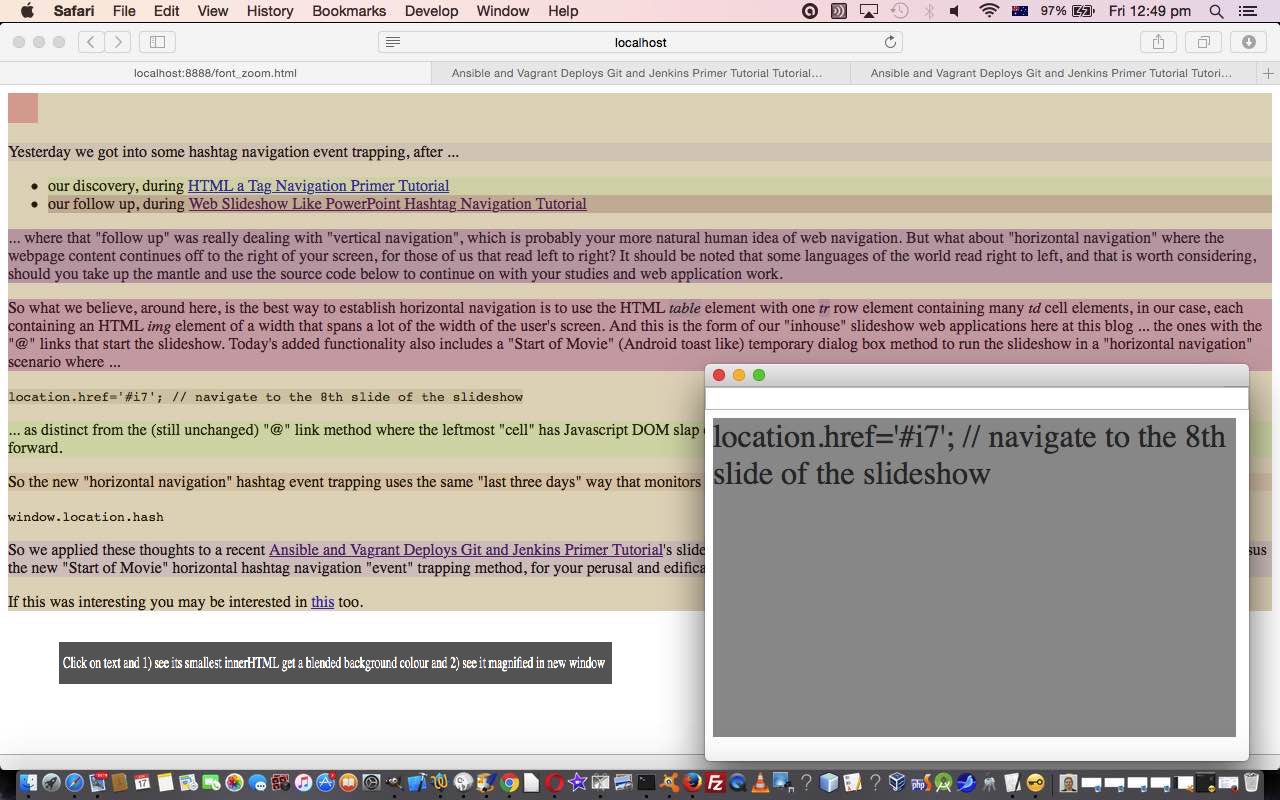
- Click/touch on pieces of text, and see the relevant “smallest” [element].innerHTML involving that text faintly highlight with a colour of opacity:0.08 … and to see this colour better …
- See a separate window (via the use of [element].outerHTML and window.open) show this [element].innerHTML with font-size:xx-large and the background colour more clearly indicated to you with opacity:0.8 …
- It’s up to you, but we thought it was interesting to reclick/retouch (chortle, chortle) the same text to see the 1 of above turn into a colour with the mix of the original colour and the new colour (again shown to you in the new window) mixed together with opacity:0.08
Sadly, have to say, that in the “hopeful conceptualization” stages of the thinking regarding …
- fonts, and whether they can be zoomed to pixel level with not much more than client side Javascript, not using jQuery or other librries … yet
- colour mixing … like at school … when you mix colours with watercolour or even pencil and less so with crayons … can that be simulated by “overlay” thoughts (the usual suspects like position:absolute property and z-index) combined with really small opacity usage
- [top.]document.all or [top.]document.getElementsByTagName(“*”) … traversing of all the HTML elements of a webpage, regardless of their type
… we hoped that, somehow … wishful thinking, huh … we might be able to set a huge numerically based font-size (and we tried font-size:1234px to no good avail) so that we could get “pixellated” text. Really, wanted to get one of those effects on neon signs, and some other road signs, of text forming from “pixellated” chaotic text “coming together” to form the text we can resolve in our brains … and perhaps vice versa, of course. This quest has been sidetracked, for now, as a result, but there are many other approaches that could involve reading font files and/or using other software languages with their libraries (including looking further into Javascript options this way).
We hope you live run users like the Android toast looking temporary dialog box “overlay” idea we try (and we first tried with Web Slideshow Like PowerPoint Hashtag Navigation Tutorial), that contains usage information, avoiding the need for static text to explain, we hope?!
If this was interesting you may be interested in this too.


