Despite the ongoing pace of change in Information Technology there are some less glamorous hardware we admire greatly …
- leads
- card readers
- digital cameras
… and we guess some will be thinking “troglodyte”, but, be that as it may, even though mobile phones can do what is “compartmentalised” above, we like the “compartmentalisation” just for itself … lest we forget.
Am no expert here, but guess Card Readers became a thang thing when digital cameras became a thang thing to rival those wonderful (usually SLR (single lens reflex)) Cameras many people used for their photographic exploits.
Perhaps you want to separate phone use from photography in your mind regarding gizmos? Then hang on to your digital camera. And these days the digital camera will supply you with a lead (who knows what colour) that will, no doubt, be able to be connected via a USB connection into a personal computer or laptop (we’re calling our MacBook Pro featuring today “a laptop” … it makes “blogging life” easier).
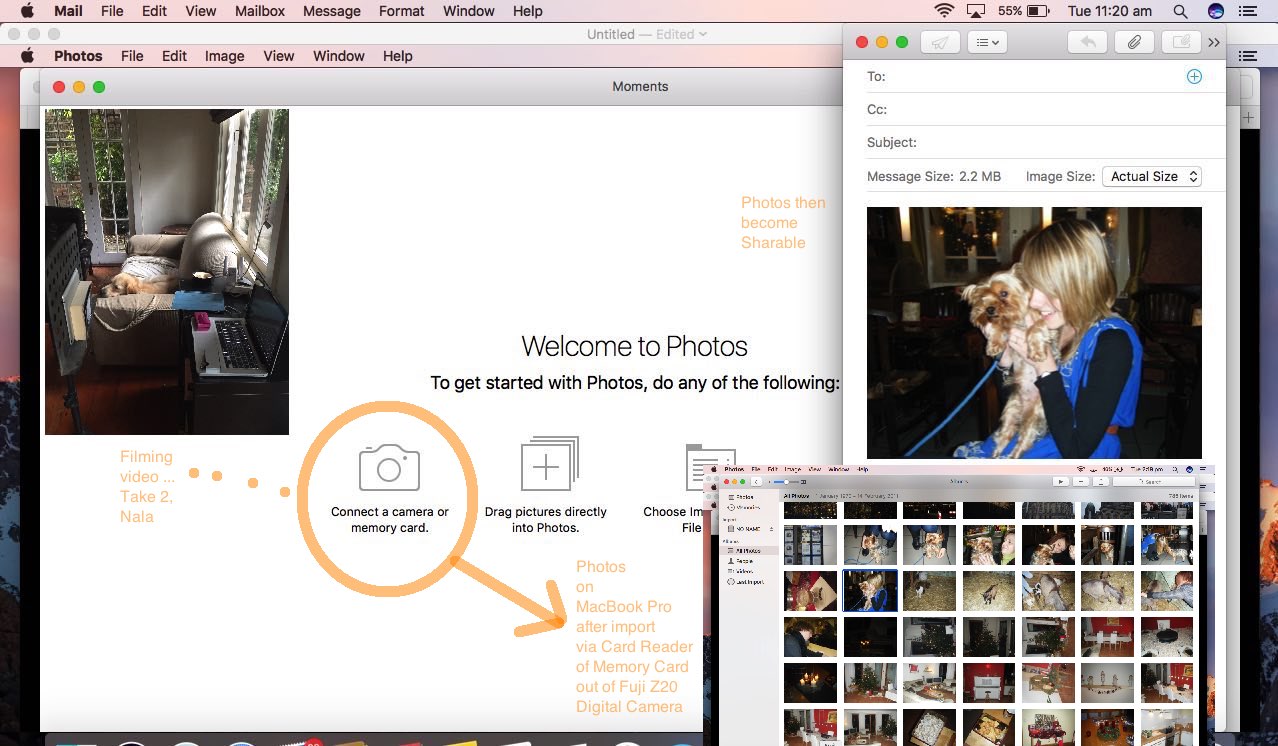
Which gets us to the aim of today’s tutorial. We have a newly initialized MacBook Pro using the Photos desktop application for the first time today. When that happens you are presented with some “first go” importing options, and the “Connect a camera or memory card” option caught our eye, as a procedure we wanted to document “good times” for card readers. The hardware ingredients for doing this, for us, were …
- Fuji Digital Camera Z20 … containing …
- Memory Card 2gB … readable by …
- QPix Card Reader … USB connectable to …
- Apple white lead … into …
- MacBook Pro … executing the desktop application …
- Photos … for the first time
… and for the filming of this video we also use …
- iPad … using Camera app’s Video option filming of the MacBook Pro’s goings on, positioned on a …
- Music Stand … with a …
- Book … wedged between iPad and Sheet Music “pacifiers”
… so to understand this procedure, please consult today’s tutorial picture and the YouTube video below …
… where, in basic terms, we …
- On MacBook Pro open Photos desktop app (for the first time)
- Arrive at the “Connect a camera or memory card” menu that we will return to after …
- Open Fuji Z20 memory card “hatch” and take out the 2gB memory card
- Place the 2gB memory card into the appropriate QPix Card Reader slot
- Place the Apple white lead with the USB end placed into the MacBook Pro USB port and the other end into the QPix Card Reader and see that the Card Reader red light goes on … so, back at the Photos app …
- Click the “Connect a camera or memory card” menu button … which opens up and displays the list of photos and videos stored on the 2gB memory card …
- Up the top right click the “Import All…” button … the importing proceeds for the bulk of the length of the video, and near its end we …
- Reopen Photos app and two finger gesture (equivalent of Right Click) one of the newly place images to check that Share… -> Mail works
And we hope you contribute to the survival of the “card reader”, “leads” (of all kinds) and the digital camera (and SLR cameras, of course).
If this was interesting you may be interested in this too.


