A while back we learned how useful Mac OS X AppleScript ideas could be when combined with TextWrangler text editor constructing WordPress Blog Posting content when we presented WordPress Blog Posting AppleScript TextWrangler Helper Primer Tutorial, and today we extend that thinking to add the Mac OS X Mail desktop application to that list of AppleScript benefactors.
Today we use a Mac OS X Mail Rule type “Run AppleScript”, in the form of an AppleScript Script bundle to …
- automatically download any image attachment of emails …
- From: contains rmetcalfe15@gmail.com … into the …
- “Macintosh HD:Library:pgAgent:MyPictures:” folder, as defined in the AppleScript source (specific to our situation)
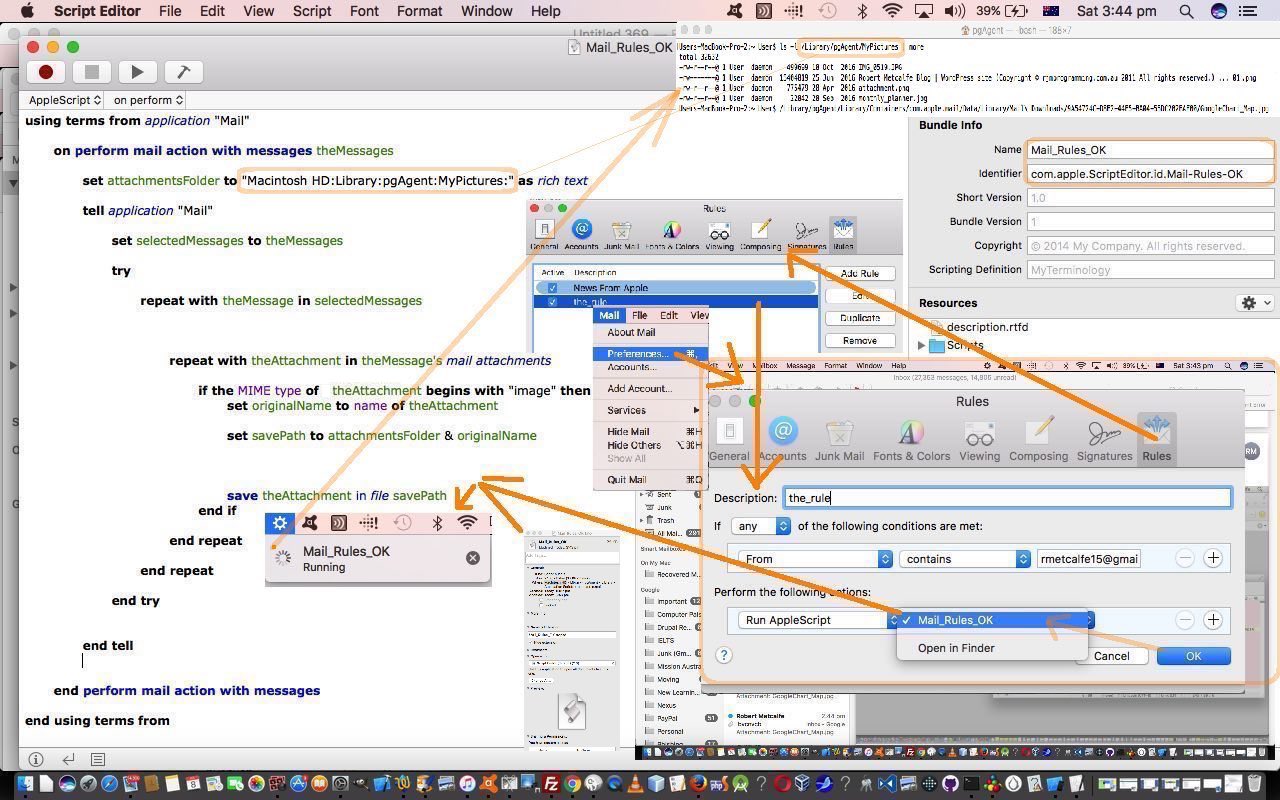
… and have to thank this very useful link for great help here, its advice invaluable, but we found that the third part to the advice was unnecessary, at least for us. So, in broad brush terms, today’s tutorial picture shows a lot of what we did to achieve the aim above …
- opened the AppleScript Editor desktop application
- New from Template -> Mail -> Mail Rule Action.scptd
- Edit -> Select All
- Edit -> Cut
- specific to our case, we arranged to get into the Paste buffer the contents of Mail_Rules_OK.scptd (which you should tailor for your own situation) … and then …
- Edit -> Paste that content
- toggle second dropdown to “on perform”
- click the Hammer button to compile … and then …
- File -> Save… … and set …
- Save As: Mail_Rules_OK.scptd … as a Script Bundle formatted file (different to the TextWrangler simple *.scpt normal type of script) … to folder …
- “Macintosh HD:Library:pgAgent:Library:Application Scripts:com.apple.mail:” … in our case … for our Mail requirements … then …
- click Save button
- opened the Mac OS X Mail desktop application …
- clicked Mail (menu) -> Preferences…
- clicked Rules tab
- clicked Add Rule button … and set (for our situation) …
- Description: the_rule
- If Any of the following conditions are met: From contains rmetcalfe15@gmail.com
- Perform the following actions: Run AppleScript … (and consider adding with “+” button, perhaps before this action, one that makes a unique sound, for “heads up” purposes) then you should find …
- Mail_Rules_OK appears and should be picked in accompanying dropdown … then, as required …
- click the Apply button to run this rule now … which caused image attachment files to be downloaded to “Macintosh HD:Library:pgAgent:MyPictures:” as per our aim, and as showing on today’s tutorial picture
- click OK button to finish off the setup of this Mail Rule that uses AppleScrtipt scripting to download image attachements to your MacBook Pro hard disk
Go back to Mail Rule Action.scptd to see some other possibilities for AppleScript ideas to team with Mac OS X Mail desktop email client application, and/or read here for some great ideas. As you can imagine, you can get very organized using functionalities such as this to automate and control your work practices, perhaps. Compare and contrast this with the Gmail website “filtering” equivalent to Mail Rules that we discussed at Gmail Email Filtering Tutorial.
Previous relevant WordPress Blog Posting AppleScript TextWrangler Helper Primer Tutorial is shown below.
Way back at the infancy of this blog we broached the idea that more people should learn computer coding with Are you interested in combating drudgery? as we put to you …
In your job do you have pretty simple repetitive tasks to do?
Are they jobs that involve doing the same thing to every file in a directory?
Do you end up with RSI (no need to answer this one … just there for drama)?
Are you sheepish to ask your office’s IT people?
Are you a self-professed non-programmer, but have a tiny little nerdy molecule here or there?
If your answer to the questions above is “what are you on about?” … read on.My message is, don’t ditch the command line, whether you are on Windows, Linux or Mac OS X.
… well, today we, hopefully, get you thinking on such matters, and want to show today, if you are using a MacBook Pro laptop to do your work, or some other Mac OS X platform, please do not overlook AppleScript ideas (last mentioned with AppleScript Surfing Primer Tutorial) to “combat drudgery”. And where we say “combat drudgery” that includes “jobs that have an overall exciting dimension to them, but you’d love to save time on the bits that are repetitive”, for us, and maybe for you too?
Today’s “procedural repetitive task” we work on, is very particular to our work here, and relates to “Cloning an Older WordPress Blog that is Built Upon and Referred to by the Current WordPress Blog Posting” (phew!), but we hope you get into AppleScript the way we did today, working in the same “dark” as any beginner (and most near beginners) do, and “nut things out” (and that is where we want you to view our slideshow (the first two slides of which show an AppleScript Editor environment, and then take you on to see how to use that script in practice) today, for context), because though that initial effort can be a slog, you may work it to save heaps of time on other tasks with your understanding more generic and useful, as your “slog” progresses.
So what can we say about AppleScript, and its relationship to our Mac OS X text editor of choice (to write our WordPress Blog Postings), TextWrangler? Well, first off …
- you can find TextWrangler (AppleScript) scripting functionality access off its scripting menu icon to the left of the Help menu … and being the relative beginners that we were, we, today, spent a lot of time “nutting things out” by lots of …
- TextWrangler -> Script Icon Menu -> Start Recording … gets you to an exciting “Recording Your Actions” place where you can …
- TextWrangler -> Script Icon Menu -> Start Recording …
- Work away at things you want to achieve in TextWrangler … until …
- TextWrangler -> Script Icon Menu -> Stop Recording …
- Save As… a well named *.scpt AppleScript script in the Scripts folder
- TextWrangler -> Script Icon Menu -> Open Script Editor …
- navigate to your (just) saved script … look and learn … repeat … try new things … then realize there is more to AppleScript than “recording” … even less that AutoHotKey’s “recording” brilliance … or those “old days” Windows Recorder days (sigh!)
- learn off the “net” what people before us … bless them … have taught us … took a list of those that helped today below … thanks …
- Mac Automation Scripting Guide: Manipulating Text
- applescript – Script to convert lower case characters into upper case is working differently as service action – Stack Overflow
- AppleScript: How to split a string | Erik’s Lab
- Can I use Applescript to go to the end of a text document? – Ask Different
- applescript – keystroke string with new line in it – Stack Overflow
- MacScripter / How do you code keystroke enter?
- How do I invoke enter with keystroke in AppleScript so Web Clipper will save a web page to Evernote? – Stack Overflow
- Insert Text With A Keystroke or Shortcut In Any Application | Mac Tricks And Tips
- AppleScript Pages – get insertion point – Stack Overflow
- macos – How to select File menu in Mac, just like Alt + F in Windows? – Super User
- which lead me to one of the biggest ideas from today’s work, at least for me … I love Korn Shell (back at Linux or Unix or Mac BSD) … and this type of scripting is available to you once you have got a string variable established at the AppleScript via code like …
	set myNickNameLower to ¬

		(do shell script ("echo " & myName & " | tr [a-z] ' ' | sed '/ /s///g' | tr [A-Z] [a-z];"))

	set myITblog to ¬

		(do shell script ("echo " & myName & " | tr ' ' '-' | tr [A-Z] [a-z];"))
… the “myNickNameLower” ending up as a good HTML p (unique) id to hash tag navigate to, and “myITblog” converts a blog posting name to a WordPress (4.1.1 (or most modern versions) that use the default permalink arrangement) relative URL bit that appends to //www.rjmprogramming.com.au/ITblog/ WordPress blog (document root) URL and navigates you to a WordPress Blog posting of interest via the Blog Posting Title’s permalink arrangement … we rely on this Blog Posting Title and Permalink “arrangement” everywhere, and recommend it as a “way to go” with WordPress blog URL organizational arrangements - on a web browser identify previous WordPress blog posting you want to base new one on …
- Copy its contents into the clipboard …
- in TextWrangler, use File -& New… Text Document …
- Paste in that older content
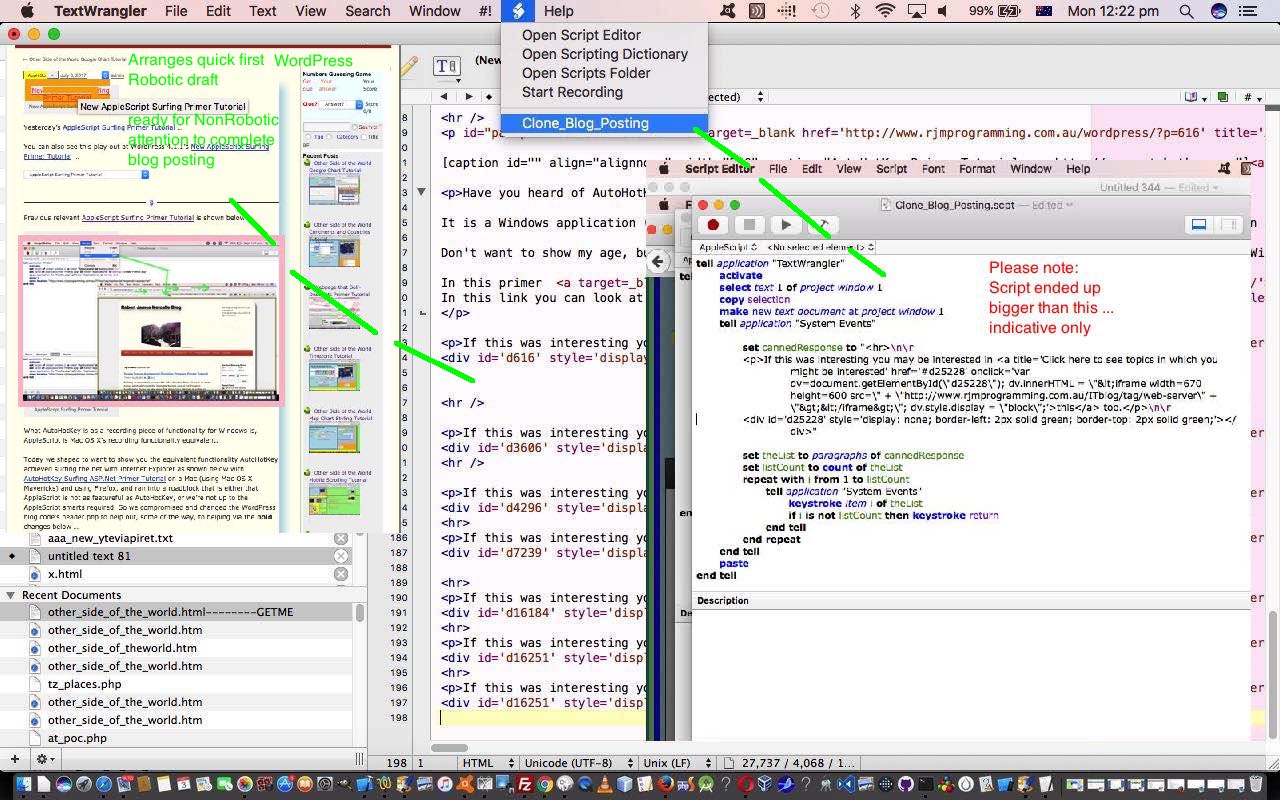
- TextWrangler -> Script Icon Menu -> Clone_Blog_Posting (see how creating Scripts (and Saving them) automatically adds them to this menu!)
- either flesh out more in TextWrangler for the less robotic aspects … NonRobotsRUs … or
SelectAll Copy(Stop Press: we now have it in clipboard off running script) here and Paste into a WordPress -> Add New Post content (sub)window and work it the less robotic aspects …NonRobotsRUs… oops … there, instead … or do a combination of less robotic aspects …NonRobotsRUs…2x oopsoops, oops - scared of scripting …
- be told by people it (ie. scripting, or any interpretive computer language) is “programming for dummies” … interpretive programming is very important, and am not sure it is not the major growth with computer coding, but am pretty sure it will be the “foot in the door” for lots of people trying to learn to code
- ASP.Net (VB.Net codebehind) code you could call AutoHotKey_Test.aspx (or call it something better?!) … and its helper Windows (DOS) Command Line …
- Windows (DOS) Command Line batch file you could call autohk.bat (which is designed to keep running, and we show with today’s slideshow which, today, doesn’t show the Task Schedular idea you might like that we showed with C Sorting ASP.Net Primer Tutorial)
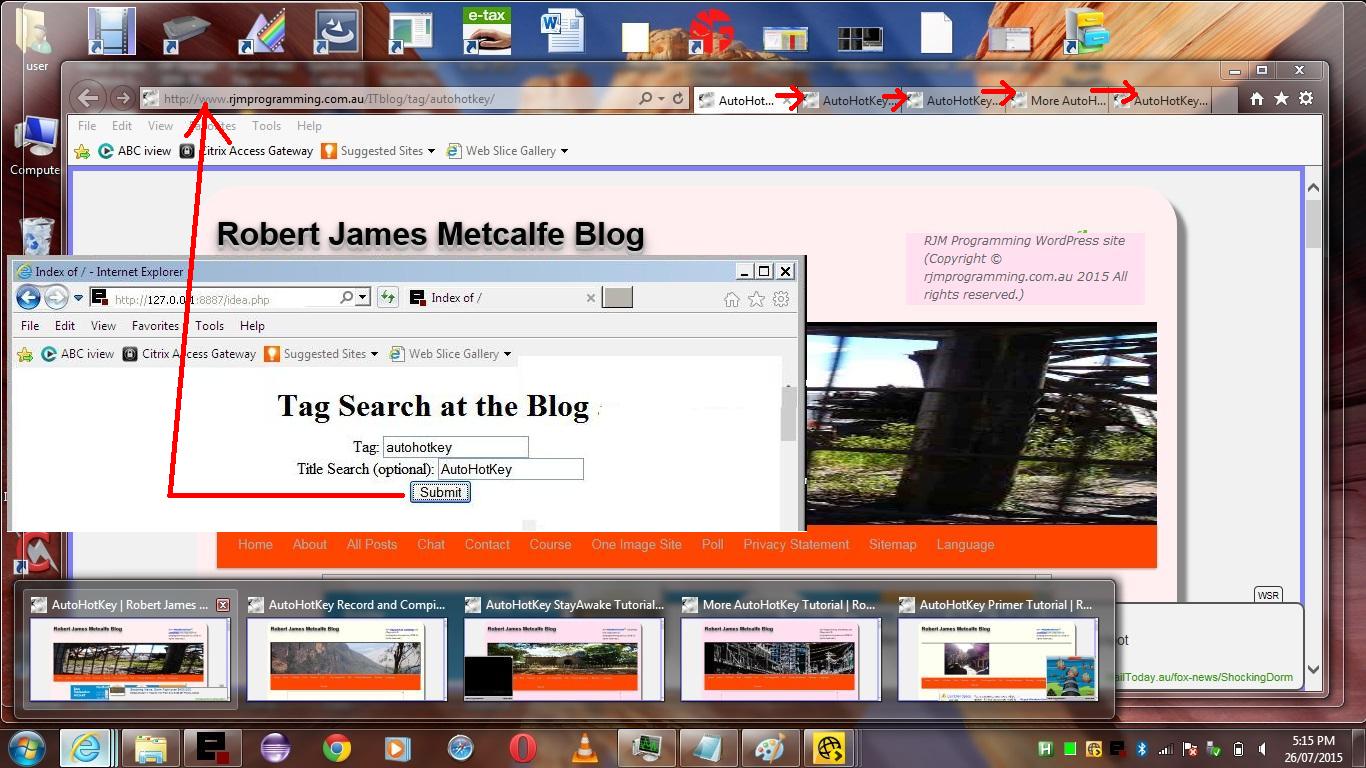
- we have our idea.php (and you are welcome to make a better name) … in the Document Root of EasyPHP (in our case at c:\progra~1\EasyPHP-12.1\www\idea.php … or //127.0.0.1:8887/idea.php) … and in the same place have …
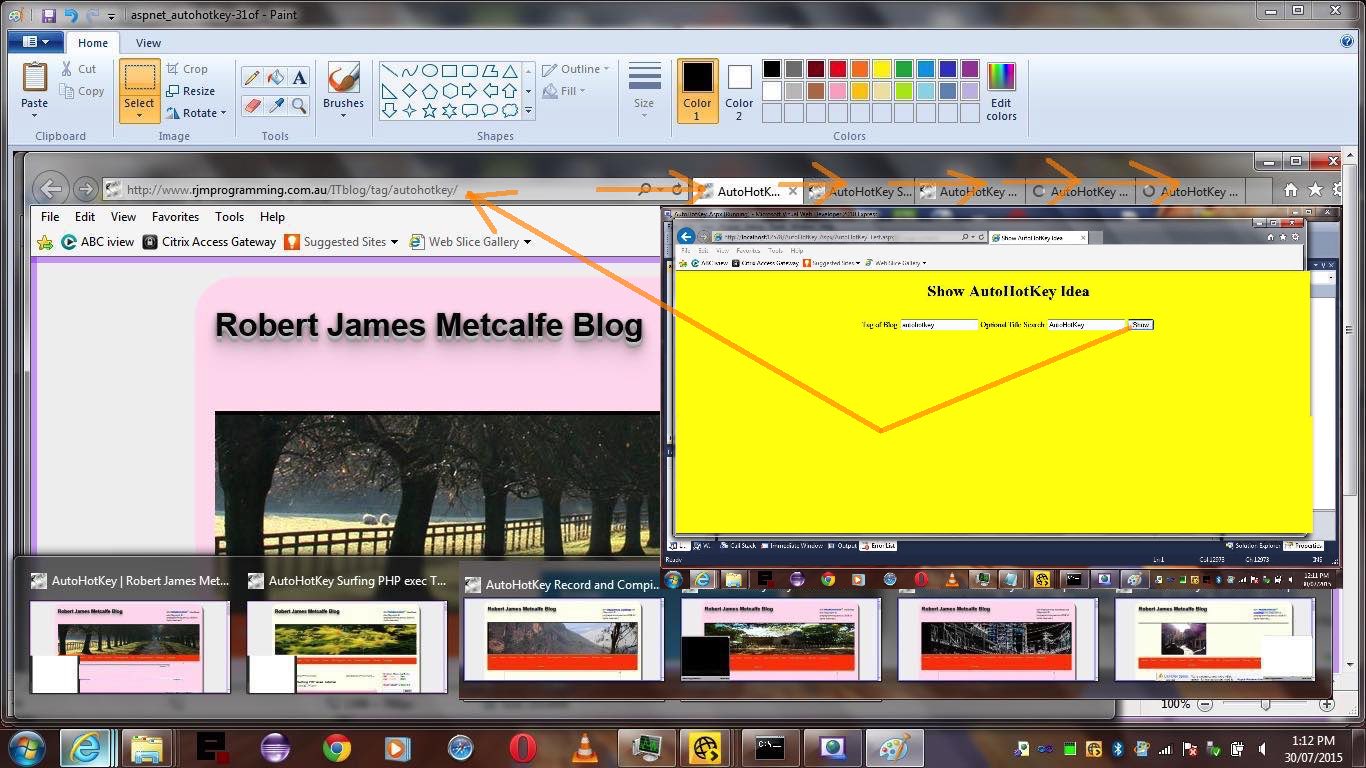
- a subdirectory called AutoHotKey containing the AutoHotKey scripting software … so that on typing //127.0.0.1:8887/idea.php into the Internet Explorer address bar …
- an HTML form asks about a good Tag to look for at the blog here and, optionally, within the blog posting titles that result, a search string to narrow down the scope … and then …
- we have the information for PHP to write out an AutoHotKey script for the purpose which PHP exec() arranges to dynamically create a Windows executable that …
- runs to open an Internet Explorer webpage for the Tag search and any accompanying offshoot webpages for matching title search blog postings of interest … cute, huh?
- As a side issue, opened up a previous script (you can use Notepad) from the Compiler folder off the root AutoHotKey folder and copied some MsgBox code of interest.
- Used Windows Explorer to double click the AutoScriptWriter folder off the root AutoHotKey folder.
- Double clicked AutoScriptWriter.exe.
- At the “Initiate the following ‘Run’ line upon Record” put taskmgr
- Within the main body went Ctrl-V to paste in that code regarding MsgBox
- Clicked Record button.
- Clicked anywhere in space on the Desktop.
- Clicked Stop button.
- Rearranged the lines of code such that Run, taskmgr sat up the top.
- Hit the Save button.
- Saved to the Compiler folder off the root AutoHotKey folder with the name TaskMgr_MsgBox (and it will give the default AutoHotKey extension of .ahk (for a script)).
- Used Windows Explorer to double click the Compiler folder off the root AutoHotKey folder.
- Right-clicked TaskMgr_MsgBox.ahk and chose Run Script … it worked .. great.
- Right-clicked TaskMgr_MsgBox.ahk and chose Compile Script.
- Double clicked resultant TaskMgr_MsgBox.exe (with the AutoHotKey “H” icon … cute, huh?) … it worked .. great.
- That resultant TaskMgr_MsgBox.exe is like any other Windows (desktop) executable that can be mapped to a shortcut or added to a taskbar or menu or be mapped to a keyboard shortcut, or be called by a .bat script, or be placed in a user Startup Programs directory, or be the activated program of a Windows Task Schedular task, or be forked by another Windows executable, for any future use.
- right-click on AutoHotKey script file
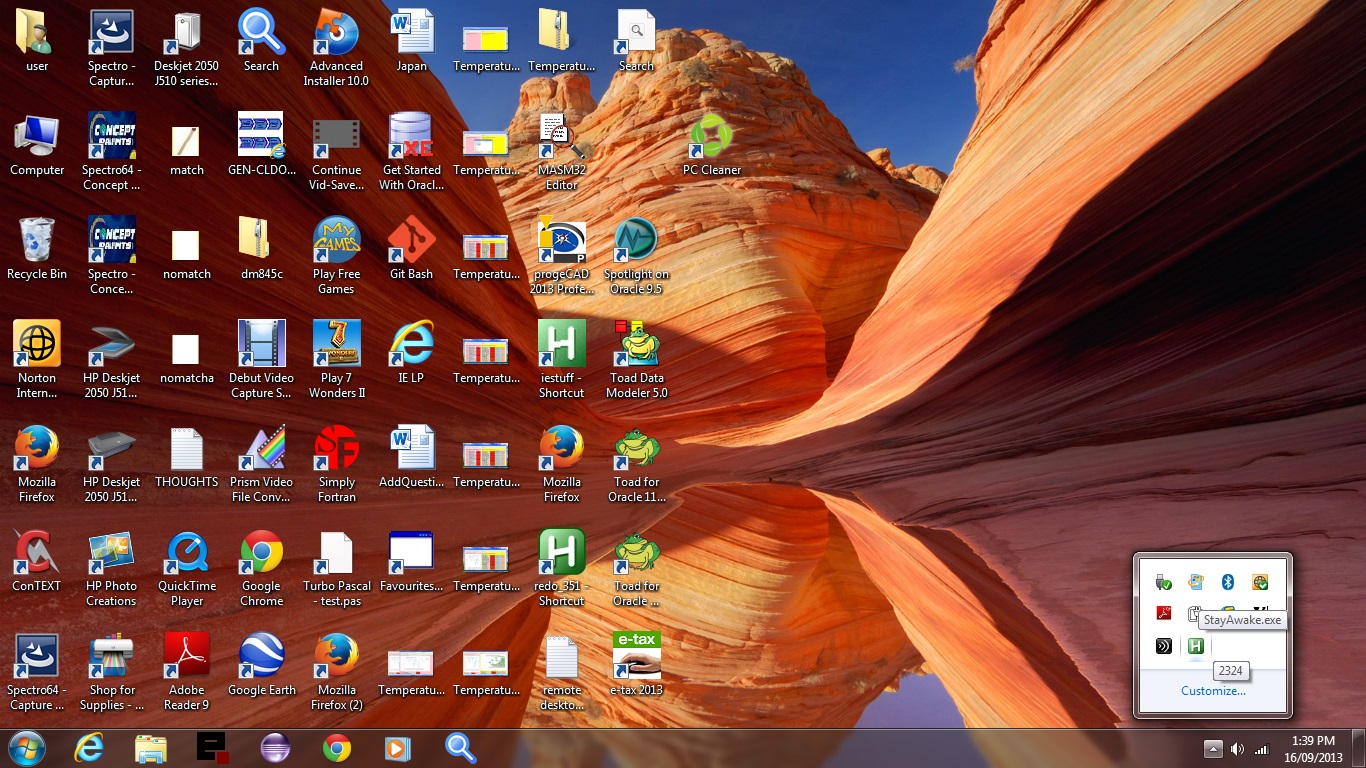
- compile script into StayAwake.exe and Run As Administrator (but you could also run it as a mere mortal!)
- copy StayAwake.exe into All Users startup programs directory, logout and login for it to stay resident
Below we want to show you today’s whole AppleScript, as directly irrelevant as it may seem to you, because, as much as anything, AppleScript is readable anyway, and it will give any beginners out there a feel for what goes on here, with a real working example (at least for this MacBook Pro using Mac OS X macOS Sierra 10.12.4) …
tell application "TextWrangler"

	activate

	select text 1 of project window 1

	copy selection

	make new text document at project window 1


	paste

	activate


	set the_text to text of document 1


	set myDelim to "\""


	set oldDelimiters to AppleScript's text item delimiters

	set AppleScript's text item delimiters to myDelim

	set myName to text item 8 of the_text

	set myNickNameLower to ¬

		(do shell script ("echo " & myName & " | tr [a-z] ' ' | sed '/ /s///g' | tr [A-Z] [a-z];"))

	set myITblog to ¬

		(do shell script ("echo " & myName & " | tr ' ' '-' | tr [A-Z] [a-z];"))

	set myUrl to text item 10 of the_text

	set myImageUrl to text item 16 of the_text

	set AppleScript's text item delimiters to oldDelimiters


	set cannedResponseTop to "<a target=_blank href=\"" & myUrl & "\"><img style=\"border: 15px solid pink;\" alt=\"New " & myName & "\" src=\"" & myImageUrl & "_new\" title=\"New " & myName & "\"  style=\"float:left;\" /></a>


<p>Yesterday's <a title='" & myName & "' href='#" & myNickNameLower & "'>" & myName & "</a> ...</p>


<p>You can also see this play out at WordPress 4.1.1's <a target=_blank  href='//www.rjmprogramming.com.au/ITblog/new-" & myITblog & "/'>New " & myName & "</a> ...</p>


<hr>


<p id='" & myNickNameLower & "'>Previous relevant <a target=_blank title='" & myName & "' href='//www.rjmprogramming.com.au/ITblog/" & myITblog & "/'>" & myName & "</a> is shown below.</p>


		"


	set cannedResponseBottom to "<hr>


<p>If this was interesting you may be interested in <a title='Click here to see topics in which you might be interested' href='#d99999' onclick='var dv=document.getElementById(\"d99999\"); dv.innerHTML = \"<iframe width=670 height=600 src=\" + \"//www.rjmprogramming.com.au/ITblog/tag/tutorial\" + \"></iframe>\"; dv.style.display = \"block\";'>this</a> too.</p>

<div id='d99999' style='display: none; border-left: 2px solid green; border-top: 2px solid green;'></div>

"


	set text of document 1 to cannedResponseTop & return & the_text & return & cannedResponseBottom


	activate

	select insertion point before line 1 of window 1

	activate


	set filen to "Macintosh HD:Applications:MAMP:htdocs:aaa_new_" & myNickNameLower & ".txt"


	save text document 1 to file filen without saving as stationery


	set the clipboard to "New " & myName


	set the_new_text to text of document 1

	set the clipboard to the_new_text

end tell
… or download it as Clone_Blog_Posting.scpt if you like.
Which leaves us with … if you haven’t watched our slideshow today … huh? Where does this help us out, with respect to “combating drudery” or “zooming through the robotic bits” (perhaps we should add)? Here, we build on previous blog posting a lot of the time. We like the user to constantly have access to that historical context, not always in full, where we are likely to just supply a link, but often in full, by including past blog postings we feel are relevant to the “thread” of blog postings, in full, into the content of the current blog posting we are writing. In this latter scenario, there are quite a few “robotic” actions we repeatedly do to write these amalgamated blog postings in terms of referring the user to that previous work, and our script today fits in helping out as below, with the overall procedure … slideshow, perhaps? …
You’ll have to take it from me, this saves us time. And the other thing about all this is that you are saving your brain from distractions that robotic tasks can impair in their distractive capabilities, and in their time-wasting aspects, and combination of both. You’ll notice in our script an approach to combat Robotic behaviours that may take over your life using (too many of?) these streamlining approaches … we deliberately break the myImageUrl link by adding the impossible image URL suffix “_new” so that using this AppleScript procedure alone can not create a good looking, but not overviewed, blog posting, and so will require your attention in NonRoboticsRUS Land sometime … yoo hoo?! You may want to factor such thoughts in yourself for you overworked and underpaid and heavily deadlined workers out there, so you don’t forget to overview things as a matter of course. This is a lot of what we are getting at with this blog, in general. Don’t be …
Have Mac OS X and TextWrangler and MacBook Pro and want to try, as a beginner or near beginner? As mentioned above the fundamental “takeout” from above … try …
TextWrangler -> Script Icon Menu -> Start Recording
… and catch you later after your several iterations of getting interested, trying new things, and getting those “oh, that’s how it works” moments.
Just a last reminder to view the slideshow, for all this in “visual” context. This blog posting comes to you faster courtesy of this blog posting.
Previous relevant AppleScript Surfing Primer Tutorial is shown below.
What AutoHotKey is as a recording piece of functionality for Windows is, AppleScript is Mac OS X’s recording functionality equivalent.
Today we shaped to want to show you the equivalent functionality AutoHotKey achieved surfing the net with Internet Explorer as shown below with AutoHotKey Surfing ASP.Net Primer Tutorial on a Mac (using Mac OS X Mavericks) and using Firefox, and ran into a roadblock that is either that AppleScript is not as featureful as AutoHotKey, or we’re not up to the AppleScript smarts required. So we compromised and changed the WordPress blog code’s header.php to help out, some of the way, to helping via the bold changes below …
function precc() {

 var ourwov=location.search.split('wopenall=')[1] ? location.search.split('wopenall=')[1].split('&')[0] : ' ';

 var ows, owstwo, iot;

 if (ourwov != ' ') {

  var hones=docgetclass("entry-title", "h1");

  if (hones.length > 0) {

   for (iot=0; iot<hones.length; iot++) {

    if (ourwov == "" || hones[iot].innerHTML.toLowerCase().indexOf(ourwov.toLowerCase()) != -1) {

      ows=hones[iot].innerHTML.split("href=");

      if (ows.length > 1) {

       owstwo=ows[1].substring(1).split(ows[1].substring(0,1));

       window.open(owstwo[0], "_blank");

      }

    }

   }

  }

 }

}


</script>

</head>

<body onload="precc(); courseCookies();" <?php body_class(); ?>>
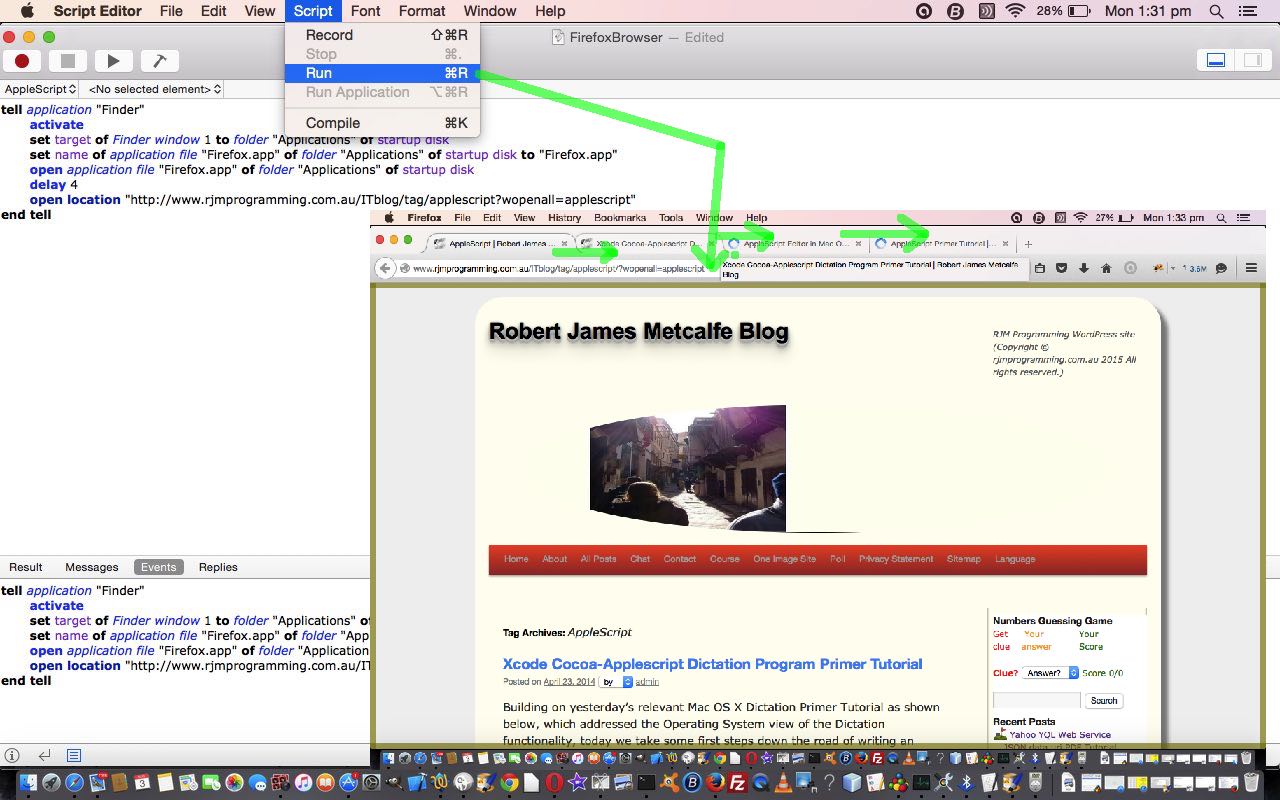
… which make the open location … statement of our AppleScript script as below …
tell application "Finder"

	activate

	set target of Finder window 1 to folder "Applications" of startup disk

	set name of application file "Firefox.app" of folder "Applications" of startup disk to "Firefox.app"

	open application file "Firefox.app" of folder "Applications" of startup disk

	delay 4

	open location "//www.rjmprogramming.com.au/ITblog/tag/applescript?wopenall=applescript"

end tell
… be more meaningful with the ?wopenall=applescript being used to open the first page worth of blog posting links be opened as new tab web pages in Firefox … semi-cute, huh?!
So if you have a Mac and Mac OS X and have the Firefox web browser installed and you look in Applications->Utilities and find the AppleScript Editor why not try FirefoxBrowser.scpt or see what happens with today’s tutorial picture or just see the use, in isolation, of the WordPress changes with this link.
Previous relevant AutoHotKey Surfing ASP.Net Primer Tutorial os shown below.
When, some time back, we talked about the “sisterly” (to today’s ASP.Net) PHP way of approaching the AutoHotKey Surfing “interface” to a web application with AutoHotKey Surfing PHP exec Tutorial as shown below, it was inferred that we might approach this, in ASP.Net (using Microsoft’s Visual Studio IDE under Windows), by using a “new Process()” technique … well, please scratch that idea … Windows security has come down pretty hard on such thoughts … so what we did today was compartmentalize more and allow the “AutoHotKey Surfing” be handled by Windows desktop techniques and has as the “interface method” the existance, or not, of files … a favourite technique for us, as much as anything because “methodologies” containing “file_exists” (or its like) are common in so many “server” programming languages … “server” not “client” … so not Javascript.
So we have …
As far as the code goes it assumes either the ASP.Net project will be located where the AutoHotKey compiler Ahk2Exe.exe is located or you could make the code better or it can work with the AutoHotKey compiler Ahk2Exe.exe on the computer’s PATH. Anyway, try for yourself and if you settle on something there is the ASP.Net VB.Net
Of more than somewhat help today was ASP.NET 3.5 Unleashed by Stephen Walther … thanks.
So please compare and contrast the server giants and their software integration with some Windows operating system C.
Previous relevant AutoHotKey Surfing PHP exec Tutorial is shown below.
There’s another companion piece to our C “sorting” program tutorials finishing with C Sorting PHP exec Tutorial as of a couple of days ago. And it’s a pretty important chapter if you are interested in software integration, and “meeting points”. We talk about the “meeting point” of web and desktop applications through the use of mechanisms with the web application server language’s world … our web server language today is PHP and its exec method, but it could be ASP.Net and a new Process() scenario if that’s how you roll … but it has to be Windows web hosting … as we do with some local web serving utilizing the brilliant EasyPHP local web server … we can’t show you live on rjmprogramming.com.au domain because it is a Linux web server. The difference today is that instead of using some C code compiled using the Digital Mars C compiler, we dynamically create a Windows executable, on the fly, using the brilliant AutoHotKey (last talked about at this blog with AutoHotKey StayAwake Tutorial as shown below) and its *.ahk scripting language that can compile Windows executables for the Windows environment you find yourself in.
The AutoHotKey script created on the fly has behind its logic the brilliance of the code suggested at this very useful link … so, thanks.
What happens on EasyPHP local (WAMP) Apache/PHP/MySql web server, under Windows, is that …
“Who” (but they’re on “second”) says desktop work is irrelevant to web applications? After all, the server side languages interface to what the desktop world looks like … a web server operating system. It is worth remembering that no matter how “cloudy” things get there are still web servers at the end of all these trails.
Previous relevant AutoHotKey Record and Compile Primer Tutorial is shown below.
Have you heard of AutoHotKey?
It is a Windows (desktop) application (that is quite brilliant) which can record and replay mouse and keystrokes, or assign a group of actions to a HotKey. Anybody into procedures and the operations side of I.T. will want to know about it, am sure.
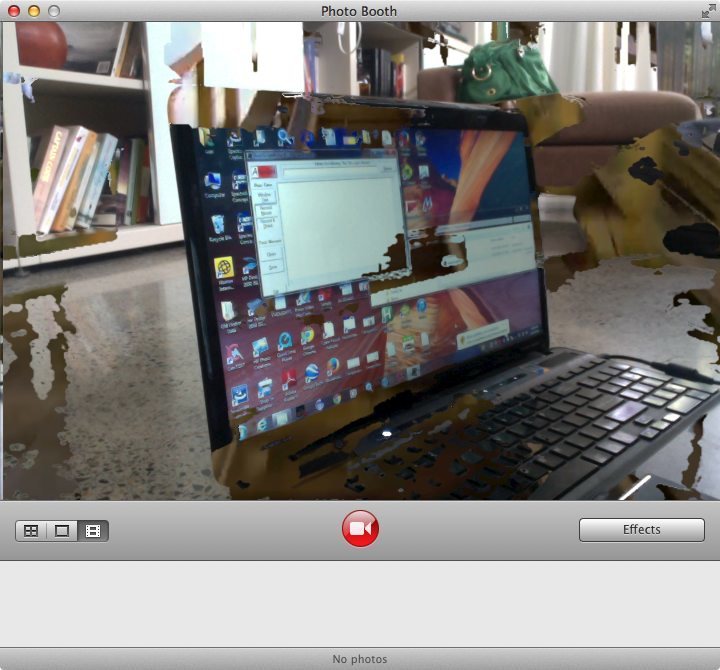
Our unusual* video of a tutorial (which aims to start up the Windows Task Manager process and place an AutoHotKey MsgBox along with it, to allow the user to possibly close the Windows Task Manager process using the AutoHotKey executable) today uses the Mac application PhotoBooth with the (video) effect called “Rollercoaster” (and set Edit->Auto Flip New Items to on (otherwise it will all be back to front!)) … am not sure of its relevance and whether you can see enough … so, if that is the case, we basically (on a Windows laptop) (* dedicated to Sydney Royal Easter Show):
Here is a link for some downloadable programming AutoHotKey script source code you could rename to TaskMgr_MsgBox.ahk
Here is a link for more information regarding AutoHotKey’s MsgBox functionality … and a lead in for a lot of other AutoHotKey functionality documentation … a feast of brilliant Windows application information.
Here is a link to the home of AutoHotKey.
Previous relevant AutoHotKey StayAwake Tutorial is shown below.
Have you heard of AutoHotKey?
It is a Windows application (that is quite brilliant) which can record and replay mouse and keystrokes, or assign a group of actions to a HotKey. Anybody into procedures and the operations side of I.T. will want to know about it, am sure.
We have introduced you to AutoHotKey with this previous AutoHotKey Primer Tutorial here.
Then we went a bit further with AutoHotKey with this previous More AutoHotKey Primer Tutorial here.
We talked about stay-resident programs earlier with Menu for Windows Command Prompt Via Batch File Tutorial. Our tutorial today uses AutoHotKey to create one. It uses the ToolTip functionality of Windows to keep the cursor busy. In the tutorial we show it being run:
Please enjoy our tutorial with some stay-resident approaches shown here.
Link to downloadable AutoHotKey programming script file StayAwake.ahk
Previous More AutoHotKey Tutorial is shown below.
Have you heard of AutoHotKey?
It is a Windows application (that is quite brilliant) which can record and replay mouse and keystrokes, or assign a group of actions to a HotKey. Anybody into procedures and the operations side of I.T. will want to know about it, am sure.
We have introduced you to AutoHotKey with this previous AutoHotKey Primer Tutorial here.
On a previous tutorial Windows Command Prompt Via Batch File we introduced you to some Windows Command Prompt commands and you can see that tutorial here. Our tutorial here builds on this in that the Windows Command Prompt batch file used for making that tutorial and downloadable here with rename to xxx.bat created/copied into c:\Users\user\ please (if no good you will have to dive in and adjust redo351.ahk yourself now, and learn about the wonders of AutoHotKey!), was deliberately made so that it can be stepped through slowly by entering {ENTER} key a lot (in xxx.bat this is done by set /p commands), and we have here the pressing of those {ENTER}s (ie. simulating answer to set /p sleeping for 2 seconds between each one … here is your homework … make it wait for 3 seconds between each {ENTER} then compile it then rerun it) with an AutoHotKey script largely created by hand (or via leads from recordings (do you remember Microsoft Excel VBA for CSV Primer Tutorial where similar thoughts were discussed as ideas for how to “get into programming”?)) and you can also download this here and rename to redo351.ahk and compile to redo351.exe using AutoHotKey’s compiler. If, when you do all that you run it and it stands there looking at you like a dead mullet it will be because your Command Prompt window for such a scenario does not end up being called “C:\Windows\system32\cmd.exe” and you will need to change this throughout redo351.ahk and then recompile (after stopping previous go (with Windows Task Manager maybe)) and test again. An AutoHotKey program called AU3_Spy.exe can help identify the names (or titles) of Windows, as required.
Please enjoy our tutorial with some recording functionality shown as well as the little “subplot” above (where the butler actually “did it”) here. The subplot is represented by the last 6 slides of the tutorial.
Previous tutorial AutoHotKey Primer Tutorial below …
Have you heard of AutoHotKey?
It is a Windows application (that is quite brilliant) which can record and replay mouse and keystrokes, or assign a group of actions to a HotKey. Anybody into procedures and the operations side of I.T. will want to know about it, am sure.
Don’t want to show my age, but first got keen about AutoHotKey because I couldn’t believe the day (was it when Windows 5 came out?) that Microsoft abandoned the cute program called Recorder, that came with Windows. For myself, this was a moment of deep mourning, like when Collingwood lost to Carlton in the 1970 Grand Final.
In this primer tutorial see a brief install then a record-compile-replay cycle.
In this link you can look at some of the personal usage of AutoHotKey.
If this was interesting you may be interested in this too.
If this was interesting you may be interested in this too.
If this was interesting you may be interested in this too.
If this was interesting you may be interested in this too.
If this was interesting you may be interested in this too.
If this was interesting you may be interested in this too.
If this was interesting you may be interested in this too.
If this was interesting you may be interested in this too.
If this was interesting you may be interested in this too.

