Underpinning a Mac OS X MacBook Pro laptop’s workings is a Linux or Unix-like BSD operating system. This operating system, like a lot of others, uses files that have permissions and ownership.
If you have file permissions they are for …
- read
- write
- execute
… with respect to the file access right categories …
- system
- owner
- group
- world
… and so you have command line commands …
NAME
chown -- change file owner and groupSYNOPSIS
chown [-fhv] [-R [-H | -L | -P]] owner[:group] file ...
chown [-fhv] [-R [-H | -L | -P]] :group file ...
NAME
chgrp -- change groupSYNOPSIS
chgrp [-fhv] [-R [-H | -L | -P]] group file ...
NAME
chmod -- change file modes or Access Control ListsSYNOPSIS
chmod [-fv] [-R [-H | -L | -P]] mode file ...
chmod [-fv] [-R [-H | -L | -P]] [-a | +a | =a] ACE file ...
chmod [-fhv] [-R [-H | -L | -P]] [-E] file ...
chmod [-fhv] [-R [-H | -L | -P]] [-C] file ...
chmod [-fhv] [-R [-H | -L | -P]] [-N] file ...
… to help control how files are accessed by users and their underlying group “membership”.
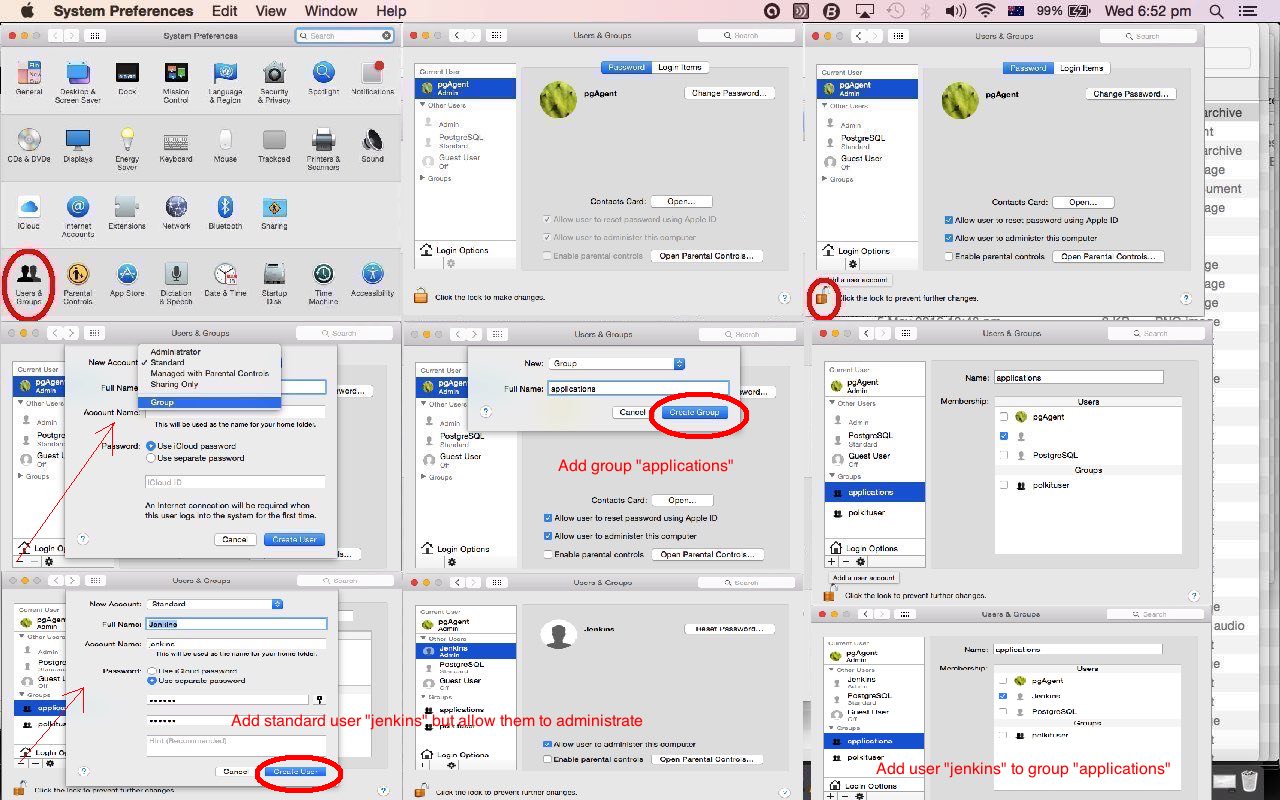
So, what about create Users and Groups in the first place with Mac OS X? Well, you can do it using the command line, but in this case we think to use the Mac OS X Apple -> System Preferences -> Users and Groups GUI interface, as much as anything, because you can visualize the relationships better in a GUI arrangement, for this.
So for today’s tutorial picture example we, that being the administrator user ‘pgAgent’, create …
- new group called ‘applications’
- new user called ‘jenkins’ (with administrative rights) with group ‘applications’
… and once a restart “cements” this into place, you will then be able to access user ‘jenkins’ at either …
- login screen ‘jenkins’ (new) button
- at the command line via …
NAME
su -- substitute user identitySYNOPSIS
su [-] [-flm] [login [args]]
Also of interest to administrator users (where the system file access category applies) is the command …
NAME

       sudo - execute a command as another user
SYNOPSIS
sudo -h | -K | -k | -L | -Vsudo -v [-AknS] [-g group name|#gid] [-p prompt] [-u username|#uid]
sudo -l[l] [-AknS] [-g group name|#gid] [-p prompt] [-U user name] [-u user name|#uid] [command]
sudo [-AbEHnPS] [-C fd] [-g group name|#gid] [-p prompt] [-u user name|#uid] [VAR=value] [-i | -s] [command]
sudoedit [-AnS] [-C fd] [-g group name|#gid] [-p prompt] [-u user name|#uid] file ...
… so that, logged in as ‘pgAgent’ for instance … you can then type, at the command line …
sudo -u jenkins -i
… and if ssh access restrictions come into play, sometimes a usage as below, to switch login sessions to a session for the user ‘jenkins’ …
su -s /bin/ksh jenkins
… can be useful
The other crucial command line linker to users and groups information is the command line …
ls -la ./
… that reports on owner (user) and group and file permissions for files in the current directory, as per …
NAME

     ls -- list directory contents
SYNOPSIS
ls [-ABCFGHLOPRSTUW@abcdefghiklmnopqrstuwx1] [file ...]
We’ll leave you with man man though we really think unix should have thought person person … chortle, chortle …
NAME

       man - format and display the on-line manual pages
SYNOPSIS
man [-acdfFhkKtwW] [--path] [-m system] [-p string] [-C config_file] [-M pathlist] [-P pager] [-B browser] [-H html-
pager] [-S section_list] [section] name ...
If this was interesting you may be interested in this too.


