Yesterday’s YouTube Embedded Iframe API Playlist Tutorial got us hankering for either/both of …
… be more proactive by nature, in terms of the fact that neither, in “native thinking terms” are changed in look (and value) via a click or touch event. But after a mull, we wanted to use one of our favourite Javascript functions, the …
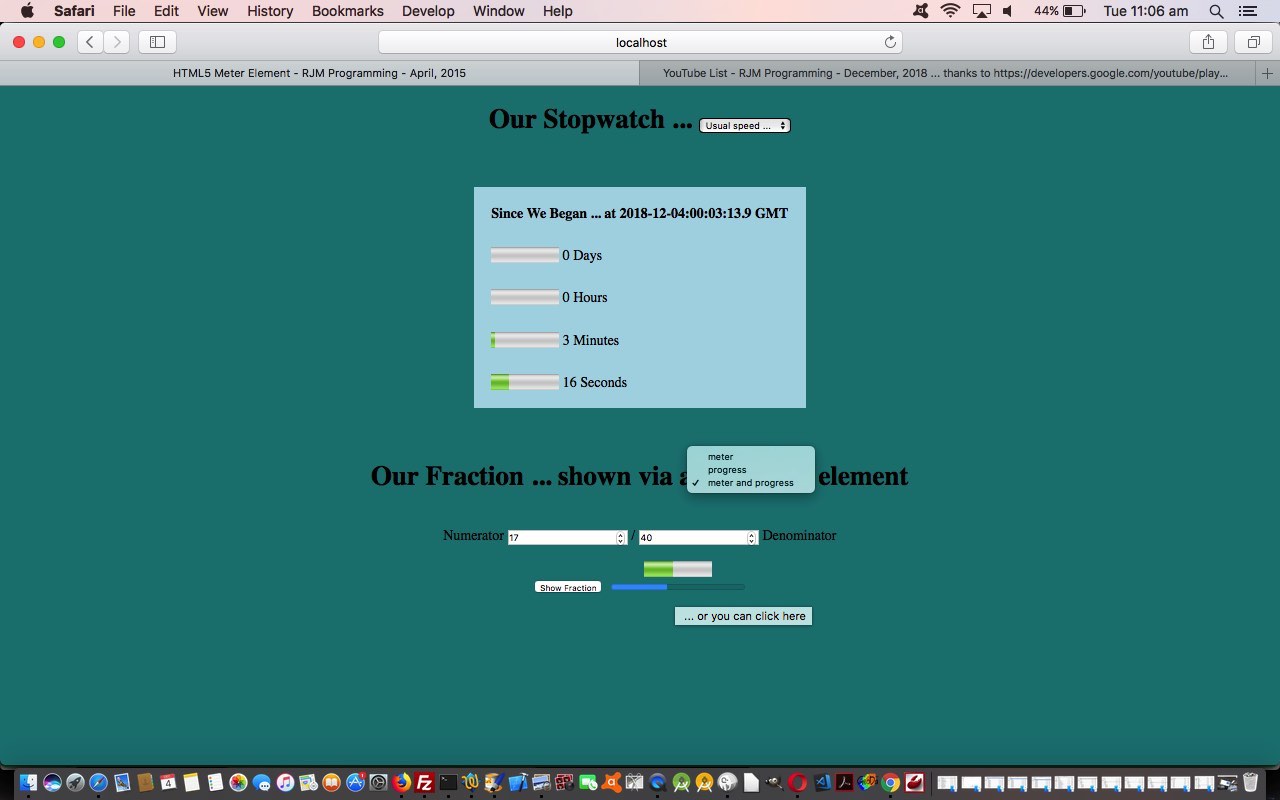
… and start with a proof of concept integration into the previous HTML5 Meter Element Primer Tutorial‘s web application, to respond to either or both of the meter and progress elements representing a fraction, in broad brush terms …
Numerator (of fraction in lowest common denominator form) = ([click/touch_X] - [getBoundingClientRect_Left])

----------------------------------------------------------------

Denominator (of fraction in lowest common denominator form) = [getBoundingClientRect_Width]
To do this …
- Changed HTML …
<input type="button" value="Show Fraction" id="show" onclick="document.getElementById('myfraction').value=eval(document.getElementById('numerator').value / document.getElementById('denominator').value);valchange();"></input> <div id='mp' style='display:inline-block;'><meter title=" ... or you can click here" onclick="myownfraction(event);" id='myfraction' value="0"></meter></div>
- Added Javascript …
 var mpis='progress';


function myownfraction(event) {

    var x=0, y=0;

    if (event.clientX || event.clientY) {

       x = event.clientX;

       y = event.clientY;

    } else {

       x = event.pageX;

       y = event.pageY;

    }

    var rect = event.target.getBoundingClientRect(), varn=0, vard=0, iv=0;

    //alert('x=' + x + ' and left=' +  Math.round(rect.left));

    if (eval('' + x) >= eval('' + rect.left) && eval('' + x) <= eval('' + eval('' + Math.round(rect.left)) + eval('' +  Math.round(rect.width)))) {

    varn = eval('' + eval('' + x) - eval('' +  Math.round(rect.left)));

    vard = eval('' +  Math.round(rect.width));

    for (iv=Math.min(Math.abs(varn),Math.abs(vard)); iv>=2; iv--) {

      if (eval(Math.abs(varn) % iv) == 0 && eval(Math.abs(vard) % iv) == 0) {

        varn /= iv;

        vard /= iv;

      }

    }

    document.getElementById('numerator').value = '' + varn;

    document.getElementById('denominator').value = '' + vard;

    valchange();

    }

}


 function valchange() {

  document.getElementById('myfraction').value=eval(document.getElementById('numerator').value / document.getElementById('denominator').value);

  if (document.getElementById('my_fraction')) {

   document.getElementById('my_fraction').value=eval(document.getElementById('numerator').value / document.getElementById('denominator').value);

  }

 }
So, again, take a look at the changed HTML code in meter.html, or a live run, for your perusal. Again, we hope it helps with an HTML project you are on now, or mulling about now.
Stop Press
Applying similar thinking to YouTube Embedded Iframe API Playlist Tutorial we came up with the new Javascript code (to suit the changed Javascript DOM document.getElementById(‘tdright’).innerHTML+='<details id=dtls’ + ij + ‘><summary id=sums’ + ij + ‘>Start at (seconds): <span id=star’ + ij + ‘>0</span> <progress onclick=myownfraction(event); title=”” id=prog’ + ij + ‘ value=0 min=0 max=0></progress></summary><iframe width=”640″ height=”560″ id=ifra’ + ij + ‘ src=”‘ + document.URL.split(‘#’)[0].split(‘?’)[0] + ‘?ij=’ + ij + ‘&eurl=’ + pla[ij] + ‘” title=””></iframe></details><hr>';) as per …
function myownfraction(event) {

    var x=0, y=0;

    if (event.clientX || event.clientY) {

       x = event.clientX;

       y = event.clientY;

    } else {

       x = event.pageX;

       y = event.pageY;

    }

    var rect = event.target.getBoundingClientRect(), varn=0, vard=0, iv=0;

    if (eval('' + x) >= eval('' + rect.left) && eval('' + x) <= eval('' + eval('' + Math.round(rect.left)) + eval('' +  Math.round(rect.width)))) {

    varn = eval('' + eval('' + x) - eval('' +  Math.round(rect.left)));

    vard = eval('' +  Math.round(rect.width));

    if (eval('' + vard) > 0) {

    for (iv=Math.min(Math.abs(varn),Math.abs(vard)); iv>=2; iv--) {

      if (eval(Math.abs(varn) % iv) == 0 && eval(Math.abs(vard) % iv) == 0) {

        varn /= iv;

        vard /= iv;

      }

    }

    document.getElementById(event.target.id.replace('prog','sele')).value='' + Math.round(eval('' + event.target.max) * (eval('' + varn) / eval('' + vard)));

    event.target.value='' + Math.round(eval('' + event.target.max) * (eval('' + varn) / eval('' + vard)));

    }

    }

}
… and we decided to fix up the ol’ “no ondblclick mobile platform event, so write code for two slow clicks” trick … second time I’ve fallen for it this month … as per Javascript (to suit the changed HTML <input type=text title=’Double click for suggestion’ onclick=’onclicktwo(this);’ ondblclick=’clicktwo=0; this.value=this.placeholder;’ style=width:30%; onblur=goplay(this.value); id=isuffix placeholder=’M7lc1UVf-VE’></input>) …
var clicktwo=0;

function poisout() {

  clicktwo=0;

}


function onclicktwo(pois) {

  clicktwo++;

  if (clicktwo >= 2) {

    clicktwo=0;

    pois.value=pois.placeholder;

  } else {

    setTimeout(poisout, 2000);

  }

}
… in the changed youtube_list.htm‘s live run.
Previous relevant HTML5 Meter Element Primer Tutorial is shown below.
HTML5 brought with it many great features to front-end work on the internet in HTML, and today we talk about one of the newly introduced, and very useful, elements called “<meter>”.
At its core the “<meter>” element represents a “fraction of one” or perhaps you can think this as a “percentage of one hundred”, and, as you’d guess, a generic “xth of y for the fraction x/y” idea … where “y” could be your “max” parameter, and perhaps your “min” parameter is zero.
This element is useful to represent a numerical concept graphically (like a ratio), something we do today with …
- simulation of a stopwatch … with its seconds, minutes, hours, days, years elapsed
- a fraction as (numerator) x / y (denominator)
Tomorrow we’ll show you a very commonplace usage for “<meter>” as a “progress bar” which you see so much of on the internet, when you are waiting for something.
So take a look at the HTML code in meter.html, or a live run, for your perusal. Hope it helps with an HTML project you are on now.
If this was interesting you may be interested in this too.
If this was interesting you may be interested in this too.


