

Emailing iPad Screenshot Primer Tutorial
There are at least a few variations on how you can send a screenshot of a mobile device as an image in an email. They, for the iPad we’ll be using (with iOS) today are …
- using AirServer to do this … please see this link and/or AirServer on Mac Primer Tutorial as shown below
- an image or photo (that could have been created by simultaneously holding iPad’s large “home” button and smaller opposite side button at a screenshot …
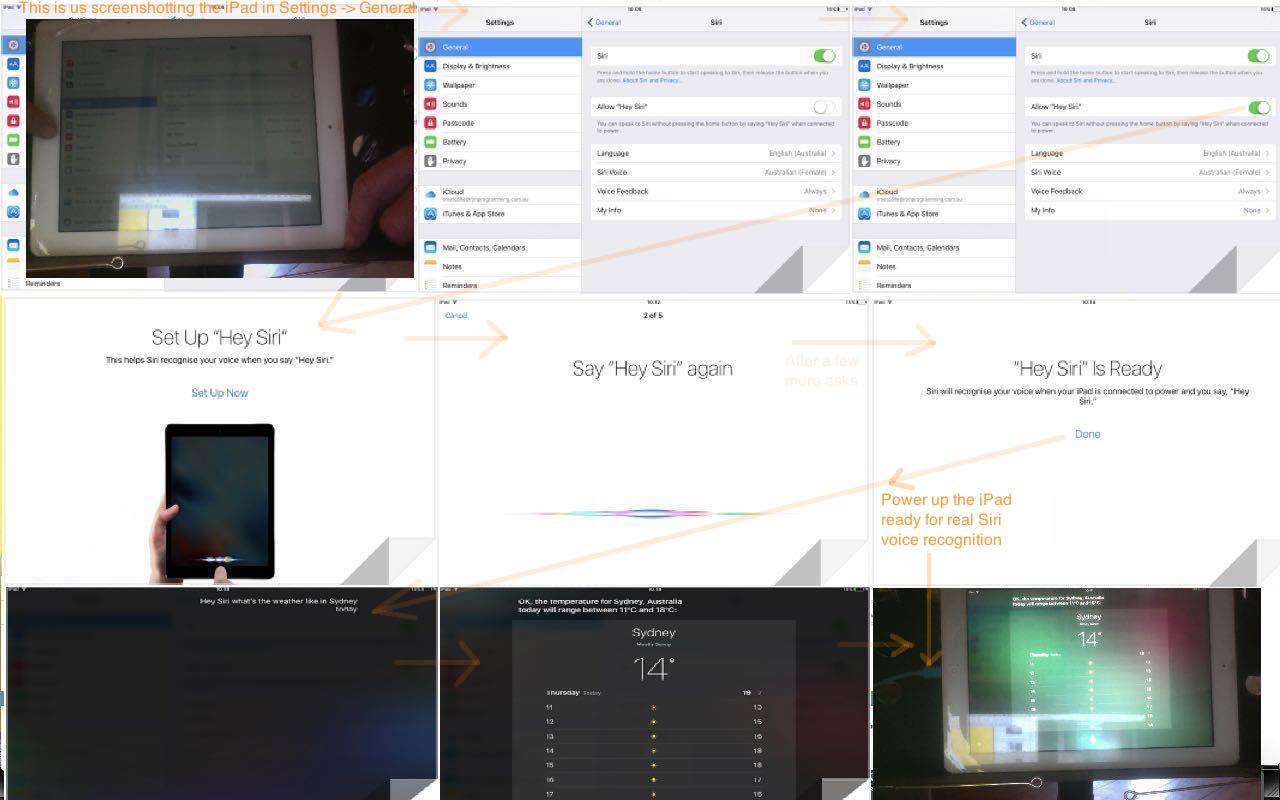
… of interest) that can be touched in the Photos app and a Share to Email option chosen to send it on in an email … and …
- today’s third thought revolves around using web browsers in particular to …
- hold a touch down to get up a copy rectangle via a touch of the Select option (though sometimes you need two discrete touches to see the extendable copy rectangle), the dimensions of which you probably extend to overlay the screenshot parts required … and then …
- select Copy … and then …
- switch to the Mail (iPad) app and select New (Email) Message option and just above in the body of the email where it says “Sent from my iPad” you hold a touch to reveal the Paste option … and fill out the rest etcetera etcetera etcetera

We show you an example today that shows that it isn’t a perfect replica …

…like the other two methods do, but, nonetheless, can be a useful tool to explain something to somebody about something off the web, in an email.
On the MacBook Pro (Mac OS X), meanwhile, we have the Grab application we like to do this job with pretty perfect replication, and on a Windows laptop how can you beat the keyboard’s Print Screen button to screenshot into your clipboard buffer?!
Previous relevant AirServer on Mac Primer Tutorial is shown below.

AirServer on Mac Primer Tutorial
Yesterday with our Xcode Swift iOS Application End Game Primer Tutorial we got a lot of help here submitting an iOS mobile application for Submission Review as preparation for display at the Apple Store.
The hardest part of that “end game” procedure yesterday was to do with the creation of a properly formatted and sized App Video Preview. For a long while, working in the dark for some time, we tried to create a fixed size video for this purpose via Screen Recordings (such as QuickTime Player offers) of the Xcode Swift project running of an iPad Simulator. After many attempts and perhaps getting closer and closer … am not sure … we could not comply with the requirements using this method. Then we stumbled upon this great link which put us onto the (hint, hint, nudge, nudge) wonderful AirServer Mac desktop application allowing the recording of an iPad procedure as seen from a MacBook Pro laptop, for instance, that are sharing the same WiFi connection … you don’t even need your UWL (ie. ubiquitous white lead) … brilliant concept!
Just to reiterate what happened yesterday here … we …
- install (the brilliantissimo) AirServer … thanks
- capture video via AirServer called IGCag55.mov … video needs to be 15 to 30 seconds long
- at Mac Terminal application with Linux Bash session (because we did a portrait iPad ((AirServer) video) run) …
ffmpeg -i IGCag55.mov -strict -2 -vf scale=900:1200 igc5ag.mp4- be in Safari (web browser) as you follow the advice of 3 – How to upload on Safari? section 3
- then drop igc5ag.mp4 into the App Video Preview drop zone (OMG! … how many hours was that?!)
… so this AirServer webpage explains how to record an iPad procedure.
We’ve recorded a different (to the one recorded to iTunes Connect for our app) video of how to use AirServer … lights please! … play.
Great! … huh … yeh! … man person.
Its small problem is that it makes the previous Photo Booth attempts at this blog look a little bit laughable chortle, chortle.
If this was interesting you may be interested in this too.
If this was interesting you may be interested in this too.

